
As well as his own fabric:

He selected a wool coating in black with a very, very subtle basket weave pattern to it. The lining is a silk twill, like what is used to make men's ties. I think it is a nice combination, and the red and black lining is a nice bit of "flair" for the coat. I am participating in a "sew along," so will have some other folks and their experience to draw on. Coats are complex from the standpoint that they consist of a lot of layers (lining, interlining, insulation, etc.) and need a lot of structure (hair cloth/canvas, shoulder pads). Plus, I want to put in some nice professional touches like welt pockets and bound buttonholes.
I also have some projects for myself coming up, including my first attempt at drafting a pattern. I'll tell you a little bit about the history of this pattern alter(c)ation. I found the pattern below and really loved the look of the front of the jacket, clean lines, 3/4 sleeves, standing collar, and really, I was fine with the back, too, even though it was a little bit more "stylish" than things I was used to wearing. I really am a pretty traditional girl.

You can see from the line drawing that the jacket is supposed to have a draped back, while still being fitted in the front:

However, mine didn't turn out so well. You can read my "official" review of it if you like, but suffice it to say, the back did not drape the way that it should, the fullness was all out in the armpits, and the front was not as crisp and fitted as the drawing led you to believe. Now, you could say "Michelle, you did something wrong, Vogue wouldn't draft a faulty pattern" and believe me, those were definitely my first thoughts! But I have been sewing long enough that I do believe that I understand the basics of garment construction and that pattern is just has problems. I did not screw that up all on my own. Which is not to say I won't wear it anyway! I just had to do some monkeying around to get it to look like the pattern drawing, including adding darts to the back:

Here is the finished front:
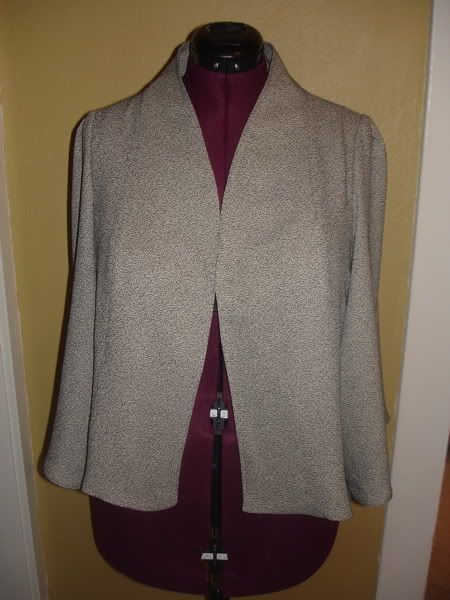
It is important to say that I don't dislike the finished product, in fact, I like it well enough that I am making a sheath dress with the leftover suiting to go under it. It is also a nice, lightweight and airy jacket that will be nice for summer days when I have to dress for work.
What is especially interesting is that for all the problems with the jacket pattern, the pants went together brilliantly. I didn't even have to alter them, they fit my hips and waist with no changes. Which NEVER happens. I have what I suppose you could call an hourglass figure (or perhaps it is more of an hour and a half these days), but even though I am a bit fluffy, I still have a defined waist. This makes for some problems getting pants that fit, because if I buy them to fit my hips, I have a ton of extra fabric flopping around on the back of the waist. Hence why I make my own pants. I can alter the pattern to avoid that. But, as I said, this pattern didn't even need any alteration:

I made the pants from a poly/cotton suiting that has a floral pattern woven right into the fabric:

But, I did really want a more structured jacket for work, and thought that it would make a good partner for these pants. I also still liked the front of the original Vogue jacket, so decided that I would try my hand at altering it to make the back flat, and add some interfacing to make the front look more like the photo.
I started by taking the original pattern and doing a tissue fit on my dress form, essentially folding out all the fullness:

After cutting that from some muslin and putting together the body of the jacket for fitting, I found that while this did serve to take out the fullness, it resulted in a blocky, square jacket:

So, I thought princess seams would do the trick. I found a RTW jacket from Ann Taylor that I had that had seams like the ones I wanted, so using that as a guide, I drew on my seam placement:

Using that lines as a guide, I started pinning away until the fit in the back was the way I wanted it. It didn't exactly follow that line, but it was pretty darn close. I drew on my seamlines, and then dismantled the jacket, using the newly drawn on seam lines to create three new pattern pieces for the back. Don't forget to add your seam allowance on your princess seam! This is what I ended up with when I put the jacket back together:

I now have the jacket cut from the black suiting, and if it weren't for the fact that I had to work until 10 last night, and have to give a presentation at 3 today, I could have had a jacket for work on Monday. But that is OK, I'll just have one for Tuesday instead.
I am also considering sewing my own wedding dress, but will seek professional counselling prior to purchasing any fabric. However, I think this style would be brilliant!

Not to mention, I still owe a friend some drapes....at least I have them cut out....


1 comment:
Wow! That dress is stunning and based on everyone's raves and your pictures I bet you'll do a great job.
Post a Comment