Friday, April 30, 2010

Hand-Embroidered Western Shirt


Today I snuck out of work a touch early, because I was there super-late last night. When I got home, I headed for the sewing room to finish Jeremy's western shirt.

A little background, Jeremy is playing with a western swing band and they dress appropriately. Being a jazz bassist, Jeremy doesn't exactly have a closet full of western shirts. So, I decided that I would make a shirt for him, complete with embroidered yokes.

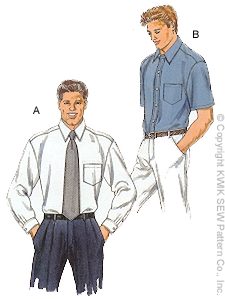
I used both Kwik Sew 2777, a shirt that I had made for him before, as well as a vintage western shirt pattern.


I made some small changes to the Kwik Sew draft. Instead of an actual yoke, I drew the yoke onto the back piece and eliminated the pleat in the center of the back. The embroidered yoke was done just as an overlay, based on this vintage pattern:


I also shortened the shirt by 2 inches and also the sleeves, based on the fit of the last version that I made for him.

Here are the yokes ready to be sewn onto the shirt:


I drew the pattern using motifs inspired by the bass. The curl in the center back is inspired by the scroll:


And the other motifs are meant to represent the f-holes:


Here are photos of the finished shirt:


And from the back:


Close-up of the front yoke:


And a close-up of the back yoke:


The embroidery is very simple...I used only three stitches: backstitch, "lazy daisy," and a blanket stitch (around the flower cutouts).

Overall, I am really pleased with the way the shirt turned out, but I need to find a source for better pearl snaps. The ones I used were pretty shoddy, but we don't exactly have great notions available...just what they sell at Hancock's. But, after I beat the crap out of them with the hammer, they decided to stick.

I also got this sateen from Fashion Fabrics Club to make a shirt, sans embroidery:


So I guess I better get on the ball and find better snaps!!

Monday, April 26, 2010

I Have Been a Baaaad Blogger....

And I have not been keeping up with anyone else's blogs, much less updating my own. I feel disconnected! But I hope to get back on track, soon. Work has been insane...finals and graduation is coming up...and family and other issues have been beckoning as well. Not to mention, I spent every spare minute last week preparing a job application for a position that has recently become available at my university that I think I would be PERFECT for...now to just convince the committee....

This weekend I have my niece, Sadie, with me. My mother called me and told me I had to take her to get a haircut, and because my mother has no patience she was ill prepared for the two days of "But Aunt Missy, HOW should I get my hair cut???" that leads up to these decisions. Sadie also wanted to sew this weekend, and wants to make a dress from one of the vintage patterns that I got recently. She is working on Simplicity 8192 from the 1960's and has the pattern traced, altered, and the fabric cut out. She hopes to get to some of the sewing today.


I also made her a little dress from the Hot Patterns Uptown Downtown Knit Dress pattern:


She loves polka dots of all kinds, and I found this fabric on sale, so I made her the dress. When I got the fabric home it was so far off-grain that I am surprised the skirt is not spun around backwards on her. But, as little as I paid for it, it is unsurprising. I just muddled along hoping that the additional ease in the dress would keep it from twisting too badly. She's 12....it's not like she'll notice!

Sadie insisted that we needed matching dresses (if someone can explain to me the brain of a 12-year-old girl, that would be much appreciated), so I had to slap one together for myself, too:


I also made a shirt for myself last weekend and then never photographed it. I had this Alexander Henry quilting cotton languishing in my stash that I had loved because it had architectural details all over it. I bought 2 yards not really knowing what I would do with it. So, I traced a version of the shirt dress that I made the other week, but cut it off shirt-length, and this is what I ended up with:


I am not entirely happy with what I did with the pattern on the front. I wasn't paying any attention in my layout (not thinking that the pattern was that regular a repeat) and got the patterns matching on the front:


Eh, I'll wear it anyway. People will think it was supposed to be that way.

In other news, re: getting myself in over my head with projects well outside my skill level...I am making a western shirt for my husband. He has been playing in a western swing band, and they all dress in western shirts, hats, and boots. I decided that I would make him one...complete with embroidery. The minute it was out of my mouth, I knew that I had made a mistake!!

I bought this fabric:


I have this pattern, but am just using it for inspiration because I don't feel up to the alterations:


I am just adding the cuff and yoke details to a shirt pattern that already fits my husband.

The red will be the yoke and cuffs, and the gray will be the body of the shirt. I drew my own pattern for the embroidery, basing it on the scroll and f-holes on the bass. Here is the pattern for the back:


And here is what I drew for the front:


Once I had drawn it, I had NO CLUE how to get this transferred onto the fabric. So, I traced it onto soil separator cloth...which bleeds when you use markers on it. Since it bleeds so easily, I took the pattern and then laid it on the yoke pieces. I then used washable markers (kid's crayola markers) and traced over the pattern again, letting it bleed through to the fabric underneath:


Then I embroidered the piece, using mainly backstitch, but also made flowers with cutouts of the other fabric, and used a blanket stitch to attach them. After I cut them, I ran a little anti-ravel liquid around the edges, which also made them a bit stiffer, and easier to place and sew:


I am about 1/3 done with the embroidery and hope to get to cutting out the rest of the shirt next week. Wish me luck!!

Updated 4/26 to add, I was able to get the yokes attached and the front and backs of the shirt sewn together over the weekend:


Tuesday, April 13, 2010

Vintage Pattern Contest!

Pattern Review is having a vintage pattern contest that will be running from April 15-30th, and I was considering entering. It will also be a good way to get me moving on the vintage dress I wanted to make for the reunion this summer.

The rules state that the pattern has to be issued between 1920 and 1975, no reissues. Fortunately, I have about 150 vintage patterns that fit the bill. So, I decided that I wanted to make Simplicity 2458:


I pulled out all the pattern pieces and started ironing them...and the back bodice piece was missing! Gah!!!!

So, back to the drawing board, I pulled Simplicity 3580 out of the box:


Again, I pulled out all the pattern pieces and started ironing and.....the sleeves and cuffs were missing!!!!

So, I headed over to PR to see if I could draft a sleeve, or morph the bodice together and still manage to stay within the rules. Fortunately, the contest manager said that it would be fine since both the patterns were vintage; I could morph them together.

I decided that it would be easier to make sleeves fit than put together two bodice pieces, so I traced off Simplicity 3580. I added 2 inches in width to the back and 3 inches to the front. I also moved the darts around; and shortened them slightly since the pattern was drafted in the age of bullet-bras. Since the current silhouette is one that is more rounded, I shortened the darts so that the bodice front wouldn't come to a point. I also moved the side dart lower to accommodate my lower bust point.

I made a quick bodice muslin, and I need to do a couple small tweaks. I can't decide how closely that I want the bodice to fit. It is hard to tell from the drawings what the intention was. In 2458, the top blouses out a bit over the belt in the drawing on the left. Although this online article "Tracing the Path of the 1950's Shirtwaist" show examples that are both very closely fitted, and some that are not.

However, I am assuming that one of the reasons that ladies in the 50's and 60's could wear such closely fitted dresses is that everyone was girdled within an inch of their lives. While I do plan on donning the Spanx to wear the dress, I don't intend to wear a full girdle, so I think based on that I should go with a slightly less fitted version. Also, being a little heavier, more ease rather than less might be a better idea, since the standard is that the larger the size, the more ease is needed.

Starting on the 15th, I will forge ahead. I have a length of lightweight sateen from Fabric.com (the $1.95 sale!) and thought that the large scale print would be fun for the vintage dress:


If everything works out well, I'll be able to make a version in blue silk for the upcoming reunion:

Sunday, April 11, 2010

A Productive Weekend...

This weekend has been fairly productive. The first thing that I did was complete the alterations to the pattern and sew a version of the Burda 04-2010-116 shirt dress. Burda describes the pattern as "shirt-styled shift dress of light-weight chambray is the ideal bikini cover-up. A belt with D-ring buckle cinches it to your waist."

I was immediately attracted to the dress, because I could just envision it in a blue and white stripe like a man's oxford shirt. But, I hated the shape at the waist. The dress itself had no shaping, and the back bloused out hugely, even in the magazine images:


That looks bad enough on that tiny model, can you imagine what it would look like on me? So, I decided that I would alter the pattern. I wanted to add darts to the back and shape the waist more than it was in the original draft, but retain the yoke and other aspects that attracted me to the dress to begin with:


I started my alterations by tracing a size 46. I then used the pattern that I drafted for the tunic that I recently made to add two large vertical darts to the back. I also used that same pattern to taper the sides. I had recently picked up an orange stretch cotton that I had purchased to make a shirt, but decided it was too heavy for the project that I wanted to use it for, so I used it for a muslin of this dress:


Here are the darts that I added to the back:


The pattern also included front bust darts that I left unchanged:


The one thing that I did have problems with with this pattern was that the sleeve cap was impossible to ease. If you look at the technical drawing, the sleeve caps are not supposed to be gathered, but no matter how many lines of ease stitching I put in, I could NOT get them to ease. I will cut down the sleeve cap for the next version, but for this one I put small gathers along the top of the sleeve:


I don't dislike it. I think it is a nice feminine detail on a dress with very many masculine aspects...back yoke, stand collar, curved hem. Overall, I am very happy with the fit of the dress, and if I find the blue and white oxford that I am looking for, I will make a second version.

The second project that I completed this weekend was the BurdaStyle JJ #6609 shirt from a free downloaded pattern. I had downloaded and taped this pattern together well over a year ago, but then never traced it off. So, last weekend I had started on it, and then it sat all week because finishing it would require that I rethread the serger with a different color. And since I am very, very lazy, I managed to put that off for quite some time. But, here is the finished shirt:


I made it from a dotted swiss purchased from Fabric.com. I left off the ruffles called for by the pattern, as I thought in combination with the puffy sleeves that ruffles would make it just a bit too twee for me:

I do like the puff sleeves:


And both the front and back are shaped with shoulder princess seams:


I had a heck of a time finding buttons to match this shirt. I finally found some inexpensive plastic buttons that matched the color fairly well, but since I didn't like the little details on the top of the button, I flipped them over and sewed them with their flat back showing instead:


My final project this weekend was to trace my vintage pattern for the reunion dress. I took all the pattern pieces out and ironed them...only to find that the pattern is missing the back bodice!! Oh, well...I can draft a back bodice, I'll just have to make my best guess on the armscye.

I also managed to squeeze in hemming a set of draperies for my brother-in-law. He is visiting this weekend, and brought with him a pair of drapes that were about 12 inches too long, so that was a simple fix. He came down to help my husband do some work on the gutters and downspouts. This morning he came down the stairs and announced "We are going outside to climb ladders and play in the dirt." And I pointed out that for men, being 35 wasn't really that much different from being 10. He said "Nope. And later we're going to eat pizza and play video games." So uncomplicated.