Wednesday, October 27, 2010

Online Fabric Shopping

This week I was home part of the week, rattling around the house, because I am a clumsy person. Yes, spectacularly clumsy. Tuesday at work, I fell down a flight of stone steps. I work at Webster University in St. Louis, and Tuesday I tumbled down the front steps of Webster Hall:

I managed to injure my pride much more than my body...although I did sprain the heck out of my left ankle. I tried to tough it out at work but after about the 14th instant message from co-workers saying "GO HOME," I took the hint and took myself home. The drive home was miserable, since I drive a manual (Jeep Wrangler). When I got home, I commenced calling my Mommy over and over until she FINALLY picked up, and agreed to come take me to the urgent care.

At the urgent care I was pronounced unbroken, but merely badly bent. I was issued an ankle brace, a prescription for some lovely painkillers, and directed to stay off of it as much as possible and keep ice on it. My mom was nice enough to trade vehicles with me (since both my car and my husband's are manuals. It took her 3 tries to find reverse, didn't realize it had a 6th gear, and couldn't find the controls for either the windows or the lights so the exchange has been quite giggle-worthy...in the meantime, my dad who has NEVER been allowed to drive my Mom's new car is quite peeved that I scored the Escape Hybrid). So here I am, hobbled, not even sewing!

Since I am confined to my chair, the only thing I can really do is play on my laptop...so of course I am shopping for fabric!

But this brings to mind various questions I see repeated from time to time on Pattern Review, and even questions that people have asked me through this blog:

"How do you buy fabric online when you can't TOUCH it?"

"How do you know if you can use it for the garment you want it for?

and probably most often:

"How do you MATCH fabric online?"

The first two have the same answer...return it if it isn't right! Ordering fabric online is never something you want to do when you are in a hurry. I try to avoid situations where I have a deadline or if only the most perfect of perfect fabrics will do. If it is imperative that the fabric be exactly right, the best thing to do is to order a swatch. But, this is going to set back your timeline significantly.

Also, as you become more experienced with fabric, you will be able to more easily determine if particular fabrics are going to be appropriate for your project. Also look at the descriptions...most sites will tell you "appropriate for jackets and coats" or "use for shirts or dresses." This will give you a hint as to how the fabric will drape, feel, etc. Which is not to say that I am not sometimes surprised when I recieve my order! But more often than not, I can easily re-deploy the fabric for a different garment.

There are two stand-out sites that I can think of that help with this tremendously...one is Fashionista Fabrics and the other is Gorgeous Fabrics...the owners of both I happen to know are expert sewists, as they are both members at PR!

At Fashionista Fabrics there will be photos of the fabric lying flat so that you can see the details of the print or weave...but there will also be a photo showing the drape:


This will give you some information about how the fabric will hang, and how it will behave. At Gorgeous Fabrics, you always get a recommendation for patterns that would work well with the fabric in the description. Then go look at those pattern recommendations, and see if that is like what you were thinking:


One of the reasons that Fashionista and Gorgeous Fabrics is so great in depicting and describing their fabrics is because the owners of both ARE sewists. As a result, they are fantastic at helping their fellow sewists understand the products they are offering.

However, that leaves the issue of how to match fabrics; or given the varations in computer monitors, digital cameras, and if the color you are seeing is representative of the fabric. At Gorgeous Fabrics, you can find in the description a reference to the closest Pantone color, but to use this, you will need a Pantone Color Guide, which is not cheap:


So how do you go about matching fabrics online when either the retailer does not include pantone information, or if you don't have a pantone color chart? One of the things I use very often is the Design Wall at Fabric.com. I suspect that the design wall is something of great use to quilters who need to coordinate lots of fabrics, but I use it to see if fabrics go together for outfits. Granted, there are a couple of assumptions that I am making here, one of them being that all the photos of the fabric were taken with the same camera, edited in the same way, and not altered in any way:


However, I have been placing my fabric orders this way ever since I started using Fabric.com and it has consistently worked well for me. This way I can be reasonably assured that I will not end up with any "orphan fabrics," which is how fabric stashes grow!

You can also utilize websites like Polyvore to do this when using sites that do not have services like the Fabric.com design wall. Or you can just email the company and ask..hey, does this fabric match this one? Although I suspect that Fashion Fabrics Club humors me in this area, as the office manager is the mother or one of my high school classmates, and the step-mother of another! They do also offer thread matching...and in your order form, you can tell them how many spools of matching thread you need. I do this ALL THE TIME.

Occasionally I do still end up with a fabric orphan...sometimes these fabric orphans are passed on to my neice so she can use it in her learning to sew. Or, if it was exceptionally inexpensive, I may keep it for use in muslins (knits especially...I have grown a large stash of knits because it can sometimes be difficult to find comparable knits for use in muslining patterns).

In the end, I do usually wind up with fairly well-coordinated fabrics...and have been able to talk myself out of any number of large-scale prints (I am a sucker for a print) due to my inability to find ANYTHING that coordinates with them.

Happy Fabric Shopping!

Sunday, October 24, 2010

Pieces 6, 7, and 8 of What Has Inexplicably Become 17

This weekend I completed pieces 6 and 7...a pair of grey flannel pants and a twinset made from a double-faced knit fabric. I decided to replace the purple/ivory shirting with this one since the shirting had not washed up well. For the twinset I used the McCall's 5978 twinset pattern. This is another instance when you find a pattern with "good bones," but might overlook it because McCall's sewed a bunch of crafty nonsense on it:


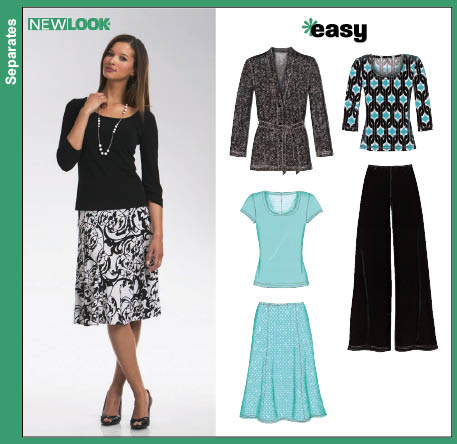
Strip away the lace, the beads, the trim, the floppy flowers, and what you have is a very nice cardigan with a nice shape. What is less awesome, is the tank underneath. The exact same pattern piece is used for the front as for the back. What?? Hello!!! BOOBS! So, I replaced it with the tee from New Look 6735:


This is pretty much my "go-to" tee. It took a while for me to warm up to it, because when I first started sewing I was of the mind that "Tee shirts don't have center back seams!!!" But as I learned more about fitting my body, with all it's lumps and bumps, I learned that a center back seam is a must. Also, at bust level, the front of the shirt is longer than the back, so you ease that extra length in when you sew it to accommodate the bust. Simple, but and excellent draft.


The fabric that I used for this is a knit snagged from the bargain table at Hancock's. It is actually double-faced, with a solid black with a texture/pattern inside and fine black and grey stripes on the outside:


Here is the final product:


I did not do any alterations, the size "L" fit just fine right out of the envelope, and of course no alterations to the tee since it is a TNT for me. One thing that some folks might not like about this pattern is the facing. Some prefer bindings to facing in knits, but I have no issues. I did handstitch the facing down on the inside, and because the fabric was double-faced, it was super-easy to stitch it to only the inside layer, and no stitches showed through to the outside.

Since I had the TNT shirt pattern out, I figured I would cut a second one out of the leftovers from piece 4, the 3 Graces Tee. So, call this piece 4.5...and it is guaranteed to coordinate, since I just used the leftover fabric. Yes, you can see the dress form's underwear because of the flash. The only way I can make her even approximate my shape is if she wears one of my bras.


Next, I finished a pair of pants from a pattern I have used before, Burda 07-2009-102 (yes, I know! The first "bottom" in this collection!):


I don't really have much to say about this, as it is one I have used before. In the gray flannel, the pants will be really comfy for winter:


Finally, how the collection has inexplicably become 17 as opposed to 16....

Earlier, Ruthie (whose choices in these collections served as an inspiration for this) commented that it seemed like a lot of grey, and on one hand, I wear a lot of grey, mainly because I hate trying to match things. If everything I own is the same color, then everything matches, right? On the other hand, isn't the whole idea of making a coordinate collection to create a set of clothes that you can mix and match?

So, I pulled out my piles of fabrics and decided to look for a way to incorporate more color into this collection. So, how does ORANGE strike you? I decided to use some remnants of rayon that I had to make the Hot Patterns Deco Vibe Delicious Dress:


I decided to make the dress with the bottom band and the raised hem. Based on flat pattern measurements and the two reviews on PR I decided to cut and sew a size 14 as opposed to the 18 that my measurements indicated. In the process of sewing I made a second change...I did not double the bottom band, but hemmed it instead. The reason for this is because I did not take into account that if I doubled it it would place my chubby, dimply knees front and center. I SHOULD have lengthened the dress overall, but did not think of it. Here is the final product:


The contrasts are both an orange and also a snake print with purple, orange and black. The purple coordinates with the purple knit that I used for the 3 Graces Tee. In fact, the shirt that I made with the leftovers from that tee is what I am wearing underneath this dress.


The back pattern piece is contoured, but I also added a significantly greater curve at the lower back to account for large bottom/sway back and keep the fabric from puddling at the waist level.

And here is the final progress report on the collection:
  1. Dark heather gray wool jersey (dress)
  2. Wool blend flannel-Burda pants
  3. Periwinkle charmeuse (shirt)
  4. Grey/black print charmeuse (blouse with bow)
  5. Black and grey herringbone suiting (lined pants)
  6. White jersey knit-3 Graces Tee
  7. Purple jersey knit with diamond pattern-Butterick 5525
  8. Purple/ivory cotton shirting eliminated, replace with black and grey knit for McCall's 5978 twinset cardigan and New Look 6735 tee from leftovers
  9. Heather gray knit (shirt)
  10. Silk Tweed suiting (skirt)
  11. Plum jersey knit-3 Graces Tee, also New Look 6735 Tee from leftovers
  12. Black jersey knit (shirt)
  13. Black boiled wool knit-Cardigan/Jacket
  14. Orchid stretch shirting-Butterick 5526
  15. Plum and orchid striped jersey (shirt)
  16. Gray cashmere wool suiting (pants)
  17. Black rayon challis with purple/orange trim-Hot Patterns Deco Vibe Delicious Dress
Next up...a periwinkle charmeuse shirt with pearl snaps a la western wear. Also there are still 3 knit jerseys in the collection for shirts, but I am not sure if I want to return to the Hot Patterns well and make another 3 Graces tee or go for something completely different. I probably shouldn't think about it too much, or else this will be a collection of 18...or 19....or more!

Monday, October 18, 2010

Five of Sixteen: I Think I Might Make It!

I don't want to jinx myself, but I might just make it through this swap! I finished piece 5, a second version of the HP Classix Nouveau 3 Graces T-Shirt. I love this pattern!


Per the pattern description: "Get yourself some Grecian goddess-style glamour with these fabulous T-shirts, designed for drapey knits...choose rayon, silk or bamboo knits for maximum fluidity. Semi-fitted T-shirts have a raised back neckline, gently shaped side seams and finish with a deep hem at the hip. Loop-front version has a narrow hemmed neckline which loops through the lower bodice, for a slightly square front neckline. Cowl neckline version has a cut-on facing; you can cut this version on the bias for even more drape. Cross-front version has a slightly cowled neckline (wrong side of fabric will show) and a cross-over wrapped front. Choose from 3 different sleeve options: sleeveless with a rib trimmed armhole; above the elbow with a deep rib cuff; or extra-long to scrunch as you wish! Wear these gorgeous T-shirts loose over dressy jeans with heels for a great casual evening look, or try them as a soft, modern blouse alternative under a strict suit jacket or a slouchy cardigan."


The knit I used is a rayon/lycra that is super-light so it drapes really nicely. I found that for this one I again used a bit less than the pattern recommendations indicated....1 3/4 yards as opposed to 2 1/2.

For the first version, I did the cross-over, and for this one I made the loop front. To be successful with these tops, Trudy's video is an absolute must! I unpicked every seam at least once because I wasn't paying attention to what I was doing. My recommendation is to pin ALL the seams before you move it off the dress form, otherwise it will shift on you while you are moving it to the machine. Also, I found that I had an easier time in getting the look I wanted to sew the seams from the side seams, then arrange the drape, then pin a second time and sew the seams to where I wanted them to end to keep the drape the way I wanted it. Does that make sense? I hope so, because it really helped me in getting the shirt done.

Having finished this, I have completed 5 of the sixteen garments that I had initially planned (the ones that are completed are in bold):
  1. Dark heather gray wool jersey
  2. Wool blend flannel
  3. Periwinkle charmeuse
  4. Grey/black print charmeuse
  5. Black and grey herringbone suiting
  6. White jersey knit-3 Graces Tee
  7. Purple jersey knit with diamond pattern-Butterick 5525
  8. Purple/ivory cotton shirting
  9. Heather gray knit
  10. Silk Tweed suiting
  11. Plum jersey knit-3 Graces Tee
  12. Black jersey knit
  13. Black boiled wool knit-Cardigan/Jacket
  14. Orchid stretch shirting-Butterick 5526
  15. Plum and orchid striped jersey
  16. Gray cashmere wool suiting
Of the remainder, I may need to jettison the purple/ivory shirting (#8), given that it did not prewash well. I have a couple of other fabrics that I could rotate into the cycle without disrupting my "Garanimals" plan. One option would be this ivory colored knit:


It has an abstract pattern created by varying textures in the knit, but is fairly heavy.

Another would be this black and grey knit:


This is solid black on one side, with a subtle pattern knitted in and black and grey stripes on the other side (the flash is making the pattern from the other side show through in the pic). It is surprisingly light for having two layers. Both coordinate fairly well with the rest of the fabrics I have chosen:


In both cases I have enough for either a twinset a la McCalls 5978:

Or I could go for a long tunic/dress like Butterick 5427:

Of course, if I made the tunic, I would also have to acquire leggings...which I swore in 1987 would never, ever, ever happen. So we will have to think on this....

In the meantime, I have cut out a pair of pants from the grey wool blend flannel....on to the next garment!

Saturday, October 16, 2010

Three and Four of Sixteen

Today I finished the third and fourth pieces of the sixteen-ish pieces for my winter SWAP.

For the third piece, I made a jacket/cardigan. If you recall, since the fabric that I had selected...a hefty boiled wool...was a touch pricier than I usually use, so I decided to muslin it. Based on my muslin I made a number of changes:
  1. lengthened the jacket overall by 2 inches
  2. shortened the sleeves by 1 1/2 inches
  3. narrowed the sleeves from mid-bicep to wrist
  4. tapered the waist
  5. widened to the center front to allow for buttons
  6. added collar and revers
Here is the final product:


The wool is very thick, and the stitches sink right into it, such as where I topstitched the edge of the collar and the lapel:


I did a couple of samples, and really didn't like the way that overlocking looked on this fabric, so I decided to do a Hong Kong finish on the seams instead:


You can also see the back neck facing that I drafted since I did not line the jacket. The facing was necessary to add the collar as well. I used two fat quarters to make the binding (tutorial here), and selected a mini-zebra-print to coordinate with the black jacket:


The other changes that I made were done by morphing two patterns together. The original jacket was made using McCall's 6041, a Chanel-style jacket with no collar, shoulder princess seams, and a two-piece sleeve. Since one of my inspirations was the Hot Patterns Riviera Boulevard Cardigan Jacket, I decided that I wanted to add lapels and a collar to the final version. This inspiration is the reason that I wanted to make a jacket out of a knit...but the "A-line shape" descriptor gave me pause. I adore Hot Patterns, but the more that I learn about fitting, the more that I am realizing that there are some hard and fast rules for what looks flattering on my particular shape, and an A-line jacket does not fit within those rules.

So, I decided that I would reproduce the spirit of that pattern in a way that would be flattering on my shape. To do this, I added lapels using Butterick 4610 as a guide:

Now you could say, "Michelle, why bother altering the McCall's pattern? Why not just make it using the Butterick pattern?" Well, one reason is a long vertical dart in the center front piece of the Butterick pattern. The thickness of the fabric made me avoid anything that had darts because I was concerned that it would not lie flat. The McCall's pattern, on the other hand, achieved all its shaping through shoulder princess seams:


To draft the lapels, I took my altered front piece (lengthened) and retraced it by lining up the shoulder seam with the front from the Butterick pattern. Using that shoulder seam as a guide, I widened the center front and transferred the markings from the blazer pattern. I also widened the center front piece to allow for an overlap and buttons:


And I finished it just in time, since it would appear that fall is finally here! This weekend I also decided to work on one of the many knits that I have in the stash to make a version of the Hot Patterns Classix Nouveau 3 Graces T-shirt:


I decided that I wanted to do the cross-over version using a purple rayon knit. The videos on the Hot Patterns website are a must in attempting this shirt! I read the instructions 3 times, and still don't get how to assemble that shirt! So I took my laptop into the sewing room and followed along with Trudy. Just as Trudy suggests, pinning the seams for the crossover top ON a dressform is much easier than doing it flat. Here is the finished top:


I cut a 16 based on my bust measurement. I can't even begin to imagine how to alter a shirt like this, so I just forged ahead. Fortunately, all the draping provides plenty of room for a full bust. I made the extra-long sleeves, designed to be pushed up. There is also some nice shaping to the back:


And as complex as the construction appears, the front neckline is the only piece besides the sleeves and the bottom of the shirt that needs hemmed:


I will say that I used significantly less fabric than was recommended. Per the pattern description, "Sizes 6-8-10-12-14-16-18 need around 2 yards/ 1.83 m of fabric; sizes 20-22-24-26 need around 2 1/2 yards/ 2.30 m of fabric for all views...just add ½ yard/ 45 cm if you wish to make any version with the long sleeves." Based on this, I purchased 2 1/2 yards of fabric. However, the pattern used only 1 3/4 yards.

One of the great things about Hot Patterns is that their styles are very current. This shirt, for example, is styled after a Rick Owens shirt:


But, you may notice that it is not as skin-tight as the Owens shirt, a much better option not only for someone larger than a size 6, but also more appropriate for work wear. Also, for those of us not in the market to spend $300.00 on a t-shirt, the ability to make our own version is especially attractive.

I still have lengths of grey, white, and black knit, so chances are this shirt will be made a number of times!

Monday, October 11, 2010

You Can Do It!

A couple folks commented two blogs ago that they were surprised that my dad and I would undertake installing a new toilet.

First, it's really not that hard. And second, one of the first tenets of cheapness is "never hire anyone to do something you can do yourself." Plumbers, unfortunately, are really expensive! And they never, ever want to take instructions from me as I hang over their shoulder. My dad, on the other hand, is perfectly happy to teach me how to do this stuff and since my mother has placed a "handyman moratorium" on her house, he actually kind of likes to come over and putter around with me fixing stuff at my house.

Back to the toilet...the main problem that we were having was that the toilet did not rest flat on the floor because the tile underneath it was not level. As a result, we had to use shims (little wood or plastic wedges) to level the toilet, but over time the shims would move and the toilet would start to rock...which means that the seal underneath it would be compromised and it would begin to leak. If the toilet leaks, not only do you have, um, toilet water outside the toilet, but if it is not dealt with, your floor will rot.

I talked with my dad and we decided that not only did the toilet need replaced, but we needed to level the floor underneath it, either by building up the low spots or grinding down the high spots. Replacing a toilet is simpler than you might think, and doesn't require a lot of tools. Here is a schematic of a commode and the underlying plumbing:


To begin any project involving plumbing, the first thing to do is turn off the water. Usually, there is a shutoff right behind the toilet, with a waterline leading to the bottom of the tank. Shut this off, and you will be ready to begin. If there is no shutoff there, you will need to locate the shutoff for your house. Typically, this is located very near your water meter. In my case, the water meter is at the bottom of the stairs in the basement, and the shutoff is about 3 feet directly above the meter.

Once you get the water shut off, you need to get the water OUT of the toilet and tank. Just flush it to get most of the water out, then use a large sponge to remove the remainder of the water from the bowl and tank before continuing. Just soak up the water and squeeze the sponge into a bucket:


Next you want to undo the nuts on the hold-down bolts and lift the toilet. This can be really heavy, so it helps if you remove the tank first. The tank can be removed by undoing the tank bolts that attach the tank to the bowl. However, if you are replacing the toilet because of a leak, sometimes these bolts can be corroded, so it may be easier to lift the toilet in one piece. BEFORE you lift it, know where you are going to put it! If you have a bathtub, place the toilet in there, then if there is any water yet in it, it just drains into the tub.

Now that the toilet is up, there will be a bit of a mess to clean up:


You will also need to clear the old wax ring away from the floor flange. Wax rings look like this:


A wax ring only costs a few dollars at the hardware store. Most times that you might have a leak that is seeping from under the toilet, the problem is the wax ring. Because parts are cheap, but plumbers are expensive, it is always good to have a little basic plumbing knowledge. Definitely call a professional if the job gets too big, but replacing a wax ring, or even a whole toilet doesn't really require any special technical knowledge.

Once we pulled up the wax ring, we found one of the problems with the toilet. For one, the spacer between the flange and the toilet was bent into a saddle-shape, and was only attached to the subfloor with a single tiny screw and flimsy washer. Rather than attaching it properly, the knuckleheads who "repaired" this house threw some mortar in the hole, and then slapped some silicon in there and stuck a toilet on top of it. Blech:


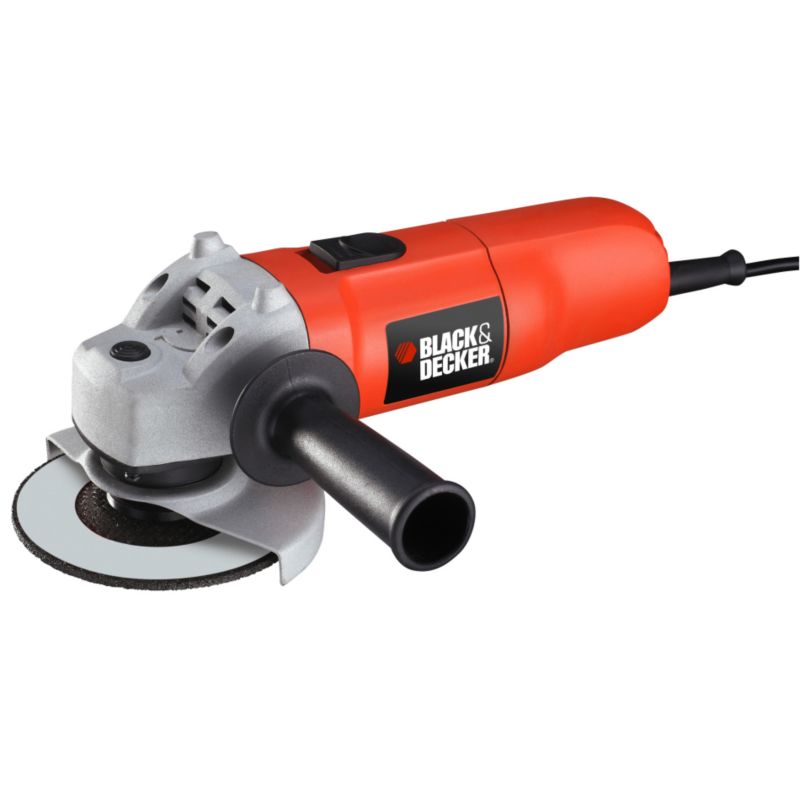
If your hardware is not as destroyed as this was, you can just clean away the remainder of the wax ring, put in a new one, and replace the toilet. If you have this mess, you have some more work to do. Dad and I started with leveling the tile under the toilet. One of about 6 problems with this toilet was that the tile underneath was not level. So, we started to knock down the high parts with an angle grinder:


A word of warning...if you do this, dust will fill the bathroom, followed by an acrid smoke, which will set off all the smoke detectors in the house. You know, just an FYI.

After that, we chiseled out the mortar and corrosion that was preventing the spacer from lying flat to begin with. Before you start this, wad up an old towel and put it in the soil pipe. The last thing you want is a bunch of stuff ending up in the soil pipe and clogging your drain. Once we had the mortar and corrosion from the flange cleaned up, we put in a new spacer:


The new spacer was installed by driving concrete screws directly into the mortar that had been used to level the subfloor. Most replacements will not require the acrobatics that we went through to get to this point. And most intelligent people would not look at the mess that we found and say "Dad! Get the grinder!!" A smart person would have called a plumber. We are not smart, though.

At this point, you are ready to reinstall the toilet. The first thing you should do is place the bowl of the toilet on the hold down bolts. It helps to have two people to do this, since once can guide the toilet onto the bolts. If you are by yourself, though, here is a trick....to make the hold down bolts stand straight up, take a bit of your old wax ring (the one you scraped off the bottom of the toilet), roll it up like silly putty, and stick it to the head of the bolt. You can stick that bolt to the floor, and it will stand straight up.

Once you have the toilet on the bolts, sit down on it, and make sure it is sitting level. If you need to, place your shims under the edge and make sure you can't rock it back and forth (it helps to have two people...one can sit, and the other can shim). Then, take a pencil and outline the edge of the tank on the floor, marking where your shims go:


The black mark in front of the waste pipe is where we ground the tile down, but you can see that is completely inside the outline for the toilet, so it will be completely hidden.

Take the towel out of the waste pipe, and you are ready to put your toilet back on. Start by unwrapping your wax ring (which is like a combination of wax and glue, it is pretty disgusting) and placing it on the bottom of the toilet. It will stick there:


Now, flip the toilet over, guiding the hold down bolts through the holes in the base, and pressing the toilet onto the wax ring. Use the outline you drew on the floor as a guide. When the toilet is in place, put the nuts onto the hold down bolts, tightening them evenly on each side to hold the toilet down. Sit on it...make sure it doesn't rock. Then you will attach the tank, seat, water line, and turn the water back on. The tank will fill, and your new toilet is ready to use:


Now it is time for some beers!

Sunday, October 10, 2010

Muslining Piece Three

For the third item in my swap, I wanted to make an unstructured jacket of black boiled wool knit. I initially wanted to make the Hot Patterns Riviera Boulevard Cardigan Jacket, as I had a length of boiled wool with minimal stretch. Hot Patterns describes the jacket as "designed for heavy knits with just a little stretch, so make it in stable sweatshirting, firm sweater or double knits or even fleece (yes, fleece!) Unlined, cropped single breast Jacket has a gentle A-line shape and a classic collar & rever."


I like everything about this except....the issue is the "gentle A-line shape." With my hips, an A-line skirt is a good idea, but an A-line jacket would be a definite no-no. And while it is one thing to fit a pattern, to completely alter the shape of a pattern can be more problematic, so I decided to go a different direction.

Therefore, what to use for my boiled wool knit?

I decided to use McCalls 6041, a "Make it Crafty" lined jacket.


Look past the crafty nonsense sewn onto it and wacky fabrics you will see a jacket with some nice details, including:
  1. A full lining
  2. Shoulder princess seams
  3. A two-piece sleeve
  4. Front pattern options for A/B, C, and D cup sizes
Since I paid a bit for the boiled wool, I decided that a muslin would be in order. To make the muslin I purchased some gray sweatshirting from the bargain table at my local Hancock's. For $2.95 a yard, the fabric was more than worth it to make sure that I did not ruin my boiled wool. Here is the finished product:


My main goal with any muslin is to come away with a garment that can actually be worn. I rarely do muslins JUST for fit, unless it is a pattern line I have never used before or a vintage pattern. If it is Burda, the Big 4, or Hot Patterns (the lines I typically make and know how they usually fit) I usually try to make a wearable muslin. The main reason for this is that in the past I have found that a garment that fits in the sewing room, standing in front of the mirror, often does not make the cut after a day of wear. It is only wearing a garment for the day that can reveal issues like a collar riding up on a shirt, or pants that are not comfortable to sit in.

Given this, I went ahead and finished the muslin to wear. Since I was using a fabric that would not need a lining, I stitched the front facing to the front princess seam:


I also drafted a back facing, and added a row of ruffles to the front:


The ruffles I made playing with my ruffler foot for one of my old singers. I just cut some strips of the knit and fed it through the ruffler. To stitch the ruffles down to the front of the jacket, I just sewed right on top of the seam from the ruffler.

Two things that I did find out about the jacket from this muslin is that the sleeves were incredibly long...I had to hem them by 2 1/2 inches. They are also incredibly wide at the wrist, so I needed to shorten them, as well as taper them towards the wrist.


Second, I would prefer the jacket itself to be slightly longer, so I lengthened the pattern for the next version by 1 1/2 inches. Does that mean that I won't wear the muslin? Nope! It's already hanging on the back of my office door.

So, after lengthening the jacket, shortening the sleeves, and tapering the sleeves at the hem...then the question remained, to draft the lapels/revers onto the jacket, so that it would look more like the Hot Patterns inspiration piece? I am currently obsessing over this, so more later!