Friday, July 31, 2009

Look What Followed Me Home!

A Singer 503, the Rocketeer! In a table, with a box of attachments, and only $75.00.

And not just any Rocketeer but one in great condition, even the hinges for the top lid are intact (that NEVER happens!!).

See, it's a good thing to check Craig's List at work!


Thursday, July 30, 2009

And the no-sewing stretch continues....

I haven't really been working on much, you know, since I am diseased. Mostly just tracing patterns and making plans. I don't want to do any fitting because I am covered with medicated cream, and I don't want to get that on any of the clothes that I am working on.

Unfortunately, being isolated doesn't keep me from shopping online. So I have a couple of things coming from Fabric.com, among them this satin twill:


If it is anything like the silk twill that I got from FFC last year, it will have a really nice drape, with the added advantage of being machine washable. I was too slow to catch the plum color, but there was still plenty of black, as well as an acid-green chartreuse. Which I didn't buy. Surprising, I know.

Anyway, these are my plans....and there is great opportunity for failure here, but hopefully it will work out.

You may remember that recently I made McCall 5809 in a white eyelet with a batiste underlining. That shirt has been worn nearly to death. Once I got the issues with the back fit figured out, it turned out to be a really great shirt:


And here it is "in action," so to speak:

So my plans are, I am going to lengthen that peplum to a full skirt, about the length of my favorite wrap dresses for a super-duper awesome dress from that black satin twill.

Fortunately I have some additional lengths of fabric coming because in the mail today I got a lot of 19 vintage patterns that I won on Ebay. They are all 1940's and 1950's, and they are larger sizes! Some are as big as size 20, which is awesome! It means that my alterations won't be so drastic.

Wednesday, July 29, 2009

Bringing Sexy Back

I haven't had a chance to do any sewing this week because:

1. My grandmother went into the hospital on Monday. Pneumonia, again. The third time this year. Because she WON'T CALL the Dr. when she should. Just like always. I'll tell you, if she lives through this, I'm going to kill her.

2. I got an awesome present from the kids. RINGWORM! Yes, ringworm. I went to the Dr. yesterday to see what the mystery rash on my neck and chest was, and yay! Ringworm!

I'll tell ya, I'm bringing the sexy back to fungal skin infections.

So, new sewing because I spent my time washing all the bedding in the house, all the towels, all my clothes and slathering myself with prescription anti-fungal cream.

Seriously. Ringworm. W. T. F? Next I'll have head lice and pinworms. I'm going to completely sterilize those kids the next time they are here, Silkwood-shower-style.

Oh, and I can't touch the pets because apparently they are susceptible to ringworm, too. Only in them it makes their hair fall out and it's impossible to get rid of in cats because they spread it every time they groom themselves.

I'm going to just go sit in my plastic bubble now.

Sunday, July 26, 2009

Progress Report on Fitting the Vintage Butterick

This is my first foray into vintage patterns, as well as making extensive alterations to account for the changes in proportions in patterns over the past 50 years, and also the fact that the pattern is an 18, which is a 38 inch bust. My bust, on the other hand, is 41.5. Also, the pattern that I have opted to use is from the early 60's, which means that it was assumed that you would be wearing a heavy-duty girdle and a pointy bra. So, I had a lot of alterations to do before I could cut into my fabric, and a muslin is a must:


I started the process by tracing the pattern exactly, and then doing flat pattern measurements. started by adding 3 inches of tissue above the bust dart (I repeated this on the back) to lower the bust point and lengthen the bodice:


I then slashed the pattern vertically, and added a triangle of tissue to add one inch in width (for 4 inches total, front and back) at the waist:


I also slashed the skirt vertically and added the same amount of tissue there:


The muslin looked like this:


The first thing that clearly needed changed was the length and shape of the skirt. It was too long, and looked really frumpy, and it also needed tapered towards the hem. To fix this, I folded out 3 inches of tissue above the kickpleat and tapered by about 1 inch (for 4 inches total, 2 front pieces and 2 back pieces).

Second, you can see the fold above the bust that is more pronounced than it should be, even given that the bodice has kimono sleeves. I also needed to lift the waistline slightly:


Overall the front was pretty close. The back, however, was a disaster!!


I started by pinning up the shoulders, and that took care of some of the issues, and partially decreased the extra fabric in the back:


To repair the bodice issues, I took in bodice sides above waist by 3/4 inch, tapering to armpit. I then narrowed back above darts by 1/2 inch on each piece. I also shortened the center back by slashing and overlapping the tissue, the side seams correct length, but center back was bagging. I also lifted shoulder by 1 1/2 inch, tapering out towards shoulder curve, and increase circumference of each sleeve. Here are the changes illustrated on each pattern piece:


And here is the altered bodice:


There are still some creases in the shoulder/arm pit area, but that is a fact of life with kimono sleeves. They even have creases included in the pattern illustration! But, the fit so far is really good. Hopefully tomorrow I will have a chance to work on the skirt.

Saturday, July 25, 2009

More Planning Than Sewing

This past week it struck me....there is a whole lot of crap going on in August that I am going to need dresses and stuff for! I have two weddings in August, plus my birthday (37, gah!). One of the weddings is outdoors, so I need something of cotton, not too dressy, and not to hot.

Below are some of my ideas, I spent most of the day today tracing off patterns and even started a muslin for the vintage pattern.

For the persistent magenta sateen that has variously been slated to become a coat, a ruffle-neck dress, and goodness knows what else...is now being considered for a vintage dress:


Today I traced it, and made alterations. Because it is a vintage 18, I needed about 4 more inches in the bust, and also in the hips (I want to make the straight skirt version), I have the muslin cut out and all the markings transferred, hopefully I can baste it together tomorrow and see how the fit is.

I also have a length of deep purple cotton that may end up this Burda pattern:


Because the dress in the pattern image is white, it's hard to see the details, so here is the line drawing:

I really like the shape of the collar and the princess seams on the top, but am a little iffy about that dropped waist. We shall see. The fabric for it cost a grand total of $8.00, so it's not any great loss if it looks bad. I will probably leave off the boob-pockets, though. No better way to call attention to a large bustline than to perch two tiny, pleated pockets on the girls.

Finally I have a lightweight khaki twill that may inspire me to get on board with this safari-thing that Burda has going on (seriously, is there not SOME safari dress in every single issue of the magazine??). I traced this Burda pattern:

I like the shape of the dress, and I even "get" the shoulder flap thing, but I think the buttoned epaulets may be a tad much. I may edit some of the details and find some happy medium between the two versions:


In other sewing news, I finished the other tire-print shirt for my littlest nephew, except I switched out the snake print with flames:

I then got a call from my brother asking me when I am going to start making them for grown-ups, i.e., HIM! So, now I have to measure him tomorrow so I can make a shirt for him, too. I told him I was making it with pin-up girl print, and he was pretty much ok with that.

Sunday, July 19, 2009

A Budding Designer

Now that I got my nephew interested in sewing, he is obsessed with what can be made with the "stash."

This morning, he began dismantling all the "fun" prints, removing them from their tubs, spreading them all over the bed, and making matches. Here and there I would have to respond to "Aunt Missy, does this go?" until he finally settled on this combination:


And demanded that "We need to make a shirt. Today." Fortunately, the serger makes quick work of finishing the seams, so it went together in about 2 hours, even with a wiggly 6-year-old on my lap (I insisted that if we had any hopes of getting it done today, he would have to help).

He is getting very good at guiding the fabric, and is also quite bossy with the "Now backwards, Aunt Missy. And hand me the scissors. No the little ones." His favorite part is easing the sleeves, because I taught him how to "crowd" the fabric. I never really easestitch, but for the caps of sleeves I just run a line of stitches in the seam allowance from notch to notch on the cap, pressing my finger on the back of the presser foot, and letting the fabric "crowd up" behind it. This takes just enough length out of the sleeve cap that it fits right into the armscye, without any gathers. Now that he has seen the trick once, he wants to crowd EVERYTHING. I'm surprised his shirt isn't shirred.

Here he is modeling his new shirt:


And here he is hopping around telling me what he wants to make next and how Caiden (his baby cousin) should have a shirt to match his, and you should make that this week Aunt Missy:


While it's kind of a pain to have to instantaneously put together shirts for him, it is very heartening that he is so interested in what can be made as opposed to what can be bought.

Saturday, July 18, 2009

A Break From Pants

I decided that before I embark on further pants-fitting adventures, I would take a break and work on a couple of projects that have been on the back-burner for quite a while.

I decided to make a tunic from some of the charmeuse that I have been stashing. I love the patterns and colors available in charmeuse, and I can't resist it, especially on sale! But I never really know what to do with it. I have managed to make only one thing, a button-down shirt from McCalls 5522. I spent a lot of time on that shirt, finishing everything with french seams and binding:


This time I used my brand-new serger for the seam finishing:


The pattern that I used was McCalls 5708, which is actually a Hillary Duff pattern. Although the styling in the pattern photo is very youthful, it has good "bones."


In fact, it is not drastically different from Kwik Sew 3461, except for the rounded neckline vs. the square.
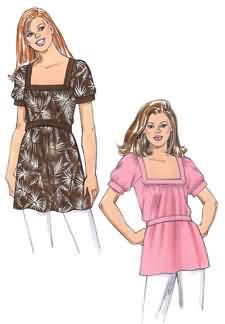

Here is the finished product, looking a bit odd since I really need to pad the hips of my dressform:


As you can see, my hips fill it out quite a bit more!


And from the back. The neckband is constructed in 4 parts, the front and back both have bands and facings that are then sewn down to cover the raw edges, and the sleeves each have their own individual facings. The front is done in a contrast, although the back neckband is not:


I used starch on the fabric to make the fabric easier to handle. I sprayed the entire length of fabric before cutting, and then used more starch as I was pressing the hems and pleats. By using the starch as a stabilizer, I was able to turn under a tiny hem on the sleeve and at the bottom hem:


I also used starch when making the pleats. I didn't want to baste the seams together since charmeuse is fairly delicate, and I didn't know if the needle holes would close after a wash or not. So, rather than worry abut it, I just used lots and lots of starch and an iron to set in the pleats. There are 5 pleats across the top of each sleeve, as well as across the bodice front:


Overall, the shirt went together very easily. Al the pieces were clearly and correctly marked, and there were no difficult aspects of the construction. The sleeves were raglan-style, so they were very easy to set, no gathering or easing at all. The pleats were all well marked.

In constructing this I made no alterations. I cut an 18, and it worked just fine. Although I am a 34DDD, I did not make a full-bust adjustment because the front had 5 huge pleats across the front neckline, so there is really no need to add an FBA. If I were to make this again, the one change that I would make would be to lengthen the belt a bit, but this is something that I commonly find necessary with commercial patterns, I always lengthen waist ties and sashes.

I still have a couple more lengths of charmeuse, that I think may find themselves made into Burda 7693:


Vogue 1111:


Or even another version of McCalls 5809:


I have a pucci-esque print (the pink and black) that I think would look better in a simple tunic, but the black with the leaf print (far right) I think would look good in either a fitted style or a tunic. Or perhaps the leaf-print needs a tunic because it is so large scale. Who knows? I'll figure it out!!

Tuesday, July 14, 2009

Live and Learn

After my recent near-triumph in pants fitting, I am now filled with fail.

I think that in any endeavor like learning to sew, and learning good fitting techniques, that it is important to have failures AS WELL AS successes. And since I am documenting this journey, I will document my failures as well as successes, in hopes that it may help someone else on their journey.

If you recall, this is what my last pair looked like:


Pretty good, right? Some small wrinkles on the back of the thigh, but nothing major. Well, I told myself that what I needed to do was extend that crotch just...a....bit....more to get rid of those wrinkles.

And guess what?

I was wrong!!!

What I did instead was add so much fabric to that center crotch seam, I made it look like I had a penis!


So, I guess it's strangely appropriate that this pair was exactly the same color as a pair of Dickie's? Ok, that was a bad joke, but here you can see just how far forward that inseam comes:


So, I decided it was back to the drafting table. I needed to take out that last addition. I also decided that I wanted to shift some of the length of that crotch curve to the front pattern piece so that the inseam wouldn't slope so much to the front.

Here you can see the back pattern piece. The first green line represents the placement of the inseam for the brown pair that worked well:


But, I am going to shift the inseam back to this line:


And transfer some of that length to the front piece:


Bringing that point out from the original location here:


I am also going to add some width to the back leg to try and get rid of the last of the wrinkles that way:


So, we will see how that comes out. In the meantime though I am kind of exhausted with pants right now and am going to work on a fun charmeuse shirt. A little hint for working with charmeuse? Starch, and lots of it. I start out by hanging the fabric over the shower rod and just spray, spray, spraying it with starch. Here is the fabric all covered with starch:


Once it is treated it is pretty stiff and doesn't slither all over the table while you are trying to cut it. If you look really closely in this pic, you can see where the fabric has creased like paper while it was folded:


Once you are done sewing, just pop it in the washing machine, all the starch comes out, and the charmeuse returns to normal!