 What caught my eye about this pattern was the front of the jacket. I really loved the clean front and the stand-up collar. What I was a little bit less thrilled about was the back of the jacket. You can see from the line drawing below that the back of the jacket is very full and draped, although they don't show a photo of this on the pattern:
 As I was making my first version of this jacket, I realized why there is no photo of the back on the pattern envelope. It's because the pattern doesn't look like the line drawing at all. As I was constructing the jacket, I noticed that all that fullness that had been cut into the back all hung out in the armpits. The only way to make the jacket look like the drawing was to add two darts on the shoulders to pull the fullness of the fabric to the center-back:
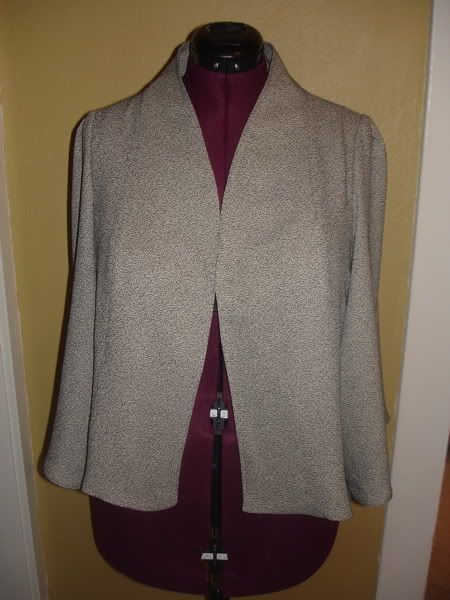
The front, on the other hand, ended up looking very much like the pattern; although the more I look at it the more I suspect that I may have attached my center-front pieces backwards:
Overall, I was not unhappy with the finished product, but it was not the crisp, tailored, clean jacket that I had been wanting. So, I began to consider making my first foray into actually redrafting a pattern. As someone who only recently came back to sewing and still considers themselves a "beginner," I was reluctant to attempt to make my own pattern. However, the more that I thought about it, the more I thought "What do I have to lose? I don't have the outfit I want right now; and if I screw it up, I still won't have the outfit I want. On the other hand, if I succeed, I might just end up with what I wanted!"
So, I started doing some research. The first thing I did was start following the alteration threads on Pattern Review and reading all the reviews I could of self-drafted patterns. Once I felt that I had some ideas about how I would like to start, I embarked on my redrafting project.
The first thing that I did was do a tissue fit on my dress form, just pressing the pattern itself on the form, seeing where the seams would fall. I folded all the fullness out of the back using that as a place to start:

Using the folded pattern, I created a "muslin," or a fitting garment. Muslins are great to do because they are cheap, fast, easy and offer a way to "test" a pattern before you cut into your "good" fabric.
There are two schools of thought on making muslins. One, that you a muslin from actual unbleached muslin; an inexpensive fabric that you can usually pick up for a dollar a yard or less at most fabric stores. You then put together just the body of your garment using a basting stitch that can easily be undone to make quick alterations and so that the muslin can be dismantled and used for the pattern itself. There is no need to add facing, finish seams or hems, or insert sleeves, unless sleeve fit is a concern.
Another school of thought is that you should make your muslin of a fabric of a comparable weight and body to that of your finished garment, and that you should finish your muslin as you would the garment, including facing, interfacing, and hems.
The method that you use will depend on what your purpose in sewing your own garments is. If your goal is to create a couture garment that is perfectly fit to your body, and would have cost you hundreds of dollars to purchase; then by all means, use the second technique.
I, on the other hand, sew at least in part to save money on clothing. Now, if I purchased all my clothing at Old Navy and Target, there would be no savings in spending $50.00 on fabric and materials to make a suit and jacket; or $25.00 on materials for a dress. But, since I adore places like Ann Taylor and Banana Republic I can save a significant amount by sewing for myself. It is because I sew in order to be frugal that I opt for the first method in making muslins, and use actual muslin.
Below, you can see the first version of the muslin that I made with the folded pattern. It's not very pretty. The back is very blocky and unflattering. What it needs is some ease, which can be added in the form of princess seams. If you want to know what princess seams are, go pull a blazer out of your closet. Most women's blazers have curved seams on the back to give them a more feminine shape.

So, I did just that. I got a jacked out of my closet and drew onto the back of my muslin where a princess seam should fall based on the placement of the seams on a jacket that fit me well. Using that line as a guide, I began pinning the seam into the back of the jacket until the fit was the way that I wanted it. Then I took a sharpie and drew along my pin line.

I then cut along the lines I just drew, creating three pieces; the large piece that would become my center-back pattern, the piece that would become my side-back pattern, and the strip of extra fabric that would be discarded. You can see that the pin line did not follow exactly my original line, but was close:

I then used the muslin to create two new pattern pieces for the back by tracing them onto pattern paper. Don't forget to add a 5/8 inch seam allowance on your newly added princess seam! After my second muslin, I also found that I needed to lengthen the "point" of the side-back a bit to get the armscye (sleeve-hole) to look right.

Here is the second muslin, with the princess seams:

Once I got the back to fit, though, it revealed some issues with the front, namely that the bust and sides were pulling slightly:

I repaired this by slashing the side-front, and narrowing the center-front:

I altered the pattern pieces using pieces of tracing paper, or folding out the extra:


This left only the sleeves to deal with. You can see below that the top of the original sleeve had darts that created a small puff, and the sleeve itself was a wide bell. With a closely tailored jacket, there was no need to retain these design elements in the redrafted jacket. They were really easy to get rid of , though. I just folded and taped the darts along the pattern lines and then drew in a new sleeve using a "normal" jacket sleeve as a guide:


I then traced a new pattern , transferring the necessary markings:

From there, I used my newly drafted pattern to cut a new jacket from a black suiting with a floral design woven right into the fabric. I then constructed the jacket using the original pattern instructions, except for the back. In the case of the back, I constructed the back first and then treated it as if it were the single piece back in the pattern instructions.
Here is the finished product:

Here is a close-up of the princess seams:

And here is the front of the finished jacket:

Overall, I am very happy with the finished product, and I have also made a pair of cropped slacks from the same fabric for a summer suit. The pants, fortunately, required no alteration whatsoever. With the cropped pant and 3/4 sleeve of the jacket, I think that this makes a nice summer suit that is appropriate in business-casual settings. The suit can easily be dressed up with nicer shoes and a collared shirt, or dressed down with ballet flats and a tee.

2 comments:
Wow! A lot of work but worth it. You've made a beautiful suit.
I love your result. I enjoyed following your rework process of the jacket. Good job!
Post a Comment