Let's get this party started, shall we? I think I am going to split this project into two posts because the alterations are JUST THAT EXTENSIVE. Really, I probably could have spent less time just drawing up my own pattern. But, once I got into it, it became a test of wills between me and Burda.
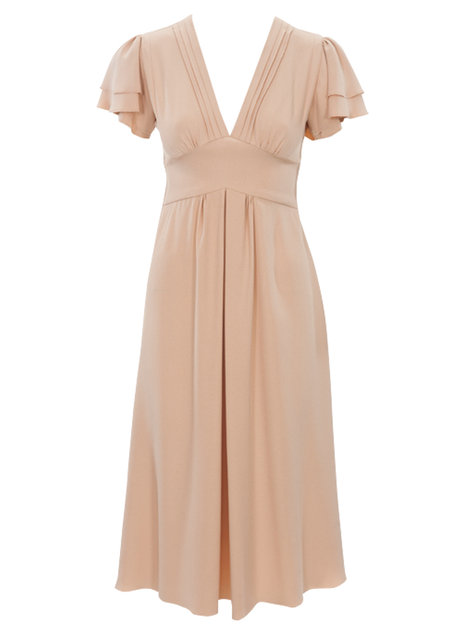
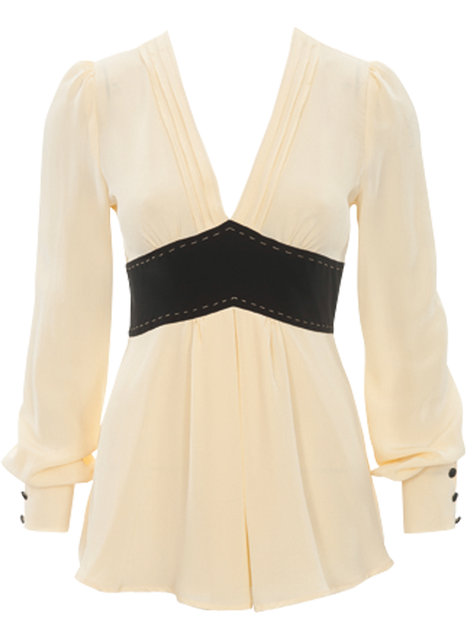
I decided that I wanted to make BurdaStyle 12.2011.107, a V-neck dress with pleats and gathers at bust and waist, which can also be made as a shirt with peplum. It is available as a download from the Burda site, and since I had temporarily let my subscription lapse (and by temporarily, I mean "two years") I did not have the magazine at home.
Here is the image of the dress:
And sewn as a shirt:
And the line drawing:

I chose the pattern, in part, because it was available in size 38 to 46. I can wear a 44 in a shirt, but in skirts am a 46 and pants a 48 (don't ask me how that is possible, it boggles my mind too). This way I had a size that would fit both my top and bottom, all in the same pattern.
Because I have sewn Burda items that have empire waistlines before, I knew they assumed that all women had preternaturally perky boobs, and I would most likely need to add some length above the waistline. I was not disappointed, and found that not only did I need to add 2 inches in length to cover the girls, I needed to add some fabric in width as well....see below as to how this resulted in the most insane FBA of all time. However, with the pleats along the front, gathers as well as princess seams, I had a real task ahead of me if I wanted to make any alterations. My process was as follows:
- Since I can print off another any time I want, I just cut out my taped together pattern from the download.
- I started by cutting a size 46 (I find altering Burda patterns, with no seam allowances, a thousand times easier than altering Big 4 patterns and constantly having to figure out where the actual seam will be).
- To begin the alterations, I folded out the pleats (on the front and the back) and taped the pattern down, tracing another version to work on.
- I then slashed the pattern horizontally.
- I separated along the slash, and added 2 inches in length to bust, and retracing the pattern pieces.
- I then created an "FBA" by slashing vertically multiple times, widening the piece, and then tracing again.
- I raised the neckline, as I usually do with Burda.
- Finally, I made muslin....which then revealed a few more issues.
- I needed to shorten above bust, although the rest was just fine
- I also needed to alter for a square shoulder along with shortening above the bust, which also involved redrawing the armscye
- And to avoid a very frumpy look, I needed to shorten peplum by 2.25 inches
I know that in print this makes virtually no sense, so I have included many, many photos....
Here we start with the original pattern piece, with the pleats folded out. The pattern is printed so the two front pieces, joined by a princess seam, are for now one piece. Excellent for making alterations easier and more precise:

Since this created a lot of layers of pattern paper, I decided my first step would be to make a tracing of that pattern piece. Also, I wouldn't have to print it out again if I messed up. Here you can see I have made the horizontal slash, and added two inches to the bust:

Trace again, and add a bit of height to the neckline:

I then cut out this version of the tracing, separated it along the princess seam and prepared to add my completely insane FBA by slashing the pattern vertically, repeatedly, and adding width:

Trace again, and here is the difference between the original and the altered pattern:


I then made a muslin and found that due to my extraordinarily square shoulders that I needed to accommodate for that, as well as remove some extra fabric above the bust. Here you can see just how square my shoulders are, much different than the slope of the pattern piece in the next photo:

To do that I pinched out the fabric at the shoulder, towards the neckline, as necessary, which required also lowering the back neckline. You can see the new line is angled to make the shoulder more square:

And then I had to account for that change in the armscye, so retraced that as well, since if you pinch out at the top of the shoulder, you have to drop the curve of the armscye at the bottom, otherwise you will be wearing a straightjacket:

After all these alterations, retracings, fittings and refittings...I needed to take a break before cutting my actual garment.
Since I typically make things as difficult as I possibly can, I chose a fabric that needed to be underlined...which in turn required that the order of assembly be changed. Which is, of course, fine...because I never read Burda instructions anyway.
Next time I'll have the final product ready to share....


2 comments:
That looks pretty genius. Making these alterations are are pretty tricky, I can't wait to see how it works out.
Benefits of drinking coffee and lime juice at the same time. We do not normally add a cup of coffee to our everyday diet but we are adding this once in a while after enjoying some of these great healthy drinks to mix it up. Green tea has some amazing health benefits and you can now add it to your daily routine to get most of its benefits. read more..
Post a Comment