Wednesday, May 21, 2008

Building Skills: Pattern Drafting

Every now and then, Vogue Patterns will have great sales and you can get patterns that are normally in the range of $20.00-$25.00 for $4.99. The last time they had a sale like this, I bought a pattern that I was a bit "iffy" about:

What caught my eye about this pattern was the front of the jacket. I really loved the clean front and the stand-up collar. What I was a little bit less thrilled about was the back of the jacket. You can see from the line drawing below that the back of the jacket is very full and draped, although they don't show a photo of this on the pattern:

As I was making my first version of this jacket, I realized why there is no photo of the back on the pattern envelope. It's because the pattern doesn't look like the line drawing at all. As I was constructing the jacket, I noticed that all that fullness that had been cut into the back all hung out in the armpits. The only way to make the jacket look like the drawing was to add two darts on the shoulders to pull the fullness of the fabric to the center-back:


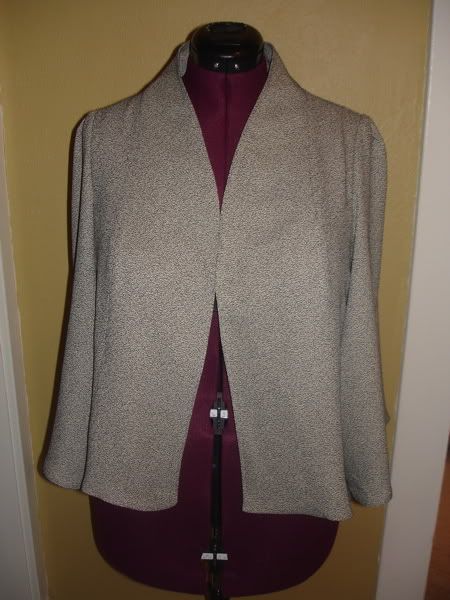
The front, on the other hand, ended up looking very much like the pattern; although the more I look at it the more I suspect that I may have attached my center-front pieces backwards:

Overall, I was not unhappy with the finished product, but it was not the crisp, tailored, clean jacket that I had been wanting. So, I began to consider making my first foray into actually redrafting a pattern. As someone who only recently came back to sewing and still considers themselves a "beginner," I was reluctant to attempt to make my own pattern. However, the more that I thought about it, the more I thought "What do I have to lose? I don't have the outfit I want right now; and if I screw it up, I still won't have the outfit I want. On the other hand, if I succeed, I might just end up with what I wanted!"

So, I started doing some research. The first thing I did was start following the alteration threads on Pattern Review and reading all the reviews I could of self-drafted patterns. Once I felt that I had some ideas about how I would like to start, I embarked on my redrafting project.

The first thing that I did was do a tissue fit on my dress form, just pressing the pattern itself on the form, seeing where the seams would fall. I folded all the fullness out of the back using that as a place to start:


Using the folded pattern, I created a "muslin," or a fitting garment. Muslins are great to do because they are cheap, fast, easy and offer a way to "test" a pattern before you cut into your "good" fabric.

There are two schools of thought on making muslins. One, that you a muslin from actual unbleached muslin; an inexpensive fabric that you can usually pick up for a dollar a yard or less at most fabric stores. You then put together just the body of your garment using a basting stitch that can easily be undone to make quick alterations and so that the muslin can be dismantled and used for the pattern itself. There is no need to add facing, finish seams or hems, or insert sleeves, unless sleeve fit is a concern.

Another school of thought is that you should make your muslin of a fabric of a comparable weight and body to that of your finished garment, and that you should finish your muslin as you would the garment, including facing, interfacing, and hems.

The method that you use will depend on what your purpose in sewing your own garments is. If your goal is to create a couture garment that is perfectly fit to your body, and would have cost you hundreds of dollars to purchase; then by all means, use the second technique.

I, on the other hand, sew at least in part to save money on clothing. Now, if I purchased all my clothing at Old Navy and Target, there would be no savings in spending $50.00 on fabric and materials to make a suit and jacket; or $25.00 on materials for a dress. But, since I adore places like Ann Taylor and Banana Republic I can save a significant amount by sewing for myself. It is because I sew in order to be frugal that I opt for the first method in making muslins, and use actual muslin.

Below, you can see the first version of the muslin that I made with the folded pattern. It's not very pretty. The back is very blocky and unflattering. What it needs is some ease, which can be added in the form of princess seams. If you want to know what princess seams are, go pull a blazer out of your closet. Most women's blazers have curved seams on the back to give them a more feminine shape.


So, I did just that. I got a jacked out of my closet and drew onto the back of my muslin where a princess seam should fall based on the placement of the seams on a jacket that fit me well. Using that line as a guide, I began pinning the seam into the back of the jacket until the fit was the way that I wanted it. Then I took a sharpie and drew along my pin line.


I then cut along the lines I just drew, creating three pieces; the large piece that would become my center-back pattern, the piece that would become my side-back pattern, and the strip of extra fabric that would be discarded. You can see that the pin line did not follow exactly my original line, but was close:


I then used the muslin to create two new pattern pieces for the back by tracing them onto pattern paper. Don't forget to add a 5/8 inch seam allowance on your newly added princess seam! After my second muslin, I also found that I needed to lengthen the "point" of the side-back a bit to get the armscye (sleeve-hole) to look right.


Here is the second muslin, with the princess seams:


Once I got the back to fit, though, it revealed some issues with the front, namely that the bust and sides were pulling slightly:


I repaired this by slashing the side-front, and narrowing the center-front:


I altered the pattern pieces using pieces of tracing paper, or folding out the extra:


This left only the sleeves to deal with. You can see below that the top of the original sleeve had darts that created a small puff, and the sleeve itself was a wide bell. With a closely tailored jacket, there was no need to retain these design elements in the redrafted jacket. They were really easy to get rid of , though. I just folded and taped the darts along the pattern lines and then drew in a new sleeve using a "normal" jacket sleeve as a guide:


I then traced a new pattern , transferring the necessary markings:


From there, I used my newly drafted pattern to cut a new jacket from a black suiting with a floral design woven right into the fabric. I then constructed the jacket using the original pattern instructions, except for the back. In the case of the back, I constructed the back first and then treated it as if it were the single piece back in the pattern instructions.

Here is the finished product:


Here is a close-up of the princess seams:


And here is the front of the finished jacket:


Overall, I am very happy with the finished product, and I have also made a pair of cropped slacks from the same fabric for a summer suit. The pants, fortunately, required no alteration whatsoever. With the cropped pant and 3/4 sleeve of the jacket, I think that this makes a nice summer suit that is appropriate in business-casual settings. The suit can easily be dressed up with nicer shoes and a collared shirt, or dressed down with ballet flats and a tee.

Sunday, May 18, 2008

Building a Fence, Part Two: Tools

I promised two blogs ago that I would tell you how to build a fence, should you be as cheap as I and not wish to hire people to do this for you.

The first thing that you will need to do is gather your tools. The two most important things that you will need is a power drill and circular saw:


You should purchase a cordless drill and saw. But, it is important to make sure that they have the power that you will need to cut through 4x4 treated lumber and your fence panels. Sometimes, cordless tools just do not have the power that you need. So you will want to make sure that you purchase 18 volt tools. It's pretty easy to find that information, since it will be on the battery:


You should also purchase at least two batteries, and a charger. Three batteries and two chargers would be better, but let's not get crazy!

When you purchase your saw, you also want to make sure that it is a 6 inch saw. Often cordless circular saws are smaller, even 4 inch. The reason that you need a 6 inch saw is because you are going to be cutting through 4 inch lumber. 6 inches is the diameter of the blade. Which means, that you can only make a cut 3 inches deep. Actually, slightly less than 3 inches, since the nut that holds the blade into the saw takes some depth away. By the same logic, a blade 4 inches in diameter would make a cut under two inches deep. Once again showing off my mad math skillz, you can circle that post all day, but if you can't cut more than 2 inches deep, you'll never be able to trim the length of your 4x4 posts.

You also want a saw that you can change the angle of the cut on. Now, on a table saw you do this by actually tilting the blade. On a hand-held saw, however, you do this by tilting the plate:


You will also need a rigid tape measure that has locking capability, and is longer than then length of your panels (8 feet). I was lucky in that I was following the line of my old fence, so I simply used the old fence posts as a guide for keeping the new fence straight.


If you are building a completely new fence as opposed to to following the line of an old fence, you will also want to make sure you find your local "Call Before You Dig" company and have them come locate your gas line and also electrical and communication lines if they are buried. If you are building a new fence you will also need to get a permit from your city, and they should have the contact information for your local service providers. You will also need to get a long measuring tape and surveyors flags to lay out your fence line.

You will also need a post hole digger, since there are some places (near the house, for example) where you won't be able to use the gasoline auger. If you look, the post holer is also marked with measurements so you can estimate your depth:


You will also want to have a lopper, so that you can cut tree roots that you come in contact with:


A measuring stick is also handy, to measure the depth of your augured holes. It is also handy to have a t-square to mark off the posts for cutting to length. This is a drywall square, but fits the bill nicely:


You will also need a level. A three-foot level is important. Longer levels are more accurate.


The level can be used both vertically:


And horizontally:


You will also need a shovel and potentially a pick axe, depending on the soil you are working in. You should also have ready access to water, and either a hose long enough to reach the furthest point of your fence line or a five gallon bucket.

You should also determine how you want to get rid of your old fence, whether you want to actually dig out the old posts, or if you want to cut them off and leave the concrete in the ground. If you dig them out, you really will need that pick axe. If you cut them off, you will need a saws-all, or reciprocating saw, as noted in the previous blog.

You will also need to make arrangements to get rid of your old fence and posts, generally the garbage company gets pissy when you put that out on the curb. You can contact your garbage service to see if they offer large pick-ups, or you can search for a service that will take care of it for you. In St. Louis, there is a company called "Anything Goes" that will haul off the materials for a reasonable price. That is who I used.

Stay tuned....someday soon I'll even tell you how to start building the fence....

Saturday, May 17, 2008

A Whole Summer Full of Sewing

I have quite a few projects "in the queue," including a first attempt at sewing a winter coat. This could potentially be my downfall. But, J. really needs a new winter coat and since I NEVER sew anything for him, I decided that I could do this. He was pretty happy to be able to pick out his own pattern:

As well as his own fabric:

He selected a wool coating in black with a very, very subtle basket weave pattern to it. The lining is a silk twill, like what is used to make men's ties. I think it is a nice combination, and the red and black lining is a nice bit of "flair" for the coat. I am participating in a "sew along," so will have some other folks and their experience to draw on. Coats are complex from the standpoint that they consist of a lot of layers (lining, interlining, insulation, etc.) and need a lot of structure (hair cloth/canvas, shoulder pads). Plus, I want to put in some nice professional touches like welt pockets and bound buttonholes.

I also have some projects for myself coming up, including my first attempt at drafting a pattern. I'll tell you a little bit about the history of this pattern alter(c)ation. I found the pattern below and really loved the look of the front of the jacket, clean lines, 3/4 sleeves, standing collar, and really, I was fine with the back, too, even though it was a little bit more "stylish" than things I was used to wearing. I really am a pretty traditional girl.


You can see from the line drawing that the jacket is supposed to have a draped back, while still being fitted in the front:


However, mine didn't turn out so well. You can read my "official" review of it if you like, but suffice it to say, the back did not drape the way that it should, the fullness was all out in the armpits, and the front was not as crisp and fitted as the drawing led you to believe. Now, you could say "Michelle, you did something wrong, Vogue wouldn't draft a faulty pattern" and believe me, those were definitely my first thoughts! But I have been sewing long enough that I do believe that I understand the basics of garment construction and that pattern is just has problems. I did not screw that up all on my own. Which is not to say I won't wear it anyway! I just had to do some monkeying around to get it to look like the pattern drawing, including adding darts to the back:


Here is the finished front:


It is important to say that I don't dislike the finished product, in fact, I like it well enough that I am making a sheath dress with the leftover suiting to go under it. It is also a nice, lightweight and airy jacket that will be nice for summer days when I have to dress for work.

What is especially interesting is that for all the problems with the jacket pattern, the pants went together brilliantly. I didn't even have to alter them, they fit my hips and waist with no changes. Which NEVER happens. I have what I suppose you could call an hourglass figure (or perhaps it is more of an hour and a half these days), but even though I am a bit fluffy, I still have a defined waist. This makes for some problems getting pants that fit, because if I buy them to fit my hips, I have a ton of extra fabric flopping around on the back of the waist. Hence why I make my own pants. I can alter the pattern to avoid that. But, as I said, this pattern didn't even need any alteration:


I made the pants from a poly/cotton suiting that has a floral pattern woven right into the fabric:


But, I did really want a more structured jacket for work, and thought that it would make a good partner for these pants. I also still liked the front of the original Vogue jacket, so decided that I would try my hand at altering it to make the back flat, and add some interfacing to make the front look more like the photo.

I started by taking the original pattern and doing a tissue fit on my dress form, essentially folding out all the fullness:


After cutting that from some muslin and putting together the body of the jacket for fitting, I found that while this did serve to take out the fullness, it resulted in a blocky, square jacket:


So, I thought princess seams would do the trick. I found a RTW jacket from Ann Taylor that I had that had seams like the ones I wanted, so using that as a guide, I drew on my seam placement:


Using that lines as a guide, I started pinning away until the fit in the back was the way I wanted it. It didn't exactly follow that line, but it was pretty darn close. I drew on my seamlines, and then dismantled the jacket, using the newly drawn on seam lines to create three new pattern pieces for the back. Don't forget to add your seam allowance on your princess seam! This is what I ended up with when I put the jacket back together:


I now have the jacket cut from the black suiting, and if it weren't for the fact that I had to work until 10 last night, and have to give a presentation at 3 today, I could have had a jacket for work on Monday. But that is OK, I'll just have one for Tuesday instead.

I am also considering sewing my own wedding dress, but will seek professional counselling prior to purchasing any fabric. However, I think this style would be brilliant!


Not to mention, I still owe a friend some drapes....at least I have them cut out....

Saturday, May 3, 2008

Good Fences, Good Neigbors

I am a firm believer in the "Good fences make good neighbors" tenet, as well as it's sub-precept "If I have a really big fence with a lock on it, maybe my neighbors won't be able to steal my stuff."

Some of you may be familiar with my run-ins with my neighbors; you can find a taste of the crazy here, here, and here if you should be so inclined.

Needless to say, I recognized very soon after moving in that the 3-foot tall chain link fence was just NOT going to cut it and what I needed was an 8-foot tall poured concrete barrier, preferably with pieces of broken glass set into the top of it. But since the city would not grant a the permit request for the concrete wall, 10-foot deep moat, or tower from which I could pour boiling oil on intruders, I settled for a 6-foot wooden stockade fence instead. See, even Spaz likes it:
A giant wooden fence is an awesome thing to have, but it is also RIDICULOUSLY EXPENSIVE to have someone come in and install it. I have a HUGE back yard and to have a landscaping company come and install a fence would have cost me nearly $10,000.00. Now, it's not that it is not worth it. If I had ten grand laying around, I would consider spending it on some undocumented laborers.

But, I don't have that kind of money stuffed into the mattress. Beyond that, whenever considering a huge renovation or improvement project, it is always important to consider what you are willing to put into your house and potentially not get back.

Consider this...

I purchased a home in a "potentially reviving" neighborhood. In other words, it's not revived yet. And there is no guarantee that it will.

I paid $107,00.00 for a 2200 square foot, 3 bedroom home that needed A LOT of work. Recent appraisals put it's value at $175,000.00. That leaves me about $70,000.00 of repair and improvements that I could potentially make my money back on. But do you just break even? I don't know about you, but the word "profit" is mighty appealing.

If you want to eventually sell and come out ahead ahead, you need to keep a gap between that "how much I COULD spend" and "how much I have spent."

I also took into consideration how much I did spend to purchase the house. At a cost of $10,000.00 to fence my yard, I was looking at potentially spending 10% of the purchase price on my house on fencing the yard. And I just could not justify that kind of expenditure.

So, I began to research just what it would cost if I did it myself. What I found was I could do it myself for about 1/3 of that cost, if I was willing to find my own labor. Fortunately, my younger brother still does what I tell him to, and my brother and I were able to install, over the course of 3 spring weekends, a fairly professional looking stockade fence.

In this blog I will break down what you need to do it and what the potential costs are. In future blogs, I will outline just how my brother and I did it.

The materials you will need are:

Pre-made fence panels. I used 8x6 ash "dog ear" panels.
Treated 4x4 posts. I also used posts with carved decorative tops for the gate posts.
Quickrete, a type of fast-setting concrete that you can use dry to anchor the posts. You will need about 2/3 a bag for each post.
Hinges and latches for your gates. I Installed two gates, one in front and one in back.
Deck screws, three-inch long screws to anchor the fence panels to the posts.

Total cost: $2400.00

You will also need a variety of tools, many of which can be rented:

The tools I purchased or already had were:
Manual post hole digger (bought)
3ft long level (already had)
measuring tape (already had)
Reciprocating saw (also called a "Saws-All") (bought)
Cordless drill, for driving in screws (bought)
Cordless circular saw (bought)
Electric chainsaw (already had)
A lopper (already had)
Gasoline powered auger (rented)
Wooden sawhorses (borrowed from Dad)

The gasoline auger is what made the entire process possible. This made it possible to dig the post-holes in 15 minutes each as opposed to an hour each.


The total cost of the rental was $50.00 each weekend, for a total of three weekends. I purchased the reciprocating saw, cordless drill, and circular saw as a set for $300.00 and have certainly used them often since then, so it was a smart purchase. The chainsaw and lopper were used to cut roots that the auger did not cut through. The measuring tape was to ensure that the holes were each two feet deep and 8 feet apart. The level was used to ensure that the posts were being planted straight and the panels level. It is important to get a 3 foot or longer level, since the shorter levels are not as accurate and are really only for things like hanging pictures. I also paid my brother $500.00 for helping me.

The final price tag: $3500.00.

Now, I was a liberal arts major and didn't take math in college, but I am fairly positive that $3500.00 < $10,000.00 and pretty close to 1/3 of $10,000. In fact, if my calculator is to be trusted, it is 35% of the original estimate.

If you are willing to get really dirty, really tired, really achy shoulders, are mechanically inclined enough to start a lawnmower, and don't squeal and act like a ninny when presented with power tools, you can put up a fence. Stay tuned, and I'll tell you exactly how in the next few blogs....

Tuesday, April 29, 2008

Buy Used

After my posts about sewing, some folks emailed me and said "Michelle, I would love to learn to sew, but I just can't afford to buy a sewing machine."


Well, I have two words: Buy Used.


There are tons of machines out there, and if you are careful, you can get a machine that will work well for you, last forever, and if you are brave, can service yourself. I'm working my way up to that level of bravery. I don't want to break my new baby! But I want to prove that you don't have to spend tons of money to get a great quality machine, so I put my money where my mouth is and picked up a used Singer. I will keep you posted as to whether I have to tuck my tail between my legs and take it in to be serviced.


My recommendation is that if you want to get into sewing, but don't have a lot of money to spend, buy a machine made in the mid-60's or earlier. Why? Becuase you can probably get a machine that has all-metal parts. That means that unless someone left it outside in the yard as a garden ornament, with a little oil and some cleaning, it will work just fine.


Before I was born, my grandmother bought a Singer Touch and Sew. It was a 700 series, a fine machine. Every year she would clean and oil it, and that machine chugged along until I was in graduate school. Right now it is waiting for service because there are some problems with the tension, but I am sure that it can be fixed. Why? Because Singer made a quality machine. When my grandparents bought that machine, they paid $700.00 for it. Do you know how MUCH $700.00 was back then? That machine was meant to last forever. The quality of that machine is far and away better than the quality of the machines that you can purchase today. Even the machines that cost you $1000.00 today can't match the sheer durability of those vintage machines.


Being a bit nostalgic for that old machine, I started paying attention to some of the threads about vintage machines on a sewing message board that I belong to. I also started doing some research and found that there are a ton of great machines to be had out there. Namely, Singers from the 1950's and 1960's, especially Singer Slant-O-Matics. So I started searching, and this is what I found.


On Craig's List, I found a 1963 Singer Slant-O-Matic for $85.00. But it wasn't JUST the machine. I also got the original manual, two boxes of top-hat cams (which is how those old machines make all the fancy stitches that are programmed into the new computerized machines. Yes, they do everything the new machines do, just in a different way), and a box of feet, bobbins, and attachments. I also got a wooden desk that the machine folds into, cleverly disguising it as a lovely piece of furniture when not in use producing clothing and curtains.

I was also able to convince J. that this purchase was NECESSARY, because look at what an identical machine just sold for on Ebay....$377.00!! I didn't spend money, I just MADE us money!

The Ebay machine didn't come with a desk, AND you had to pay shipping, so there.

So, if you want to learn to sew, but don't want to spend a lot of money on a machine, keep your eyes on your local thrift shops, garage sales, and Craig's List. If you can find a Singer 401 or 403; 500 or 503 (the Rocketeer, very cool, very retro); or the 603, grab it. You won't be disappointed. They were considered top of the line when new, and vintage buffs will tell you that these machines will run for 100 years with a little TLC.