And once again I have become the worst blogger in the entire world.
I have to apologize, it isn't that I haven't been working on anything, but that I just have not been in the mood to photograph everything, put it on, and take more photographs.
We also had some upheaval here in we finally had to say goodbye to my 17-year-old dog, Spaz. After bouts with bladder and kidney stones, incontinence, arthritis, dementia, seizures, and finally a brain tumor, we made the decision that the time had come to say goodbye. It was one of the hardest things I have ever had to do, although I knew it was the right decision for him, it was very had for me to wrap my head around the fact that I had made the decision that he should die. And then scheduled it with the vet. I still have no way to explain how awful that was. He was a great dog, and will be greatly missed.
But, going through that process found me looking for things to do to keep my mind busy, and one of the things I did was make a complete mess of making some hats. In the March, 2013 issue of BurdaStyle, they had a pattern for a newsboy's cap:
I veerrry carefully measured my head, traced off the pattern, and ended up with a hat that was HUGE...seriously, I should have made the kid size for my tiny noggin. How did I mess it up so badly??? Fortunately, my husband has a huge head, so he got a new hat:
The one thing that I didn't really like about the Burda pattern was that there was no snap in it to keep the front of the hat down on the brim, so I added one:
Had I noticed the lack BEFORE I sewed the brim in, I would have added the snap so that it didn't show on the bottom of the brim. Not that Jeremy cares, he didn't want a hat, anyway! He just got it because I messed up the measurements.
Not to be deterred, I decided instead that I would copy a hat that I already had. I made a pattern by putting a piece of newsprint over a piece of foam core, then laid the piece I wanted to copy over the top. Stick pins through the seams of the piece you are copying, into the foam core, then when you pull them out you just "connect the dots" and you have a pattern. Add seam allowances, and there you go. The red hat is the one I purchased, and the green and black hat is the copy I made with my pattern knock off:
Then I thought about it and decided...you know, I never wear green and black. Plus, like the newsboy's cap, it was too big, ner! But I wear a lot of grey. So, I made a grey one instead:
Fortunately, that one fit!
In other sewing news, I am also on a quest for a simple, woven shirt. No collars, no buttons, just a simple t-shirt, but woven and not knit. I have been through about 6 versions so far....and they all suck. But all for different reasons. Soon, I'll have a big post about side seams, armscyes, dropped shoulders, and fabric choices...and all the reasons that woven tees can go wrong. Hopefully, I'll even have a reason that they go RIGHT from time to time. But, that is still a few versions away....
In the meantime...happy sewing!
There are two words that can be used to describe me...cheap and picky. That means I often find myself getting in over my head with projects like curtains for all 32 windows in my house. Or deciding that I can build a fence, because they wouldn't rent large equipment if it didn't mean anyone could use it, right? Right?
Tuesday, April 23, 2013
Sunday, March 24, 2013
A Simple Shirt
Today I decided that I just wanted to make something fast and easy...so I set aside the button-down shirt that I was working on and decided to make a pullover instead.
Kwik Sew 3635 had been sitting in my "to do" box for, oh, 2 years or so, so I finally decided to make it up.
The shirt has two options, a long sleeved tunic, or a short sleeved top with a band on the bottom. I decided to change it up a bit and do the shorter top with long sleeves. I also added a band to the sleeves, to match the band at the waist.
I made the top from a super-soft slub knit rayon...really almost a light sweater knit. I purchased a raft of it when it was on sale at Fabric.com, so you may well see a few more items made from the same fabric.
Some nice details include a binding on the back neckline, a substantial facing at the front edge, and a deep overlap so as to not be too revealing. As with most Kwik Sew patterns, the fit runs large, but the drafting and instructions are superb. Kwik Sew are never at the cutting edge of fashion, but are a great source for well-drafted classics and wardrobe basics. Much like the black fabric, this pattern will likely make a reappearance.
I only found a single issue with the pattern and that was that there is no notch on the sleeve to indicate which is the front and which is the back. There is a notch on the pattern piece...but it is to match with the shoulder seam. So, I thought, maybe the sleeves are interchangeable. I folded the sleeve pattern in half to see if they were symmetrical and...they were not. I checked a couple of other patterns to see what the differences were between the front of the sleeve cap and the back and found that the front is the "curvier" line, if that makes sense. The back tends to have a less deep arc in it where it transitions from the sleeve cap to the under-arm. Using this, I decided which sleeve was right and which was left. I suppose I guessed right, because it fits perfectly.
Kwik Sew 3635 had been sitting in my "to do" box for, oh, 2 years or so, so I finally decided to make it up.
The shirt has two options, a long sleeved tunic, or a short sleeved top with a band on the bottom. I decided to change it up a bit and do the shorter top with long sleeves. I also added a band to the sleeves, to match the band at the waist.
I made the top from a super-soft slub knit rayon...really almost a light sweater knit. I purchased a raft of it when it was on sale at Fabric.com, so you may well see a few more items made from the same fabric.
Some nice details include a binding on the back neckline, a substantial facing at the front edge, and a deep overlap so as to not be too revealing. As with most Kwik Sew patterns, the fit runs large, but the drafting and instructions are superb. Kwik Sew are never at the cutting edge of fashion, but are a great source for well-drafted classics and wardrobe basics. Much like the black fabric, this pattern will likely make a reappearance.
I only found a single issue with the pattern and that was that there is no notch on the sleeve to indicate which is the front and which is the back. There is a notch on the pattern piece...but it is to match with the shoulder seam. So, I thought, maybe the sleeves are interchangeable. I folded the sleeve pattern in half to see if they were symmetrical and...they were not. I checked a couple of other patterns to see what the differences were between the front of the sleeve cap and the back and found that the front is the "curvier" line, if that makes sense. The back tends to have a less deep arc in it where it transitions from the sleeve cap to the under-arm. Using this, I decided which sleeve was right and which was left. I suppose I guessed right, because it fits perfectly.
Saturday, February 16, 2013
New Sewing Room Furniture
Thank you, everyone, for the warm welcome back!
Like I mentioned in the previous post, one of the reasons that I hadn't been sewing anything was because the room was such a disaster. I had eleven, ELEVEN, sewing machines in there because I simply cannot control myself when it comes to old machines. The room also had to function as a guest room, so on top of all that, there was a queen sized bed in there, fabric in big plastic tubs, a folding table for cutting, it was all just too much to deal with, so...I didn't go in there for a while.
Over the Christmas holiday, my husband started helping me make some changes. I edited my sewing machines, as painful as that was and he helped by going to visit his brother in Chicago...who just happens to live on the same exit as Ikea. The two of them took my list and got me (almost) exactly what I wanted. I say almost, because they are boys...of course there was something that was almost, but not quite, what I had asked for. But I love them anyway.
The first thing that I did was I traded my brother the queen size bed for a twin size mattress set that he had. I got a daybed frame that was totally flat across the top, and then added a table top. Well, not really a table...it is a 3/4 inch thick piece of plywood that I wrapped with dense batting and canvas. So it is both a working surface and an ironing board. Since it is taller than the old table that I used, it doesn't make my back hurt to cut patterns anymore.
Here is the new bed:
If I have guests, I can take the table top off and stick it in the basement. The bed is an Ikea Hemnes Daybed, which was very reasonable in price but a complete bastard to put together:
As painful as it was, I now have just two other remaining machines, my 401 and 503:
I hate to admit that there are still tubs of fabric tucked into the corner behind the bed, but...they are all things that my niece and nephews use for their "crafting needs" (which in my littlest nephews case just means making the iron steam and cutting fabric into smaller and smaller pieces) when they visit.
All in all, the reorganization of the sewing room was not at all expensive...far under $1000.00, even if you include the gas to Chicago (why, oh why, is there no Ikea in St. Louis?). But, turning it into a pleasant place to work rather than a room that just raised my blood pressure means that my urge to create something has returned.
Hopefully, I will have more projects to show you soon...especially since I am now obsessed with Lekala patterns and have downloaded 4 more.
Happy Sewing, All!
Like I mentioned in the previous post, one of the reasons that I hadn't been sewing anything was because the room was such a disaster. I had eleven, ELEVEN, sewing machines in there because I simply cannot control myself when it comes to old machines. The room also had to function as a guest room, so on top of all that, there was a queen sized bed in there, fabric in big plastic tubs, a folding table for cutting, it was all just too much to deal with, so...I didn't go in there for a while.
Over the Christmas holiday, my husband started helping me make some changes. I edited my sewing machines, as painful as that was and he helped by going to visit his brother in Chicago...who just happens to live on the same exit as Ikea. The two of them took my list and got me (almost) exactly what I wanted. I say almost, because they are boys...of course there was something that was almost, but not quite, what I had asked for. But I love them anyway.
The first thing that I did was I traded my brother the queen size bed for a twin size mattress set that he had. I got a daybed frame that was totally flat across the top, and then added a table top. Well, not really a table...it is a 3/4 inch thick piece of plywood that I wrapped with dense batting and canvas. So it is both a working surface and an ironing board. Since it is taller than the old table that I used, it doesn't make my back hurt to cut patterns anymore.
Here is the new bed:
The second thing that we added was an Ikea Expedit shelving unit that would allow me to keep my fabric in a place where I could SEE it, and not stuffed away in plastic tubs:
Here you can see that yes, there are still some tubs with things that need to be organized (or finished) but for the most part my shelves are complete. The desk attaches directly to the shelves, and gives me space for two machines, my serger and my 301 which I usually keep set up for buttonholes:
As painful as it was, I now have just two other remaining machines, my 401 and 503:
I hate to admit that there are still tubs of fabric tucked into the corner behind the bed, but...they are all things that my niece and nephews use for their "crafting needs" (which in my littlest nephews case just means making the iron steam and cutting fabric into smaller and smaller pieces) when they visit.
All in all, the reorganization of the sewing room was not at all expensive...far under $1000.00, even if you include the gas to Chicago (why, oh why, is there no Ikea in St. Louis?). But, turning it into a pleasant place to work rather than a room that just raised my blood pressure means that my urge to create something has returned.
Hopefully, I will have more projects to show you soon...especially since I am now obsessed with Lekala patterns and have downloaded 4 more.
Happy Sewing, All!
Sunday, February 10, 2013
Renewed Adventures...Including My First Attempt at Deciphering a Russian Pattern
So it's been over half a year since I posted anything here, I am ashamed to say that the reason is that for most of that time, I had not done ANYTHING of interest in the sewing room.
But, over the Christmas holiday something happened that made a huge difference...I finally got new furniture in my sewing room. I'll do a separate blog post on that, but thank goodness my brother-in-law lives about a mile from Ikea. Visits to him have resulted in all new furniture, organization, and less of a feeling of "ohmygod, what a horrible mess" every time I walk into the room.
With a freshly organized workspace, with lots of working surfaces, I seem to have found my creativity again. I also have been doing more with independent patterns. For years, all I sewed was "Big 4," but since more and more independent companies are out there, and Burda is available for download, even though I let my subscription lapse...I've been trying other new things.
The first thing I made in the new sewing room was a Burda from 11/2010, a wrap blouse:
The first version I made from a bamboo knit. I had never sewn with bamboo before, and it has a great hand, but is it ever infuriating to work with! The final product was better than I possibly could have predicted:
The only issue that I encountered was that it was a bit smaller across the hips than I would have liked, but I'm not even willing to say that it is a fit issue, as it may just be more personal preference in regards to amount of ease. In fact, I liked it so much I made another version today. I had a yard and a half of a wonderfully soft rayon knit that I purchased in Texas many years ago and could never find anything I really wanted to use it for.
The only problem was, I didn't have enough. So I had to convert it to short sleeves so that I could use the fabric that I wanted. I used a sleeve from a tshirt that I had made before and just drew the contours of the sleeve right onto the sleeve pattern piece, so the sleeve cap would remain unaltered:
And in a snap I had a short sleeve, and a 3/4 sleeve traced off. Here is the second version, with short sleeves:
I made one other change in the construction, I moved the gathers for the neckline further down towards the point:
The reason for this was in the original, the placement of the gathers made a couple of small wrinkles that extended from the neckline to the armpit. Maybe I'm just being overly critical, but I disliked the same thing about my Hot Patterns Weekender Sunshine Top, I suspect that the combination of those gathers and a full bust means that those wrinkles will just happen if not placed PRECISELY right.
And since it's the dead of winter and too cold to wear short sleeves, I made a cardigan from Simplicity 2603, that I think everyone and their mother has made at some point:
It seems more difficult than it looks because I don't actually hem them...I just cut it really carefully so the edges are PERFECT. The first one I made I hemmed, and it did NOT drape the way I wanted it to, and I believe the thickness of the hem was to blame. I noticed that RTW versions were made without hems, so I gave that a shot and...much better.
All in all, a productive weekend...and I will DEFINITELY be making more Lekala patterns. I am thrilled with how this first one turned out.
PS...all of these were made with fabrics and supplies from the stash. It sure didn't make much of a dent in it, but I'm trying to NOT buy new fabric for a while!
But, over the Christmas holiday something happened that made a huge difference...I finally got new furniture in my sewing room. I'll do a separate blog post on that, but thank goodness my brother-in-law lives about a mile from Ikea. Visits to him have resulted in all new furniture, organization, and less of a feeling of "ohmygod, what a horrible mess" every time I walk into the room.
With a freshly organized workspace, with lots of working surfaces, I seem to have found my creativity again. I also have been doing more with independent patterns. For years, all I sewed was "Big 4," but since more and more independent companies are out there, and Burda is available for download, even though I let my subscription lapse...I've been trying other new things.
The first thing I made in the new sewing room was a Burda from 11/2010, a wrap blouse:
Nothing really to say about this one...how many times can one say that Burda has good fit, interesting styles, and crappy instructions? Ditto for this. I made it with a georgette that I had in my stash...that waist tie takes a ton of fabric, so you need nearly 3 yards of 60-inch wide fabric.
A much more interesting endeavor was the purchase of my first Lekala pattern. Lekala is a very interesting pattern company from Russia...the styles are alternatively fashion-forward and a bit risqué (lots of bare midriffs). I decided to give it a try and the best advice that I can give is to read Melissa's post at "Fehr Trade," on how to purchase Lekala patterns. The process is a bit confusing because the english on the site is not fantastic...and there are a lot of steps to purchase:
- you have to purchase a code for downloading patterns from an external site
- you have to return to Lekala to activate the code
- after you activate you can order patterns
I can say that it is well worth it mainly because even after the conversion from euros to dollars, the downloads cost in the neighborhood of $1.00, AND you purchase them according to your own measurements, so the patterns need little, if any, alteration. Sure, you have to tape the pattern together but...a dollar. It cost a dollar.
I started with Lekala 4100, a knit shirt with an interesting collar:
After jumping through the hoops to purchase and activate the code, I received an email with the pattern pdf...and a little something extra. You get what the computer has decided you look like based on the measurements you entered. And all I have to say is "holycraponacracker, tell me I don't look like that!"
Aaaanyway...the pattern was pretty simple to assemble...21 sheets. Not ridiculous like some Burdas I feel like I have spent days taping together.
Much like Burda, the instructions are not going to be helpful if you don't already have a pretty solid understanding of clothing construction. Google translate is only minimally helpful: link to instructions.
As for the construction, the front collar gave me a bit of trouble and I ended up scrapping and recutting it once on the first shirt...and changing it on the second. Here is the collar:
It looks like it has an overlap, but the way the pieces are constructed, they butt up against one another:
In the second version that I made, I ditched the piece on the right, and just cut 4 pieces of the one on the left, and created the overlap that it appears to have in the line drawing:
The shirt also has sleeves gathered into a small cuff:
The first version I made from a bamboo knit. I had never sewn with bamboo before, and it has a great hand, but is it ever infuriating to work with! The final product was better than I possibly could have predicted:
The only issue that I encountered was that it was a bit smaller across the hips than I would have liked, but I'm not even willing to say that it is a fit issue, as it may just be more personal preference in regards to amount of ease. In fact, I liked it so much I made another version today. I had a yard and a half of a wonderfully soft rayon knit that I purchased in Texas many years ago and could never find anything I really wanted to use it for.
The only problem was, I didn't have enough. So I had to convert it to short sleeves so that I could use the fabric that I wanted. I used a sleeve from a tshirt that I had made before and just drew the contours of the sleeve right onto the sleeve pattern piece, so the sleeve cap would remain unaltered:
And in a snap I had a short sleeve, and a 3/4 sleeve traced off. Here is the second version, with short sleeves:
I made one other change in the construction, I moved the gathers for the neckline further down towards the point:
The reason for this was in the original, the placement of the gathers made a couple of small wrinkles that extended from the neckline to the armpit. Maybe I'm just being overly critical, but I disliked the same thing about my Hot Patterns Weekender Sunshine Top, I suspect that the combination of those gathers and a full bust means that those wrinkles will just happen if not placed PRECISELY right.
And since it's the dead of winter and too cold to wear short sleeves, I made a cardigan from Simplicity 2603, that I think everyone and their mother has made at some point:
It seems more difficult than it looks because I don't actually hem them...I just cut it really carefully so the edges are PERFECT. The first one I made I hemmed, and it did NOT drape the way I wanted it to, and I believe the thickness of the hem was to blame. I noticed that RTW versions were made without hems, so I gave that a shot and...much better.
All in all, a productive weekend...and I will DEFINITELY be making more Lekala patterns. I am thrilled with how this first one turned out.
PS...all of these were made with fabrics and supplies from the stash. It sure didn't make much of a dent in it, but I'm trying to NOT buy new fabric for a while!
Sunday, June 10, 2012
Finally Finished....
I finally finished the Liberty shirt, made from the fabric that I was scared to death to cut into. I finally sucked it up and cut it, and then of course let it sit for a while before I sewed it, still afraid to mess it up.
Here is the final product:
The greatest challenge with this was matching the pattern, since there is a clear horizontal motif. I'm pretty happy with the way it turned out on the front, I agonized over how to place the front placket on the fabric so that the "right" part of the pattern would be showing:
The matching between the front and back was not great though. I haven't done pattern matching in such a long time, I totally did not take into account the horizontal bust dart. With the dart, it means that the front pattern PIECE is going to be longer than the back pattern piece...so the hem will fall in a different place on the fabric/print. Had I been thinking, I would have lined up the hems of the pattern pieces and matched the pattern there. But, I wasn't and matched the underarm instead. So, my front and back patterns match PERFECTLY for all of three inches. Then the bust dart throws it all off. You can see that the hem in back is in the middle of a different motif than the front:
But, I really don't think anyone will notice. I did get the sleeves matched and set properly so they are mirror images of one another.
While I was in the middle of delaying working on this shirt, I got a "wild hair," as my grandmother would say and decided that I wanted to create a set of interchangeable shirt pattern pieces that I could put together in different ways to make whatever I wanted to. Different collars, different sleeves, yoke, no yoke, loose fit, tailored fit, but all pieces that could be used with one another.
Because I had that really well-fitting shirt pattern from Burda, I decided to use that as a base. That shirt, if you recall, was a classic button down, with a fairly close fit, which used vertical darts for shaping. I had already made pieces for it that would allow it to be converted to a western shirt, but I also wanted a more feminine version with gathers and a yoke, also a yoked shirt with a back pleat for a dress shirt....different sleeves, regular cuffs, french cuffs, you get the idea....so I could just pick pieces of the pattern and have whatever I wanted and to be able to know that it would fit together.
Since I already had the Burda shirt traced and kew it would fit, I used it as a base. Using some other shirts as an example, I started by drawing a yoke for it. Then I slit the vertical darts and closed them, creating a wider pattern at the top where it could be gathered into the yoke. That didn't give quite enough room for gathers, so I put another slit in the pattern and added tissue there, too:
I then used this to trace off my final pattern. I used a tie collar from another pattern, increased the height of the sleeves so I could gather that as well, and this is what I got:
And from the back:
I used a drapey poly georgette that had been in my stash ever since I bought waaaaay to much of it on clearance at Fabric.com. It was cheap enough that it would have been perfectly reasonable to just use it for muslins, but I think the print goes well with this pattern.
Now, I need to figure out how I'm going to do the rest of this interchangeable nonsense....princess seams, long sleeve, short sleeve, raglan sleeve, french cuffs.....wish me luck!
Here is the final product:
The greatest challenge with this was matching the pattern, since there is a clear horizontal motif. I'm pretty happy with the way it turned out on the front, I agonized over how to place the front placket on the fabric so that the "right" part of the pattern would be showing:
The matching between the front and back was not great though. I haven't done pattern matching in such a long time, I totally did not take into account the horizontal bust dart. With the dart, it means that the front pattern PIECE is going to be longer than the back pattern piece...so the hem will fall in a different place on the fabric/print. Had I been thinking, I would have lined up the hems of the pattern pieces and matched the pattern there. But, I wasn't and matched the underarm instead. So, my front and back patterns match PERFECTLY for all of three inches. Then the bust dart throws it all off. You can see that the hem in back is in the middle of a different motif than the front:
But, I really don't think anyone will notice. I did get the sleeves matched and set properly so they are mirror images of one another.
While I was in the middle of delaying working on this shirt, I got a "wild hair," as my grandmother would say and decided that I wanted to create a set of interchangeable shirt pattern pieces that I could put together in different ways to make whatever I wanted to. Different collars, different sleeves, yoke, no yoke, loose fit, tailored fit, but all pieces that could be used with one another.
Because I had that really well-fitting shirt pattern from Burda, I decided to use that as a base. That shirt, if you recall, was a classic button down, with a fairly close fit, which used vertical darts for shaping. I had already made pieces for it that would allow it to be converted to a western shirt, but I also wanted a more feminine version with gathers and a yoke, also a yoked shirt with a back pleat for a dress shirt....different sleeves, regular cuffs, french cuffs, you get the idea....so I could just pick pieces of the pattern and have whatever I wanted and to be able to know that it would fit together.
Since I already had the Burda shirt traced and kew it would fit, I used it as a base. Using some other shirts as an example, I started by drawing a yoke for it. Then I slit the vertical darts and closed them, creating a wider pattern at the top where it could be gathered into the yoke. That didn't give quite enough room for gathers, so I put another slit in the pattern and added tissue there, too:
I then used this to trace off my final pattern. I used a tie collar from another pattern, increased the height of the sleeves so I could gather that as well, and this is what I got:
And from the back:
I used a drapey poly georgette that had been in my stash ever since I bought waaaaay to much of it on clearance at Fabric.com. It was cheap enough that it would have been perfectly reasonable to just use it for muslins, but I think the print goes well with this pattern.
Now, I need to figure out how I'm going to do the rest of this interchangeable nonsense....princess seams, long sleeve, short sleeve, raglan sleeve, french cuffs.....wish me luck!
Wednesday, May 23, 2012
Running in Place
Last week I made progress on some projects, but at the same time it felt very unproductive, hence the title of this blog. I think it was because I was mainly working on tracing patterns, making alterations, and making muslins. I KNOW that that is making progress, but I am so impatient it still feels like I am not doing anything. At least the first muslin that I made was for myself.
I had a length of Liberty that I purchased on Ebay. I needed a pattern that did not take much fabric, because the length of Liberty that I had was only 35 inches wide and 2 yards long. It hadn't been cut that way, it clearly had selvedges on both sides. But, it has been sitting in my stash for about a hundred years because I never wanted to cut into it an ruin it and I finally decided, what the heck good is it doing folded up in here? Cut it, sew it, either have a success or ruin it, because it is doing nothing in the stash.
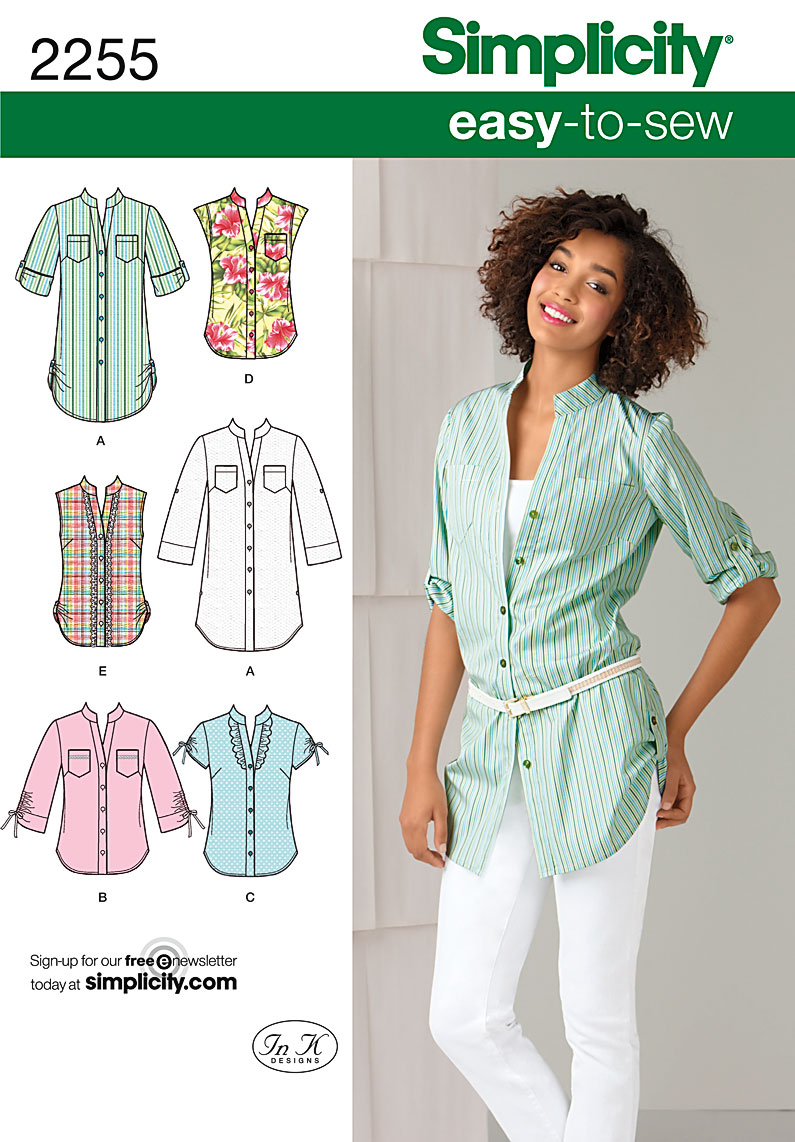
So, I fitted, and traced and muslined...looking for a pattern that would work. I finally found Simplicity 2255:
It only required 1 3/4 yards of 45 inch wide fabric for cap sleeve version, so I hoped that I would be able to squeak it out of my Liberty fabric:
I started by making a muslin using an embroidered sateen that I picked up from a clearance rack at Hancock's. The pattern has front bust darts and back waist darts for shaping:
I'm pretty pleased with the fit, so I made some small alterations and cut into the Liberty....I have a long weekend coming up (friday and monday off for Memorial Day), so hopefully I'll get some work done on it.
In other news, my nephew's interest in sewing continues. He wanted to make a coat, and thought that if we started now it would be ready by fall. So, I had him help me to trace off and muslin a pattern from the August, 2009 BurdaStyle.
It went together surprisingly easily considered I had a 10-year-old's "help" in tracing. I didn't let him off easy, though...here he is pressing the seams:
Of course, you can also see the giant mess in the sewing room and huge piles of laundry being sorted for washing behind him. Hopefully over the holiday weekend I will finally be able to put together the new furniture purchased for the sewing room last year and get the mess cleaned up!
Here is my little monkey in "his" coat. The back fits well, I might add just a touch to the length since he is growing like a weed and also leave all the ease so he can wear it for a while:
On the front, it seems like the overlap is a bit skimpy. It is supposed to be double-breasted, and I feel like if I widen the front, it will make it possible to move the buttons over time and maybe he can wear it for more than one season. Also, for all the length on the back seemed good, the front seems short. I might lengthen it overall. He is already texting me to see if I have cut the wool coating yet....
Sunday, May 6, 2012
A Summer Dress
Last week I finished a summer dress using a border print lawn that, pretty much like everything I have been sewing lately, has been moldering in my stash for a loooong time:
For the most part, I had no issues with the instructions but I COULD NOT figure out the instructions for the placket. So, I just constructed it the same way that I did for the Hot Patterns Superfantastic Shirt, which added a little pleat below the placket:
Because of a shortage of fabric, I cut the drawstring from the border. You can also see in this photo the little pleat added due to the construction of the placket...or can you? Really, it completely disappears in the print of the fabric:
I wanted to use it for a casual dress, since I had seen a number of gathered waist or drawstring dresses in RTW recently. Here is one from ModCloth:
One from J. Jill:
One from Old Navy:
So, I decided to use a pattern from stash and try and create a similar dress. I used Butterick 5612, which was very similar to the Old Navy version, right down to the sleeves:
Except...I couldn't use the pattern for the sleeves because when I laid out the pattern on the cross-grain to use the border print....I didn't have enough fabric to make the cuffed sleeves! So, I cut the sleeves shorter and just put some elastic in the hem.
Here are some additional photos of the finished dress:
For the most part, I had no issues with the instructions but I COULD NOT figure out the instructions for the placket. So, I just constructed it the same way that I did for the Hot Patterns Superfantastic Shirt, which added a little pleat below the placket:
Because of a shortage of fabric, I cut the drawstring from the border. You can also see in this photo the little pleat added due to the construction of the placket...or can you? Really, it completely disappears in the print of the fabric:
Here is an image from the hem...I just lined the edge of the pattern up with selvedge and put a 1/2 inch hem in:
Overall, I really liked the pattern and other than my inability to figure out how to install the placket, the only issues that I had were related to using a border print and running short on fabric (changing the sleeves to gathered hems).
I also finished a couple of other projects this week. I made another shirt from the same BurdaStyle pattern used for the two western shirts. This time I left off the yoke, and actually followed the instructions for the hidden buttons...except I can't help myself where adding stuff is concerned and sewed a strip of eyelet down the placket:
I also made an apron for a friend of mine who is a pastry chef. No pattern, just just laid an apron that I had onto the fabric and cut around it.:
She has sent me some embroidered patches that she found on Etsy, so I sewed them onto the pockets:
The apron will be winging it's way to California on Monday. This week I will probably finish...nothing. It is finals week, so I will have a ton of grading to do....so, I'll catch you when I can! Have a great week!
Subscribe to:
Posts (Atom)


