Sunday, May 6, 2012

A Summer Dress

Last week I finished a summer dress using a border print lawn that, pretty much like everything I have been sewing lately, has been moldering in my stash for a loooong time:


I wanted to use it for a casual dress, since I had seen a number of gathered waist or drawstring dresses in RTW recently.  Here is one from ModCloth:


One from J. Jill:


One from Old Navy:


So, I decided to use a pattern from stash and try and create a similar dress.  I used Butterick 5612, which was very similar to the Old Navy version, right down to the sleeves:


Except...I couldn't use the pattern for the sleeves because when I laid out the pattern on the cross-grain to use the border print....I didn't have enough fabric to make the cuffed sleeves!  So, I cut the sleeves shorter and just put some elastic in the hem.

Here are some additional photos of the finished dress:


For the most part, I had no issues with the instructions but I COULD NOT figure out the instructions for the placket.  So, I just constructed it the same way that I did for the Hot Patterns Superfantastic Shirt, which added a little pleat below the placket:


Because of a shortage of fabric, I cut the drawstring from the border.  You can also see in this photo the little pleat added due to the construction of the placket...or can you?  Really, it completely disappears in the print of the fabric:


Here is an image from the hem...I just lined the edge of the pattern up with selvedge and put a 1/2 inch hem in:


Overall, I really liked the pattern and other than my inability to figure out how to install the placket, the only issues that I had were related to using a border print and running short on fabric (changing the sleeves to gathered hems).

I also finished a couple of other projects this week.  I made another shirt from the same BurdaStyle pattern used for the two western shirts.  This time I left off the yoke, and actually followed the instructions for the hidden buttons...except I can't help myself where adding stuff is concerned and sewed a strip of eyelet down the placket:


I also made an apron for a friend of mine who is a pastry chef.  No pattern, just just laid an apron that I had onto the fabric and cut around it.:


She has sent me some embroidered patches that she found on Etsy, so I sewed them onto the pockets:


The apron will be winging it's way to California on Monday.  This week I will probably finish...nothing.  It is finals week, so I will have a ton of grading to do....so, I'll catch you when I can!  Have a great week!

Thursday, April 19, 2012

Two New Work Shirts

This week I finished up two projects that had been hanging out in my "to do" pile for a while, a shirt from the Hot Patterns Deco Vibe Neat and Sweet Blouse pattern and also a pleated T-shirt from a new pattern company, Salme.

First up, the Deco Vibe blouse:


This is one of the Vintage Hot Patterns.  It's been in my pattern stash for so long that I don't even know if I bought it as a "vintage" pattern...or just bought an original version when it came out.  I have been loving the tie neck blouses of late (as evidenced by the vast number of them sewn last year).

For this quick version, I made it using a floral charmeuse.  The fabric did present a couple of challenges...for one, the rolled hem on the sleeve made the hem very stiff...and as a result, it doesn't drape as well as it does in the illustration.


Second, the back is very full.  It is small at the hem, but it seems like there is too much fabric above the waist and it poufs out.  You can see that the shirt could stand to be wider at the hem, so it would not bind up on my hips.  Not that I am going to let that keep me from wearing it...I just tucked it in and went to work.


The pants are a pair from the "2009:  A Pants Odyssey," when I made somewhere in the neighborhood of 35 pairs of pants trying to figure out fit.  This is a pair that I hadn't been able to get into in a while but I kept them anyway.  Given weightless, I can fit back into them but you can see what has happened to the back leg due to the change in body shape.

Second, the Salme blouse:


I used a feather printed poly crepe from a local fabric store.  One of the things I found when I was sewing is that the front pattern piece, after all the pleats are sewn into it, is about an inch and a half shorter than the back piece.  I ended up trimming off the excess, but you can see when the shirt is on that it is just about as short as you would want it to be.  In fact, it's too short to tuck in.  I missed it when I made my muslin because I just folded out the pleats on my pattern piece and made the front flat...the front piece ended up shorter, but I just assumed that it was me not being precise with my folds in the pattern piece.  I make my patterns using soil separator cloth, so it's not like creasing a piece of paper.


Overall, it is a comfortable shirt.  I think in future iterations I will scale down the the neckline and shoulders to a smaller size and raise the armscyes.  You can't lift your arms to shoulder height without lifting the entire shirt, and normally that means that the armscye is too long, or the sleeve cap is too high.  In the meantime I will just not pick up anything above waist level.

I probably won't get anything done this weekend, because I am leaving on a trip for work tomorrow...to lovely Utah.  I keep trying to convince the administration that the campuses that REALLY need training are the ones in London and Vienna...but so far it's been Kansas, Utah, and Arkansas.

Sunday, April 15, 2012

Summer Sewing, Continued

After last week's progress made with pants, I took some time to make some plans for summer sewing and also to start to muslin a couple of patterns.

This weekend I worked on a pattern from a new (to me) pattern line: Salme Patterns.  They have a shop on Etsy, and when you order the pattern, you receive an email with a PDF that can be printed and taped.  The patterns do not include seam allowances, so they are very much like a Burda pattern.  I ordered the pattern for the pleated t-shirt:


On Saturday, I completed a muslin.  I cut a size 16, and made some small alterations after the muslin.  The most significant issue was a fold between the bust and shoulder, and I had to make some alterations at the armscye.  It really needs a bust dart, but the pleats make that very difficult.  If this turns out to be a pattern that I make more of in the future, I may attempt a dart like the horizontal one on the left, and see if I can line it up with the first pleat:


This image is from an article in Threads, Nov 2008, regarding fitting the armhole to fit the bodice.  You can find the full article here:  link.

One of the issues that I had to deal with is that the shirt is very boxy, which is not good for someone like me who is a bit heavier.  If I were tall and thin, it would not be an issue at all.  The side seams are perfectly straight, so I also contoured the waist (tapering in to a size 12) and added a slight amount (1/4 inch at each side seam) to the hips.

If you do the same, when you redraw the waist, to make sure your contouring is matching in the front and back, fold up the pattern so you fold out the pleats and then contour.  The resulting shirt is very clean, very simple, and could be very versatile depending on whether you use a solid or a print.  It is also a way to use some very decadent fabrics without spending an arm and a leg, since it takes only 2 yards of 45 inch wide fabric, and 1 1/4 of 60 inch wide fabric.

After completing the muslin, I purchased a navy poly faille from a local fabric store that was printed with multicolored feathers:


Hopefully I will have an opportunity this week to finish it up.

I have a small set of projects "in the pipeline" to hopefully augment my work wardrobe this summer.  First is a dress from this border print lawn:


I have already cut out Butterick 5612, with the blue border at the hem.  I also have a beige twill and a navy twill for pants, which I desperately need.  I am considering refitting either a basic Burda with a narrow leg, or the ubiquitous Alice and Olivia bootcut pant from Vogue:


Both of the twills came from my local Hancock's, where I also found on a clearance table to $6.00 a yard a very sweet silk chiffon.  I have enough to make a shirt with a tie collar, and two options for patterns...a Butterick with princess seams, or a Hot Patterns with darts and gathers at the shoulders and back yoke.


I also have a lightweight wool in a british khaki that matches a striped shirting that I have had in stash for a while.  I was thinking pants and a men's style shirt with white collar and cuffs, possibly even french cuffs.


There are also a few fabrics floating around in stash that may or may not see the light of day this summer. I have a pile of charmeuses and georgettes that would make lovely dresses....


And a couple of bottom weight fabrics that have been aging in stash for a while, including a blue striped ivory wool, a pinstriped taupe silk/cotton for pants, and a white pique that with lining would make nice pants:


For now, I am not going to make any massive plans, since I have been a bit slow to get back into sewing. I don't want to overwhelm myself with making a plan for a giant capsule.  If I get through the dress, 3 pants, and 2 shirts that I laid out above, I will consider that a successful summer.

Thursday, April 12, 2012

Back to Pants Fitting

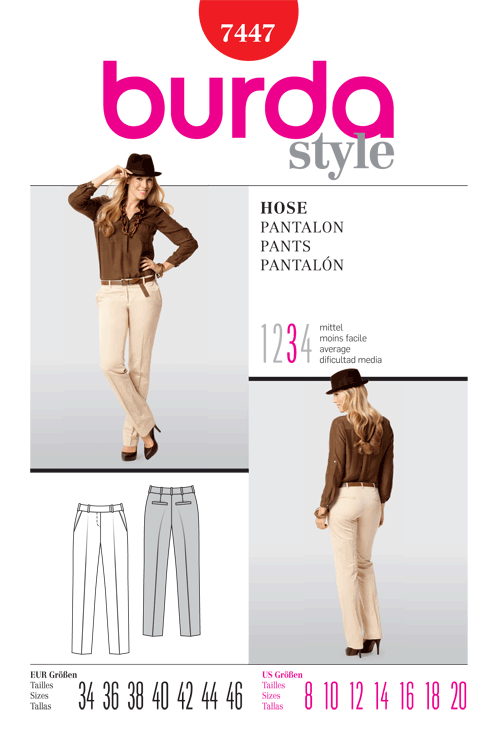
Over the weekend I made a version of Burda 7447, a narrow-leg pant.  I desperately need pants, as everything I have is either too small or too large.  But, I have been very hesitant to sew pants because I find them so difficult to fit.


This is not the first time I have made these pants, but the pair that I had initially made for the PR Endless Combinations Contest no longer fit:


For the original pair I started with a size 20, and added one inch at the side seams on the back pattern piece.  For the current pair, I removed that and used as a base for alteration a size 18.  While I am happy to be down in size, it is frustrating that I am pretty much back to "square 1" in pants fitting.

A few years ago, I dedicated myself to MONTHS of pants fitting.  In the process of figuring out how to fit my body, I made somewhere in the range of 35 pairs of pants.  And then, I gained weight.  After nearly a year of sewing almost nothing for myself, I am now back to sewing again.

I am currently losing weight,  but for the first time also working out, skating, and biking. I am back to a smaller size, but I can't just use those smaller patterns from before because  my body shape has also changed...now in addition to all the other alterations issues, I have to deal with full front thighs as well as a rounder bottom.

After racking my brain trying to decide what alterations and how much to make...I threw my hands in the air and just cut (cheap cotton twill from stash, if I remember correctly it was about $3.00 a yard from a clearance table, so no great loss if they were a disaster).

Surprisingly, they were much better than I expected.

Here is the final product, which gives me a base to determine additional alterations for future pairs:


Granted, the fit is better than anything I have purchased in RTW recently (no back waist gape at all, legs wide enough that I can actually pull them up), but still work to be done.  In the front, there are some wrinkles across the front thigh and radiating out from the crotch that are probably related to my having fuller front thighs.  This can be rectified with an alteration that widens the front pant leg piece.  Here is a link for a diagram at the Sewing Divas Blog: link.  I think I could also stand to extend the front crotch curve just slightly.

Part of the creases across the leg, especially in the back leg, is because of the narrow leg of the pant itself.  You can never get rid of all the creases in a jean, for example, otherwise you wouldn't be able to move.  Take a look at the model on the pattern cover...she has under-butt creases, too.  But what I have going on there can be lessened by better fitting, probably increasing the alterations I have already made.

As for those alterations already made:

  1. I added a wedge to back to raise waistline
  2. Increased size of back waist darts (I would have added these if the pant did not have them already)
  3. Extend back crotch curve
  4. Shift legs closer to center and redraw inseam and side seam ("knock-knee" alteration)
I think that I will also try my alterations on a pant with a wider leg, because I would like to know just how much of what I see in the photo is from the narrow leg (or, I guess I could just photograph myself in a pair of narrow jeans and compare).

I have a length of khaki suiting, and a length of navy suiting that will both make good pants for spring, so hopefully I'll be able to get the alterations figured out before the weather changes again.

Tuesday, March 27, 2012

Why Do I Get Myself Into These Things?

The past few weeks I have been working frantically getting together a shirt that will be featured in a silent auction to benefit the roller derby team that I skate with.  In a fit of insanity, while we were planning our fundraiser, I said "I can make an embroidered western shirt for the silent auction."  Then 20 minutes later I came to my senses and thought "WHAT HAVE I DONE????"

Anyway, I pulled myself together and thought..."I can DO this!"  Here is the final product:


The embroidery is based on classic tattoo flash:


In making this shirt, the first challenge that I had to address was that I had no pattern for a western shirt.  I wasn't enamored of many of the patterns that I had in my stash from the Big 4, so I checked some of my old issues of BurdaStyle, and found in the August, 2009 issue this pattern:


Granted, this looks absolutely NOTHING like a western shirt, but without the pocket and ruffles, it was a good starting point, with a nice shape.  So, I just drew my own pattern for the yokes and then traced the artwork that I wanted to use onto my fabric:


Then I just started stitching:


Three years later, I was finished.  The shirt was cut from a straight size 44, and made from a black stretch sateen.  I used purchased piping in lime green, and the yokes, cuffs, and collar were a fairly stiff quilting cotton.  I chose quilting cotton because I wanted it to stand up to the abuse of the embroidery.  To keep the stitching from coming out, I fused interfacing on the back of the stitches after the embroidery was complete.  I used pearl snaps from Snapsource.com for the closures.

Because I wanted that shirt FOR MYSELF, I couldn't help myself and made a second (non-embroidered) for myself:


For this one, I used pink piping rather than lime.  The skull fabric is a quilting cotton purchased a million years ago, which then languished in the stash since I thought it was adorable, but had no clue what to do with it.  I also got HOT PINK pearl snaps from Snapsource.  Their packages of 10 are exactly enough for a shirt:


This shirt was made from exactly the same pattern as the first except I gave it a touch extra room from the waist to the hips.  When I tried on the first one, the back bound up a bit because it wasn't wide enough to drop down over my hips.  So, about an extra inch in total (so really, just 1/4 inch on each side seam) was plenty.

The auction is this Saturday, and hopefully the embroidered shirt will bring in some good bids.  I'll let you all know how it goes!


Sunday, March 11, 2012

Two Things...

First things first...This week I have been working on a project completely unrelated to any of my planned sewing.  I have been working on an embroidered western shirt that will go into a fund-raising silent auction.  I have until March 31 to finish it, and right now I am about 2/3 of the way finished with the embroidery.  The silent auction is part of a fundraiser for my roller derby team, so given the audience I used vintage tattoo flash to create the embroidery.  Here is the tracing:


I used the more traditional motifs, such as nautical stars, roses, and sparrows.  I have a black stretch sateen for the shirt itself, and some lime green piping to go along the edges of the yoke.  I am using a BurdaStyle pattern for a shirt with both bust and waist darts for shaping, and I have pearl snaps for closures.

The yoke itself is just an overlay that goes over the shoulders, so I just used the shirt pattern to trace off the pieces.  It was simple enough to transfer the pattern to the fabric, I just laid tracing paper underneath my drawing and used a knitting needle to run over all the lines...the pressure then transferred the tracing to the fabric.

Here is a closeup of one of the finished front yokes:


To keep the stitches from coming out with wear, I took a piece of fusible interfacing (Fashion Sewing Supply, of course) and pressed it over the stitches on the back.  It won't show, because that will be in between the layers of fabric on the yoke.  Here are the finished fronts:


The eventual results will be very similar to this shirt I made for my husband:


I did say that I had two things...the second thing is a shout-out for Fashion Fabrics Club.  I know that a lot of people hate their slow shipping but let me tell you how awesome they are.

I recently purchased four lengths of fabric from them, and because their warehouse is about 4 miles from my house, I always just go into their front office and pick up my order rather than have it shipped.  Their slow shipping is because of some unholy alliance between FedEx and USPS...they always have my orders ready to pick up in a couple of days.

Anyway, I have a terrible habit of not entirely READING the fabric descriptions and one of the fabrics that I selected was laminated (how did I miss that?).  So when I got there and saw it I was a bit confused.  The ladies in the front office took a look and one of them said "Oh, you know, we have that exact fabric in a non-laminate.  Let me get one of the warehouse guys to get it down."

Except it was 10 minutes till 5, and the warehouse was already closed and locked up.

So, rather than saying "Sorry. Come back tomorrow" she opened up the warehouse, climbed all the way to the top shelves, pulled down the fabric along with 3 more similar ones just in case I wanted to look at those, brought them to the office and rolled it out and cut it right there on her desk.

Anyway, I know that going TO the warehouse isn't an option for most people, but even if I did have to wait for shipping, I would still be a loyal customer at FFC.  Their prices are better by far than most other vendors, and occasionally you get one that isn't exactly what you expect...but with their prices, I just use it for muslins (and let's face it, normally when I get one I don't expect, it's because I didn't read the description to begin with and made assumptions based on the photo).  But, reopening the warehouse at 10 minutes to five is really above and beyond; not to mention with thousands of fabrics, WHO can actually look at something and say "Oh, yeah...we have another version of that one?"

I'll have a finished western shirt soon...stay tuned, and I hope the rest of the embroidery turns out well...

Saturday, March 3, 2012

Making Tentative Plans

Since I have slowly been getting back into sewing, I have been tentatively making plans for upcoming garments.  By this time last year, I would have had 40 different fabrics laid out, making plans for spring and summer sewing!  But this year, since I am just getting back into the swing of things, my plans are much more tentative.

I also just. can't. pass. up. a fabric sale, and I succumbed to the recent cotton sale at Fashion Fabrics Club and got two pieces of lawn (plus additional for underlining) for summer dresses.  Although this one makes me think of the Portlandia skit "Put a Bird on It," it looks very "Anthropologie" to me and I think it will make a great shirt dress:


Thanks to the super-sale prices, I also got some ivory eyelet, and ivory lawn for underlining:


I am leaning towards using McCalls 4769, a pattern that I have made before:


I've made the shorter version in the past and the shape and fit is very nice.  It's also a classic, so with the right styling you can get a retro vibe without resorting to vintage patterns with the challenges of having to completely change the proportions, working with only a single size in an envelope, etc.

I won't get a chance to do much this weekend because I am leaving for a conference for work on Sunday, and will be in Arkansas through Wednesday.

In other news, our very first exhibition bout will be March 11th for our roller derby league.  I have been working hard to pass my minimum skills tests so that I can play.  The big stumbling block for me right now is speed.  You have to be able to do 25 laps in 5 minutes, and so far my best time has been 5:21.


I'll keep you posted on the progress with the dresses...and the 25 in 5.  Hope everyone is having a great weekend!