Sunday, February 10, 2013

Renewed Adventures...Including My First Attempt at Deciphering a Russian Pattern

So it's been over half a year since I posted anything here, I am ashamed to say that the reason is that for most of that time, I had not done ANYTHING of interest in the sewing room.

But, over the Christmas holiday something happened that made a huge difference...I finally got new furniture in my sewing room.  I'll do a separate blog post on that, but thank goodness my brother-in-law lives about a mile from Ikea.  Visits to him have resulted in all new furniture, organization, and less of a feeling of "ohmygod, what a horrible mess" every time I walk into the room.

With a freshly organized workspace, with lots of working surfaces, I seem to have found my creativity again.  I also have been doing more with independent patterns.  For years, all I sewed was "Big 4," but since more and more independent companies are out there, and Burda is available for download, even though I let my subscription lapse...I've been trying other new things.

The first thing I made in the new sewing room was a Burda from 11/2010, a wrap blouse:


Nothing really to say about this one...how many times can one say that Burda has good fit, interesting styles, and crappy instructions?  Ditto for this.  I made it with a georgette that I had in my stash...that waist tie takes a ton of fabric, so you need nearly 3 yards of 60-inch wide fabric.

A much more interesting endeavor was the purchase of my first Lekala pattern.  Lekala is a very interesting pattern company from Russia...the styles are alternatively fashion-forward and a bit risqué (lots of bare midriffs).  I decided to give it a try and the best advice that I can give is to read Melissa's post at "Fehr Trade," on how to purchase Lekala patterns.  The process is a bit confusing because the english on the site is not fantastic...and there are a lot of steps to purchase:
  1. you have to purchase a code for downloading patterns from an external site
  2. you have to return to Lekala to activate the code
  3. after you activate you can order patterns 
I can say that it is well worth it mainly because even after the conversion from euros to dollars, the downloads cost in the neighborhood of $1.00, AND you purchase them according to your own measurements, so the patterns need little, if any, alteration.  Sure, you have to tape the pattern together but...a dollar.  It cost a dollar.

I started with Lekala 4100, a knit shirt with an interesting collar:
After jumping through the hoops to purchase and activate the code, I received an email with the pattern pdf...and a little something extra.  You get what the computer has decided you look like based on the measurements you entered.  And all I have to say is "holycraponacracker, tell me I don't look like that!"


Aaaanyway...the pattern was pretty simple to assemble...21 sheets.  Not ridiculous like some Burdas I feel like I have spent days taping together.

Much like Burda, the instructions are not going to be helpful if you don't already have a pretty solid understanding of clothing construction.  Google translate is only minimally helpful:  link to instructions.

As for the construction, the front collar gave me a bit of trouble and I ended up scrapping and recutting it once on the first shirt...and changing it on the second.  Here is the collar:


It looks like it has an overlap, but the way the pieces are constructed, they butt up against one another:


In the second version that I made, I ditched the piece on the right, and just cut 4 pieces of the one on the left, and created the overlap that it appears to have in the line drawing:


The shirt also has sleeves gathered into a small cuff:


The first version I made from a bamboo knit.  I had never sewn with bamboo before, and it has a great hand, but is it ever infuriating to work with!  The final product was better than I possibly could have predicted:


The only issue that I encountered was that it was a bit smaller across the hips than I would have liked, but I'm not even willing to say that it is a fit issue, as it may just be more personal preference in regards to amount of ease.  In fact, I liked it so much I made another version today.  I had a yard and a half of a wonderfully soft rayon knit that I purchased in Texas many years ago and could never find anything I really wanted to use it for.


The only problem was, I didn't have enough.  So I had to convert it to short sleeves so that I could use the fabric that I wanted.  I used a sleeve from a tshirt that I had made before and just drew the contours of the sleeve right onto the sleeve pattern piece, so the sleeve cap would remain unaltered:


And in a snap I had a short sleeve, and a 3/4 sleeve traced off.  Here is the second version, with short sleeves:


I made one other change in the construction, I moved the gathers for the neckline further down towards the point:


The reason for this was in the original, the placement of the gathers made a couple of small wrinkles that extended from the neckline to the armpit.  Maybe I'm just being overly critical, but I disliked the same thing about my Hot Patterns Weekender Sunshine Top, I suspect that the combination of those gathers and a full bust means that those wrinkles will just happen if not placed PRECISELY right.

And since it's the dead of winter and too cold to wear short sleeves, I made a cardigan from Simplicity 2603, that I think everyone and their mother has made at some point:


It seems more difficult than it looks because I don't actually hem them...I just cut it really carefully so the edges are PERFECT.  The first one I made I hemmed, and it did NOT drape the way I wanted it to, and I believe the thickness of the hem was to blame.  I noticed that RTW versions were made without hems, so I gave that a shot and...much better.

All in all, a productive weekend...and I will DEFINITELY be making more Lekala patterns.  I am thrilled with how this first one turned out.

PS...all of these were made with fabrics and supplies from the stash.  It sure didn't make much of a dent in it, but I'm trying to NOT buy new fabric for a while!

Sunday, June 10, 2012

Finally Finished....

I finally finished the Liberty shirt, made from the fabric that I was scared to death to cut into.  I finally sucked it up and cut it, and then of course let it sit for a while before I sewed it, still afraid to mess it up.

Here is the final product:


The greatest challenge with this was matching the pattern, since there is a clear horizontal motif.  I'm pretty happy with the way it turned out on the front, I agonized over how to place the front placket on the fabric so that the "right" part of the pattern would be showing:


The matching between the front and back was not great though.  I haven't done pattern matching in such a long time, I totally did not take into account the horizontal bust dart.  With the dart, it means that the front pattern PIECE is going to be longer than the back pattern piece...so the hem will fall in a different place on the fabric/print.  Had I been thinking, I would have lined up the hems of the pattern pieces and matched the pattern there.  But, I wasn't and matched the underarm instead.  So, my front and back patterns match PERFECTLY for all of three inches.  Then the bust dart throws it all off.  You can see that the hem in back is in the middle of a different motif than the front:


But, I really don't think anyone will notice.  I did get the sleeves matched and set properly so they are mirror images of one another.

While I was in the middle of delaying working on this shirt, I got a "wild hair," as my grandmother would say and decided that I wanted to create a set of interchangeable shirt pattern pieces that I could put together in different ways to make whatever I wanted to.  Different collars, different sleeves, yoke, no yoke, loose fit, tailored fit, but all pieces that could be used with one another.

Because I had that really well-fitting shirt pattern from Burda, I decided to use that as a base.  That shirt, if you recall, was a classic button down, with a fairly close fit, which used vertical darts for shaping.  I had already made pieces for it that would allow it to be converted to a western shirt, but I also wanted a more feminine version with gathers and a yoke, also a yoked shirt with a back pleat for a dress shirt....different sleeves, regular cuffs, french cuffs, you get the idea....so I could just pick pieces of the pattern and have whatever I wanted and to be able to know that it would fit together.

Since I already had the Burda shirt traced and kew it would fit, I used it as a base.  Using some other shirts as an example, I started by drawing a yoke for it.  Then I slit the vertical darts and closed them, creating a wider pattern at the top where it could be gathered into the yoke.  That didn't give quite enough room for gathers, so I put another slit in the pattern and added tissue there, too:


I then used this to trace off my final pattern.  I used a tie collar from another pattern, increased the height of the sleeves so I could gather that as well, and this is what I got:


And from the back:


I used a drapey poly georgette that had been in my stash ever since I bought waaaaay to much of it on clearance at Fabric.com.  It was cheap enough that it would have been perfectly reasonable to just use it for muslins, but I think the print goes well with this pattern.

Now, I need to figure out how I'm going to do the rest of this interchangeable nonsense....princess seams, long sleeve, short sleeve, raglan sleeve, french cuffs.....wish me luck!

Wednesday, May 23, 2012

Running in Place


Last week I made progress on some projects, but at the same time it felt very unproductive, hence the title of this blog.  I think it was because I was mainly working on tracing patterns, making alterations, and making muslins.  I KNOW that that is making progress, but I am so impatient it still feels like I am not doing anything.  At least the first muslin that I made was for myself.

I had a length of Liberty that I purchased on Ebay.  I needed a pattern that did not take much fabric, because the length of Liberty that I had was only 35 inches wide and 2 yards long.  It hadn't been cut that way, it clearly had selvedges on both sides.  But, it has been sitting in my stash for about a hundred years because I never wanted to cut into it an ruin it and I finally decided, what the heck good is it doing folded up in here?  Cut it, sew it, either have a success or ruin it, because it is doing nothing in the stash.


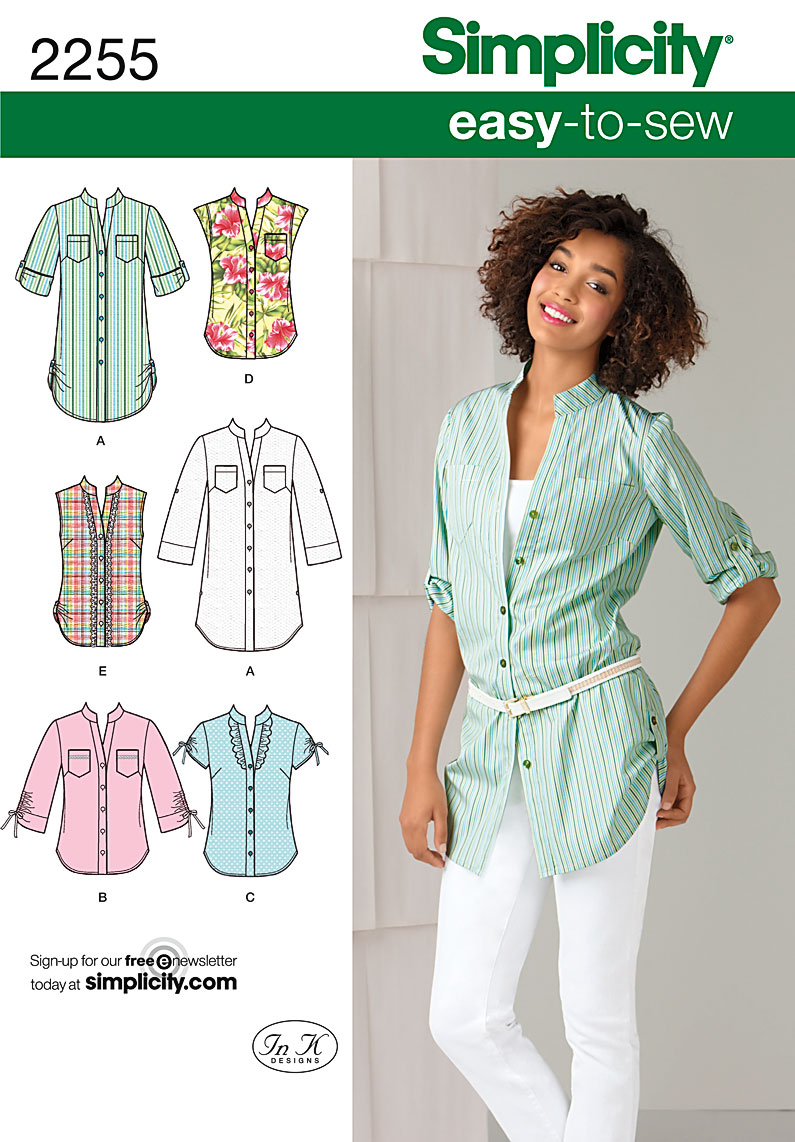
So, I fitted, and traced and muslined...looking for a pattern that would work.  I finally found Simplicity 2255:


It only required 1 3/4 yards of 45 inch wide fabric  for cap sleeve version, so I hoped that I would be able to squeak it out of my Liberty fabric:


I started by making a muslin using an embroidered sateen that I picked up from a clearance rack at Hancock's.  The pattern has front bust darts and back waist darts for shaping:


I'm pretty pleased with the fit, so I made some small alterations and cut into the Liberty....I have a long weekend coming up (friday and monday off for Memorial Day), so hopefully I'll get some work done on it.

In other news, my nephew's interest in sewing continues.  He wanted to make a coat, and thought that if we started now it would be ready by fall.  So, I had him help me to trace off and muslin a pattern from the August, 2009 BurdaStyle.  
It went together surprisingly easily considered I had a 10-year-old's "help" in tracing.  I didn't let him off easy, though...here he is pressing the seams:


Of course, you can also see the giant mess in the sewing room and huge piles of laundry being sorted for washing behind him.  Hopefully over the holiday weekend I will finally be able to put together the new furniture purchased for the sewing room last year and get the mess cleaned up!

Here is my little monkey in "his" coat.  The back fits well, I might add just a touch to the length since he is growing like a weed and also leave all the ease so he can wear it for a while:


On the front, it seems like the overlap is a bit skimpy.  It is supposed to be double-breasted, and I feel like if I widen the front, it will make it possible to move the buttons over time and maybe he can wear it for more than one season.  Also, for all the length on the back seemed good, the front seems short.  I might lengthen it overall.  He is already texting me to see if I have cut the wool coating yet....


As always, more later....

Sunday, May 6, 2012

A Summer Dress

Last week I finished a summer dress using a border print lawn that, pretty much like everything I have been sewing lately, has been moldering in my stash for a loooong time:


I wanted to use it for a casual dress, since I had seen a number of gathered waist or drawstring dresses in RTW recently.  Here is one from ModCloth:


One from J. Jill:


One from Old Navy:


So, I decided to use a pattern from stash and try and create a similar dress.  I used Butterick 5612, which was very similar to the Old Navy version, right down to the sleeves:


Except...I couldn't use the pattern for the sleeves because when I laid out the pattern on the cross-grain to use the border print....I didn't have enough fabric to make the cuffed sleeves!  So, I cut the sleeves shorter and just put some elastic in the hem.

Here are some additional photos of the finished dress:


For the most part, I had no issues with the instructions but I COULD NOT figure out the instructions for the placket.  So, I just constructed it the same way that I did for the Hot Patterns Superfantastic Shirt, which added a little pleat below the placket:


Because of a shortage of fabric, I cut the drawstring from the border.  You can also see in this photo the little pleat added due to the construction of the placket...or can you?  Really, it completely disappears in the print of the fabric:


Here is an image from the hem...I just lined the edge of the pattern up with selvedge and put a 1/2 inch hem in:


Overall, I really liked the pattern and other than my inability to figure out how to install the placket, the only issues that I had were related to using a border print and running short on fabric (changing the sleeves to gathered hems).

I also finished a couple of other projects this week.  I made another shirt from the same BurdaStyle pattern used for the two western shirts.  This time I left off the yoke, and actually followed the instructions for the hidden buttons...except I can't help myself where adding stuff is concerned and sewed a strip of eyelet down the placket:


I also made an apron for a friend of mine who is a pastry chef.  No pattern, just just laid an apron that I had onto the fabric and cut around it.:


She has sent me some embroidered patches that she found on Etsy, so I sewed them onto the pockets:


The apron will be winging it's way to California on Monday.  This week I will probably finish...nothing.  It is finals week, so I will have a ton of grading to do....so, I'll catch you when I can!  Have a great week!

Thursday, April 19, 2012

Two New Work Shirts

This week I finished up two projects that had been hanging out in my "to do" pile for a while, a shirt from the Hot Patterns Deco Vibe Neat and Sweet Blouse pattern and also a pleated T-shirt from a new pattern company, Salme.

First up, the Deco Vibe blouse:


This is one of the Vintage Hot Patterns.  It's been in my pattern stash for so long that I don't even know if I bought it as a "vintage" pattern...or just bought an original version when it came out.  I have been loving the tie neck blouses of late (as evidenced by the vast number of them sewn last year).

For this quick version, I made it using a floral charmeuse.  The fabric did present a couple of challenges...for one, the rolled hem on the sleeve made the hem very stiff...and as a result, it doesn't drape as well as it does in the illustration.


Second, the back is very full.  It is small at the hem, but it seems like there is too much fabric above the waist and it poufs out.  You can see that the shirt could stand to be wider at the hem, so it would not bind up on my hips.  Not that I am going to let that keep me from wearing it...I just tucked it in and went to work.


The pants are a pair from the "2009:  A Pants Odyssey," when I made somewhere in the neighborhood of 35 pairs of pants trying to figure out fit.  This is a pair that I hadn't been able to get into in a while but I kept them anyway.  Given weightless, I can fit back into them but you can see what has happened to the back leg due to the change in body shape.

Second, the Salme blouse:


I used a feather printed poly crepe from a local fabric store.  One of the things I found when I was sewing is that the front pattern piece, after all the pleats are sewn into it, is about an inch and a half shorter than the back piece.  I ended up trimming off the excess, but you can see when the shirt is on that it is just about as short as you would want it to be.  In fact, it's too short to tuck in.  I missed it when I made my muslin because I just folded out the pleats on my pattern piece and made the front flat...the front piece ended up shorter, but I just assumed that it was me not being precise with my folds in the pattern piece.  I make my patterns using soil separator cloth, so it's not like creasing a piece of paper.


Overall, it is a comfortable shirt.  I think in future iterations I will scale down the the neckline and shoulders to a smaller size and raise the armscyes.  You can't lift your arms to shoulder height without lifting the entire shirt, and normally that means that the armscye is too long, or the sleeve cap is too high.  In the meantime I will just not pick up anything above waist level.

I probably won't get anything done this weekend, because I am leaving on a trip for work tomorrow...to lovely Utah.  I keep trying to convince the administration that the campuses that REALLY need training are the ones in London and Vienna...but so far it's been Kansas, Utah, and Arkansas.

Sunday, April 15, 2012

Summer Sewing, Continued

After last week's progress made with pants, I took some time to make some plans for summer sewing and also to start to muslin a couple of patterns.

This weekend I worked on a pattern from a new (to me) pattern line: Salme Patterns.  They have a shop on Etsy, and when you order the pattern, you receive an email with a PDF that can be printed and taped.  The patterns do not include seam allowances, so they are very much like a Burda pattern.  I ordered the pattern for the pleated t-shirt:


On Saturday, I completed a muslin.  I cut a size 16, and made some small alterations after the muslin.  The most significant issue was a fold between the bust and shoulder, and I had to make some alterations at the armscye.  It really needs a bust dart, but the pleats make that very difficult.  If this turns out to be a pattern that I make more of in the future, I may attempt a dart like the horizontal one on the left, and see if I can line it up with the first pleat:


This image is from an article in Threads, Nov 2008, regarding fitting the armhole to fit the bodice.  You can find the full article here:  link.

One of the issues that I had to deal with is that the shirt is very boxy, which is not good for someone like me who is a bit heavier.  If I were tall and thin, it would not be an issue at all.  The side seams are perfectly straight, so I also contoured the waist (tapering in to a size 12) and added a slight amount (1/4 inch at each side seam) to the hips.

If you do the same, when you redraw the waist, to make sure your contouring is matching in the front and back, fold up the pattern so you fold out the pleats and then contour.  The resulting shirt is very clean, very simple, and could be very versatile depending on whether you use a solid or a print.  It is also a way to use some very decadent fabrics without spending an arm and a leg, since it takes only 2 yards of 45 inch wide fabric, and 1 1/4 of 60 inch wide fabric.

After completing the muslin, I purchased a navy poly faille from a local fabric store that was printed with multicolored feathers:


Hopefully I will have an opportunity this week to finish it up.

I have a small set of projects "in the pipeline" to hopefully augment my work wardrobe this summer.  First is a dress from this border print lawn:


I have already cut out Butterick 5612, with the blue border at the hem.  I also have a beige twill and a navy twill for pants, which I desperately need.  I am considering refitting either a basic Burda with a narrow leg, or the ubiquitous Alice and Olivia bootcut pant from Vogue:


Both of the twills came from my local Hancock's, where I also found on a clearance table to $6.00 a yard a very sweet silk chiffon.  I have enough to make a shirt with a tie collar, and two options for patterns...a Butterick with princess seams, or a Hot Patterns with darts and gathers at the shoulders and back yoke.


I also have a lightweight wool in a british khaki that matches a striped shirting that I have had in stash for a while.  I was thinking pants and a men's style shirt with white collar and cuffs, possibly even french cuffs.


There are also a few fabrics floating around in stash that may or may not see the light of day this summer. I have a pile of charmeuses and georgettes that would make lovely dresses....


And a couple of bottom weight fabrics that have been aging in stash for a while, including a blue striped ivory wool, a pinstriped taupe silk/cotton for pants, and a white pique that with lining would make nice pants:


For now, I am not going to make any massive plans, since I have been a bit slow to get back into sewing. I don't want to overwhelm myself with making a plan for a giant capsule.  If I get through the dress, 3 pants, and 2 shirts that I laid out above, I will consider that a successful summer.

Thursday, April 12, 2012

Back to Pants Fitting

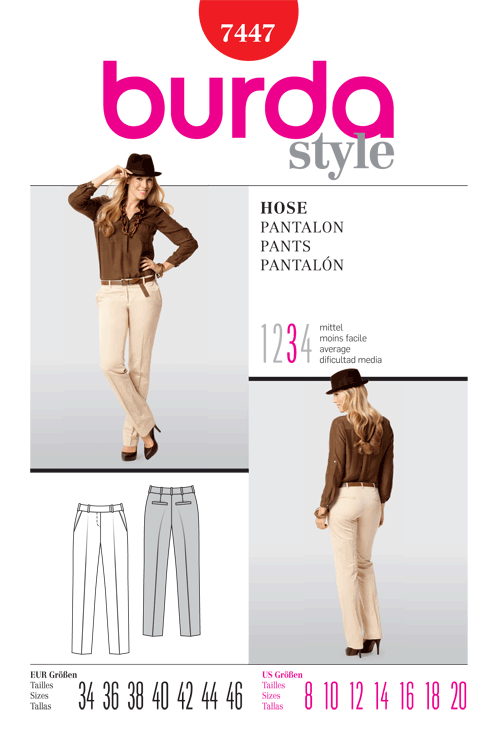
Over the weekend I made a version of Burda 7447, a narrow-leg pant.  I desperately need pants, as everything I have is either too small or too large.  But, I have been very hesitant to sew pants because I find them so difficult to fit.


This is not the first time I have made these pants, but the pair that I had initially made for the PR Endless Combinations Contest no longer fit:


For the original pair I started with a size 20, and added one inch at the side seams on the back pattern piece.  For the current pair, I removed that and used as a base for alteration a size 18.  While I am happy to be down in size, it is frustrating that I am pretty much back to "square 1" in pants fitting.

A few years ago, I dedicated myself to MONTHS of pants fitting.  In the process of figuring out how to fit my body, I made somewhere in the range of 35 pairs of pants.  And then, I gained weight.  After nearly a year of sewing almost nothing for myself, I am now back to sewing again.

I am currently losing weight,  but for the first time also working out, skating, and biking. I am back to a smaller size, but I can't just use those smaller patterns from before because  my body shape has also changed...now in addition to all the other alterations issues, I have to deal with full front thighs as well as a rounder bottom.

After racking my brain trying to decide what alterations and how much to make...I threw my hands in the air and just cut (cheap cotton twill from stash, if I remember correctly it was about $3.00 a yard from a clearance table, so no great loss if they were a disaster).

Surprisingly, they were much better than I expected.

Here is the final product, which gives me a base to determine additional alterations for future pairs:


Granted, the fit is better than anything I have purchased in RTW recently (no back waist gape at all, legs wide enough that I can actually pull them up), but still work to be done.  In the front, there are some wrinkles across the front thigh and radiating out from the crotch that are probably related to my having fuller front thighs.  This can be rectified with an alteration that widens the front pant leg piece.  Here is a link for a diagram at the Sewing Divas Blog: link.  I think I could also stand to extend the front crotch curve just slightly.

Part of the creases across the leg, especially in the back leg, is because of the narrow leg of the pant itself.  You can never get rid of all the creases in a jean, for example, otherwise you wouldn't be able to move.  Take a look at the model on the pattern cover...she has under-butt creases, too.  But what I have going on there can be lessened by better fitting, probably increasing the alterations I have already made.

As for those alterations already made:

  1. I added a wedge to back to raise waistline
  2. Increased size of back waist darts (I would have added these if the pant did not have them already)
  3. Extend back crotch curve
  4. Shift legs closer to center and redraw inseam and side seam ("knock-knee" alteration)
I think that I will also try my alterations on a pant with a wider leg, because I would like to know just how much of what I see in the photo is from the narrow leg (or, I guess I could just photograph myself in a pair of narrow jeans and compare).

I have a length of khaki suiting, and a length of navy suiting that will both make good pants for spring, so hopefully I'll be able to get the alterations figured out before the weather changes again.