Sunday, September 14, 2008

Updates and a New Toy

Here are some photos of my most recent iteration of Vogue 8379. I think that I am now officially "done" with this pattern for a while, having sewn six different versions since the beginning of the year.


This one I made with a poly knit from Gorgeous Fabrics, same place I got the pink giraffe print. I need to stay off that website for a while, especially since I still have a length of gray and a length of aqua knit from Hancocks, as well as 3 knits from Fabric.com to work on. Not to mention the stash that I have set aside for projects that probably should have been completed over the winter.

I also got a new "toy," a Singer 401a, for just $75.00 on Craigslist. It is in a giant desk and it sews like a dream. Initially I was worried that it might have to go in for repairs since the stitch selector was stuck, but after opening up the top, putting some oil in the appropriate places and just working with gears, I was able to get the selector unstuck and now it is moving just fine. It sews like a dream, in fact, I sewed the entirety of the dress above on it.


Some upcoming projects that I have are:

1. Jeremy's coat. Now that it is cooling down, I feel up to working with wool.

2. I have a tweed dress that has been cut for 6 months and I just haven't done anything with it.

3. I also have a black wool suiting for pants and awesome pink and black houndstooth for a jacket for this OOP Michael Kors suit.

4. I have a grey herringbone for these Alice and Olivia pants and separate blazer for another suit, not to mention the black denim purchased for a wearable muslin of the pants.

5. I have an embroidered red stretch twill for this BWOF dress.

And those are just the ones have material purchased already! Not to mention the dozens of patterns that I have just waiting for me to get around to!!

I am really looking forward to getting to some serious sewing on the 401!

Sunday, August 31, 2008

More Patterns, More Projects!

In the tradition of this blog, being the cheap ass that I am, I have been putting off going to the fabric store until today because today the planets aligned and Vogue patterns were on sale for $3.99, Simplicity for $1.99, and McCalls for $.99. Not to mention notions and scissors for 50% off, and I needed a new set of scissors so that I could send in my REAL scissors (the super-expensive ones that have their own wooden box) out to be resharpened. No, I didn't buy those. I swiped them from grandma. I'd be cutting fabric with a sharp rock left to my own devices. I HATE paying full price for anything, especially patterns.

So today I picked up 15 new patterns at Hancock's for just $29.00 in hopes of doing a little "Stash Reduction." I only allowed myself 1 1/2 yards of fabric, and some interfacing (because I am always out of interfacing). The fabric I got because I needed a shirt with turquoise in it to match a particular jacket and shoes. It's cool, I paid a lot of the jacket (Ann Taylor) and shoes (Cole Haan) so I think I can justify $11.00 worth of fabric for a shirt, even though I should be on a fabric moratorium. Even though Fashion Fabrics Club posted some new knits yesterday. And lawd knows I love FFC. I know people bitch about their shipping and their customer service, but I adore them all the same. Plus, I just drive over and pick up my order, so that takes care of the shipping issues right there.

Here are some of my new "treasures":


I got this Anne Klein pattern because of the great detail on the back of the skirt. I'm not a huge fan of the boxy jacket. I'm pretty boxy all by myself, so I don't think that I'll be using the jacket pattern.


The shirt in the DKNY pattern looks more like underwear than something I'd actually leave the house in. But the pants are a great find. Straight leg with a side zipper. A side zipper!! Side zippers are the most flattering for someone with a bit of a round tummy, and the contour waist is great for someone with a bit of shape. The jacket has some nice detail (and yeah, I'll be ditching that idiot collar and the trim that looks like they pulled it off my grandmother's sofa), including french seams and a two-piece sleeve.


Another stupid, boxy jacket but this one has added pleats to the back. Now, with added back fabric, to emphasize your weight!! But the skirt and pants are both contoured at the waist and both have back zippers, so again, great options to hide a bit of a tummy bulge.


A series of great skirts with a variety of lower back flounce options. Although I can guarantee that I won't be making option C with that retarded ruffle on it.

I also picked up a few Simplicity patterns. Normally I am not a fan of Simplicity, I find them to be a bit frumpy, but they have re-released some of their retro patterns and they are kind of cute.


I really love the shirt in this pattern. I probably won't use much else. Possibly the skirt, but as cute as the jacket is, I just can't see myself wearing it on a daily basis...it is too retro...it would be like a costume.


They don't show it on the line drawing on the pattern envelope, but it is on the line drawing on the instruction sheet and you can just barely see it on the taupe pants on the model, but there is a scallop detail on the waistband of these pants that is to die for.


I know, I know, they're mom pants. But I love the shirt. And plus, I'll bet my granny would love some pants she could pull up to her armpits. Maybe I'll make a pair for her.

Saturday, August 16, 2008

Don't Do It, Girl!

I just finished my most recent version of Vogue 8379 and am further convinced that this is truly the best possible dress pattern for a girl with a little extra fluff on their bones. To prove a point, I am making a side-by-side comparison of Vogue 8379 and another DVF wrap lookalike, Kwik Sew 3489.


Now you can see that at first glance, the Kwik Sew pattern looks a bit more like the original DVF dress, namely in that it is lacking the darts at the waist that Vogue added to their version, and it has the narrower skirt (so much narrower in fact that the Kwik Sew version takes 3/4 a yard less fabric than the Vogue version). But, as you can see from the following photographs, it is just the Vogue details that the chubby girl needs, and when it is lacking the dress magic is lacking too.

For my most recent version, I used a poly-lycra in an awesome giraffe print from Gorgeous Fabrics. While you'll never be able to brag about how cheaply you got off at Gorgeous Fabrics, you will be able to brag about the amazing and unique fabrics you find there.


Here you get all three views. The wide waist tie is great for cinching the waist, the wide skirt skims over the hips, and the darts/tucks at the front make it unnecessary for those of us of the D-cup persuasion to be concerned about big alterations like making a full-bust alteration, especially since you are already working with a stretchy knit. The back is properly tapered, so it doesn't tug at the waist-tie, and this is the one wrap dress that I don't have to worry about raising the neckline on. It is already properly drafted. The only alteration necessary is lengthening the bodice, and I knew that because of my first version, and also reading the reviews on Pattern Review.

Last week I made a muslin of Kwik Sew 3489. Let's face it, sometime you get bored...even when a pattern is clearly as perfectly drafted as Vogue 8379. You can probably see from the look on my face in the photos that my disappointment was palpable.

Having never used a Kwik Sew pattern before, I traced based on what the size chart indicated. I tend to go a bit smaller with Vogue/McCalls/Butterick and A LOT smaller with Simplicity because I am familiar with the amount of ease they put into their patterns. But since the Kwik Sew pattern was SO specific with the amount of stretch (35%!!) and even provided a gauge, I traced the pattern "true-to-size" and selected a large based on my measurements.

For example, my measurements are:

Bust: 39.5
Waist: 32
Hips: 41

In the Vogue pattern, I cut a 16, for which the measurements indicated:

Bust: 38
Waist: 30
Hips: 40

I decided to go with the smaller size because I was using a very stretchy knit, and was familiar enough with the pattern to feel comfortable going down a size, given that the last version I made was cut as an 18, so I had a basis for comparison.

In the Kwik Sew size chart, my measurements fall within the lower range for a Large, but outside the range for Medium.

Bust: (L) 40-41 1/2, (M) 37-38 1/2
Waist: (L) 31-33, (M) 27 1/2-29
Hips: (L) 41 1/2-43 1/2, (M) 38 1/2-40

Clearly, I am too large for a Medium, correct? Also, being very used to sewing in the 16-20 range in patterns even though I purchase a 10-14 in ready-to-wear, why question cutting a Large?

Well, question it. I should have cut a medium, at least in the bodice, and even that might not have solved all the problems illustrated below. Overall, the dress is not as flattering as the Vogue dress. Also, I took these photos on the same day as the photos in the pink dress, so I am wearing the same undergarments. There is no reason I should look this lumpy in the green dress. I'm wearing my Spanx.

1. Because the dress has bust darts rather than the darts at the waist like the Vogue version, when the waist is pulled small enough to fit my waist, it pulls in an odd way under the bust.


2. The very thin waist tie not only is very difficult to turn, but also cuts into the waist rather than cinching the waist the way the wider tie does in the Vogue version


3. The bust darts do not fall in the proper location, and you can see from the side view that the dress is just not as flattering as the pink one above. These photos were taken 10 minutes apart, I did not have enough time to put on 10 pounds. Nor did I have my boobs lowered. That is ALL THE DRESS.


4. The back is very wide and blouses out over the waist tie. I have love handles already. I generally do not like to enhance them by encasing them in green fabric and draping them over a belt.


5. As broad shouldered as I am, I am shocked that I need to take this pattern in across the shoulders. Who are they drafting these patterns for? Body builders?


6. Rather than skimming over the body the way the Vogue skirt does, this narrow skirt clings to the body instead. NOT GOOD for the chubby girl. I might need to put some spackle on that hail damage.


While the Kwik Sew version may be a good option for those with a firmer physique, if you are trying to disguise anything, I cannot recommend it.

Now, I could go back and fix all the problems with the Kwik Sew pattern and make it like the Vogue pattern, but why? When the Vogue pattern is already 90% perfect, and all I have to do is lengthen the bodice? Plus, if I want that curved skirt edge detail from the Kwik Sew pattern, I can just draft that onto the Vogue skirt.

My high hip fluff and I will be sticking with Vogue 8379.

Friday, August 1, 2008

Dress Magic

Let's face it, I'm a chubby girl. I write about being chubby all. the. time. I admit it, I sweat when I eat. So when I find something that can make you look skinny, I will totally share that secret. Now, granted, the secret is a designer dress. However, I also know the secret to making one of you own. So I'll share that one one with you, too.

I was inspired to write this by my friend Bitch Cakes's recent blog about dressing to flatter your body. And one thing that flatters nearly every body is a wrap dress in a not-too-clingy knit. THE wrap dress was "invented" by Diane Von Furstenberg in the 1970's, and it has been a classic ever since. You can pick up your very own from DVF.com for a mere $345.00 (plus tax and shipping).


OK, let's face it. $345.00 for a dress just isn't going to happen. That's a car payment. My month's grocery bill. A round-trip plane ticket to see a friend. I'm not spending that on a dress. Especially not when I CAN SEW ONE. And you can sew one, too. So, why pay $345.00 (or more, go look at the website) when you can purchase a pattern and fabric, even a full price, even if you make it from silk jersey from a swank fabric store, for less than $75.00? I'll be honest with you. I bought my pattern on sale for $3.99, and the fabric for $4.00 a yard. My dress cost me a grand total of $15.99 and one Saturday afternoon.

Now, you can do this one of two ways. You can either go back and find one of the actual patterns that Diane Von Furstenberg licensed to Vogue Patterns back in the 70's. They are out there, on vintage pattern sites, eBay and even in your local second-hand shops should you get so lucky (check out Patterns from the Past blog for more awesome pics of vintage patterns):


However, you could wait a while for your size to come up, the price might be daunting, the pattern might be damaged, cut already, incomplete, or any of the other ailment that vintage patterns typically suffer from.

I, on the other hand, suffer from extreme impatience and the need to begin projects RIGHT NOW as opposed to waiting for just that pattern to be available on an auction website. Don't get me wrong, I'll still lurk eBay looking for the original pattern, but in the meantime I have found one that makes a great substitute, Vogue 8379:


Granted, 8379 has a slightly wider skirt shape than the original DVF wrap, but, it has the "magic", the skinny magic. Like I said, I am not a skinny girl, but I have made multiple versions of this dress, for myself and others, and every person will tell you that this dress nips in the waist and hides any number of sins of the flesh as related to hips and thighs. Also, the wider skirt has a big overlap, so you are not constantly clutching at the skirt afraid that it is going to fly open, another big plus.

Here is my most recent version:


And I'll be totally honest with you...I'm not that thin! These dresses are magic. My friend Bitch Cakes on the other hand really is truly tiny. Here she is in hers. I cut a 10. A PATTERN 10. You KNOW that is small.

But, you can see, that even though I am taller and bustier, the dress is equally flattering on both body shapes. If you really want to see it on LOTS of bodies, go check out the reviews on PatternReview.com. Just filter by the pattern number, and you will see dozens of versions.

The one thing that you will learn from all those reviews though is that this pattern straight from the envelope is short-waisted. In fact, it was PERFECT for petite Bitch Cakes completely unaltered. I didn't have to shorten a single thing for her, even though she is truly a petite.

I, on the other hand, am 5' 6" and have shoulders like a line backer. Now, when sewing with knits, you can get away without a lot of alterations just because knits stretch. But, if you have a bit of a belly like I do, the short-waistedness of this pattern will bug you. In the first version of this dress I cut it completely unaltered and the waist tie would "pop up" over the top of my belly over the course of the day, simply because of the placement.

Now, that is not the worst problem in the world, and I won't stop wearing the dress. Let's face it, for a chubby girl, putting your clothes back where they are supposed to be during the course of the day is pretty much second nature, kind of like keeping a travel baby powder in your purse for chub-rub emergencies. It's just what we DO. But I decided if I was going to be "large and in charge," so to speak, I could fix that problem with the pattern. Lengthening the bodice of a pattern is SUPER-EASY, so I will show you how to do it for this dress, since anyone over 5' 4" should consider doing it for this pattern.

First, pretty much every pattern will have marked somewhere on it where you should make the alteration if you decide to lengthen it. This pattern was no different.


Starting with the bodice back, I cut along that line, and added a strip of paper equal in width to the length that I wanted to add to the bodice of the dress.


The front of the bodice is a little bit more difficult, because of angle of the front of the dress. I added a strip in the same way that I did with the back bodice:


However, with the angled front, you will now have to deal with where that is now offset. I KNOW what you are thinking. You are thinking "Michelle, you bitch! You said this would be easy!!!" It is, I swear! Don't worry!!! Just add one more tiny little strip of paper:


And then transfer the lengthening to your facing pattern as well:


One last thing to remember, we have lengthened the front bodice as well as widened it. So that means we have to take into account how that impacts the pattern pieces that that piece touches, correct? Now, we have already taken into account the impact that it has on the facing by lengthening that piece. The only other piece that it touches is the skirt front, so now we have to widen that, too, right? Wrong! Look at the skirt front pattern piece. There is a super-wide fold-over facing, two inches wide in fact. We widened the bodice front by one inch, so just remember when you are assembling the skirt, that the front facing is a one inch fold-over instead of two inches. Pretty clever, eh?


Just remember that sewing with knits is super simple as long as you take into account the stretch and adjust your sewing technique accordingly.

Next up, two more versions of the "Magic Wrap Dress," in some great patterned knits. I will probably make multiple versions of this dress, as I consider this a TNT pattern (tried n true). If you find one that has "good bones," use it a basis for many versions, different skirt lengths, collars, cuffs, contrast ties; you can get a lot of different looks that will ultimately be more flattering and versatile than making a lot of different patterns that may be less flattering on, and ultimately get less wear. I even do the same thing with ready to wear...if I find a pair of pants or a shirt that looks really great, I get it in EVERY COLOR. Here are the next fabrics on the cutting table. I'm taking Bitch Cakes's advice and going large-scale with prints. They're more slimming!


Thursday, July 3, 2008

Oy, Vey....

What have I gotten myself into?

So, I have agreed to sew a wool coat for J. He DESPERATELY needs a new dress coat. The lining has completely fallen out of his, and for some reason I have decided that I can MAKE coat that is much nicer than anything you could BUY.

Here is the project plan:


The coat will be made from black wool coating and lined with a black, red and gold silk twill. I just completed the first fitting muslin, which turned out surprisingly well:


The next step will be to cut out the wool and the underlining and start padstitching everything together before assembling the shell. It is going to take FOR-FREAKING-EVER!

Good thing it's only July! It may take me until December to get this thing together.

Wednesday, May 21, 2008

Building Skills: Pattern Drafting

Every now and then, Vogue Patterns will have great sales and you can get patterns that are normally in the range of $20.00-$25.00 for $4.99. The last time they had a sale like this, I bought a pattern that I was a bit "iffy" about:

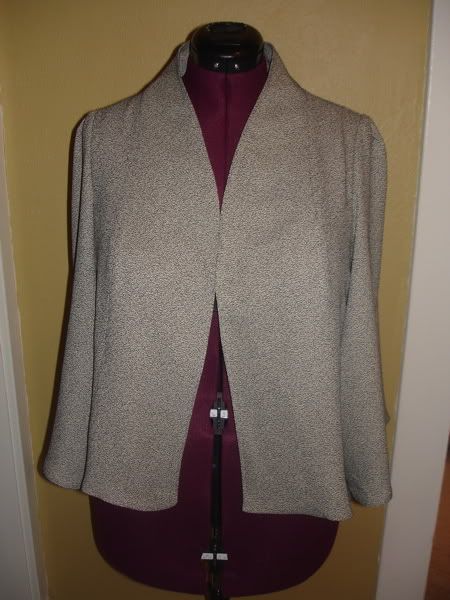
What caught my eye about this pattern was the front of the jacket. I really loved the clean front and the stand-up collar. What I was a little bit less thrilled about was the back of the jacket. You can see from the line drawing below that the back of the jacket is very full and draped, although they don't show a photo of this on the pattern:

As I was making my first version of this jacket, I realized why there is no photo of the back on the pattern envelope. It's because the pattern doesn't look like the line drawing at all. As I was constructing the jacket, I noticed that all that fullness that had been cut into the back all hung out in the armpits. The only way to make the jacket look like the drawing was to add two darts on the shoulders to pull the fullness of the fabric to the center-back:


The front, on the other hand, ended up looking very much like the pattern; although the more I look at it the more I suspect that I may have attached my center-front pieces backwards:


Overall, I was not unhappy with the finished product, but it was not the crisp, tailored, clean jacket that I had been wanting. So, I began to consider making my first foray into actually redrafting a pattern. As someone who only recently came back to sewing and still considers themselves a "beginner," I was reluctant to attempt to make my own pattern. However, the more that I thought about it, the more I thought "What do I have to lose? I don't have the outfit I want right now; and if I screw it up, I still won't have the outfit I want. On the other hand, if I succeed, I might just end up with what I wanted!"

So, I started doing some research. The first thing I did was start following the alteration threads on Pattern Review and reading all the reviews I could of self-drafted patterns. Once I felt that I had some ideas about how I would like to start, I embarked on my redrafting project.

The first thing that I did was do a tissue fit on my dress form, just pressing the pattern itself on the form, seeing where the seams would fall. I folded all the fullness out of the back using that as a place to start:


Using the folded pattern, I created a "muslin," or a fitting garment. Muslins are great to do because they are cheap, fast, easy and offer a way to "test" a pattern before you cut into your "good" fabric.

There are two schools of thought on making muslins. One, that you a muslin from actual unbleached muslin; an inexpensive fabric that you can usually pick up for a dollar a yard or less at most fabric stores. You then put together just the body of your garment using a basting stitch that can easily be undone to make quick alterations and so that the muslin can be dismantled and used for the pattern itself. There is no need to add facing, finish seams or hems, or insert sleeves, unless sleeve fit is a concern.

Another school of thought is that you should make your muslin of a fabric of a comparable weight and body to that of your finished garment, and that you should finish your muslin as you would the garment, including facing, interfacing, and hems.

The method that you use will depend on what your purpose in sewing your own garments is. If your goal is to create a couture garment that is perfectly fit to your body, and would have cost you hundreds of dollars to purchase; then by all means, use the second technique.

I, on the other hand, sew at least in part to save money on clothing. Now, if I purchased all my clothing at Old Navy and Target, there would be no savings in spending $50.00 on fabric and materials to make a suit and jacket; or $25.00 on materials for a dress. But, since I adore places like Ann Taylor and Banana Republic I can save a significant amount by sewing for myself. It is because I sew in order to be frugal that I opt for the first method in making muslins, and use actual muslin.

Below, you can see the first version of the muslin that I made with the folded pattern. It's not very pretty. The back is very blocky and unflattering. What it needs is some ease, which can be added in the form of princess seams. If you want to know what princess seams are, go pull a blazer out of your closet. Most women's blazers have curved seams on the back to give them a more feminine shape.


So, I did just that. I got a jacked out of my closet and drew onto the back of my muslin where a princess seam should fall based on the placement of the seams on a jacket that fit me well. Using that line as a guide, I began pinning the seam into the back of the jacket until the fit was the way that I wanted it. Then I took a sharpie and drew along my pin line.


I then cut along the lines I just drew, creating three pieces; the large piece that would become my center-back pattern, the piece that would become my side-back pattern, and the strip of extra fabric that would be discarded. You can see that the pin line did not follow exactly my original line, but was close:


I then used the muslin to create two new pattern pieces for the back by tracing them onto pattern paper. Don't forget to add a 5/8 inch seam allowance on your newly added princess seam! After my second muslin, I also found that I needed to lengthen the "point" of the side-back a bit to get the armscye (sleeve-hole) to look right.


Here is the second muslin, with the princess seams:


Once I got the back to fit, though, it revealed some issues with the front, namely that the bust and sides were pulling slightly:


I repaired this by slashing the side-front, and narrowing the center-front:


I altered the pattern pieces using pieces of tracing paper, or folding out the extra:


This left only the sleeves to deal with. You can see below that the top of the original sleeve had darts that created a small puff, and the sleeve itself was a wide bell. With a closely tailored jacket, there was no need to retain these design elements in the redrafted jacket. They were really easy to get rid of , though. I just folded and taped the darts along the pattern lines and then drew in a new sleeve using a "normal" jacket sleeve as a guide:


I then traced a new pattern , transferring the necessary markings:


From there, I used my newly drafted pattern to cut a new jacket from a black suiting with a floral design woven right into the fabric. I then constructed the jacket using the original pattern instructions, except for the back. In the case of the back, I constructed the back first and then treated it as if it were the single piece back in the pattern instructions.

Here is the finished product:


Here is a close-up of the princess seams:


And here is the front of the finished jacket:


Overall, I am very happy with the finished product, and I have also made a pair of cropped slacks from the same fabric for a summer suit. The pants, fortunately, required no alteration whatsoever. With the cropped pant and 3/4 sleeve of the jacket, I think that this makes a nice summer suit that is appropriate in business-casual settings. The suit can easily be dressed up with nicer shoes and a collared shirt, or dressed down with ballet flats and a tee.