Saturday, February 5, 2011

Two New Tops

January was not a very productive month...between a crazy time at work, and a couple of bouts with the flu, I did not do very much at all. I finally did pull myself together towards the end and finish a second version of the Burda 12-2009-120 hoodie:


For this version, I used a length of slub rayon knit from Fabric.com rather than a sweater knit. I also added snaps to the front placket; I had some pearl snaps left over from a western shirt I made for my husband:


The first couple days of February we had some snow days and campus was closed, so I took advantage of the time to get started on a version of Burda 09.2009.139, a raglan sleeve blouse with pussy bow.


The pattern has some nice details like gathers on the bodice at the raglan seam...if you need it, it makes an FBA really easy, although Burda typically is drafted for a larger cup size than "The Big 4." I made it from a poly charmeuse, that came from the set of fabrics I put together for my Winter SWAP so many months ago.


A little hint for working with slithery poly, which I find irresistible due to the wonderful prints, even though I can only wear it in winter since poly is too hot for summer....

When you are ready to cut your pattern out, starch the heck out of the fabric. I hang the whole length of fabric over the shower rod and spray and spray....let it dry and then it will be super-easy to cut, press, and sew. Once you have the garment finished, throw it in the laundry to remove the starch and voila! Super-easy! No slithering!! The only thing that it makes difficult is using the narrow hem foot...but given that I have never truly mastered that foot, I typically just press in a 1/4" hem instead...and the starch makes pressing SO much easier.

Also, use a microtex needle to avoid pulls from a heavier needle, and if you use a buttonhole attachment, use a sheet of tissue on top to keep the attachment from snagging the fabric.

Anyway, on to the final photos....


This shirt has no darts for shaping, it is designed to be tucked in. I am not a "tucker," but I have come back to this pattern every time I flip through my old Burdas...finally, a year and a half later, I got around to tracing it off.

The neckline is open under the bow/collar:


The pattern has a cut-on facing, which makes the front shaping fairly simple. Here is a close-up of the raglan seams/gathers:


The sleeves are very full, which lots of gathers at the cuff:


I think it will look very nice with a pair of full-legged trousers, or even a high-waisted pencil skirt.

I was doing some organizing in the sewing room, trying to better organize my notions so the ones that I use the most are more convenient. I thought you might get a kick out of one of my most used notions, my hem gauge:


This came to me in the sewing chair when my grandmother gave me her sewing machine probably 15 years ago. Can you see the little label? "Penneys." Not even J. C. Penneys....it's that old! Not to mention, how long has it been since J. C. Penneys had a sewing department?

Hopefully this month I will have a chance to continue working on the SWAP I started in October...since I still have a bit of winter left.

Happy Sewing Everyone!

Saturday, January 15, 2011

Life Gets in the Way...

Lately I have been a terrible blogger, as well as blog-friend. I haven't posted in weeks...and haven't read or commented on other blogs either. Work has been completely insane; we are in the midst of renovations in our office, and the contractors are just working around us. Over the holiday break they were supposed to have taken care of all the rerouting of our data lines; unfortunately...it didn't work out as planned. So, on our first day back on Jan. 3rd, we had no phones and no internet connections in our office. Panic ensued...and by 9am our front desk was working out of a computer lab off-campus, and the rest of the advisors were in a conference room in Admissions. Three days later, we were back in our office, but playing catch-up with all the things that we had missed or deferred while we were out of the office.

Needless to say, I haven't entered the sewing room in a week, but do have some finished projects from last week.

I started the new year off finishing up a few projects that had been lingering around the sewing room. One of them was a shirt for my nephew that had been cut out and lying around for MONTHS. He was over on the weekend and as we made a game out of finishing it...seeing if we could sew it in an hour if we worked together. He manned the iron and I ran the machine...and we would have made it, too, if it hadn't been for that broken needle. One hour and three minutes later, he had a shirt to match the one I made for his daddy:


Yes, I know that some would question making a shirt for a 9-year-old that had burlesque dancers on it:


But, he wanted one exactly like his dad's, and let's face it...I already made one with drunken skeletons on it for him...we are not exactly pillars of society around here. He wanted it, his dad was fine with it, so I made it for him. He's a tall, skinny boy so I lengthen the smaller boys' sizes for his shirts. I just slash the pattern horizontally and add about three inches, and have also found that the sleeves need lengthening, too.

In my own sewing, I have been trying to put together some travel clothing. In March, I am going with a group of family and friends to Egypt...and I need clothes that will travel well as well as be comfortable while visiting sites. To that end, I have been looking for some easy layering options. The first thing that I made was BurdaStyle 12-2009-120.

Because of the challenge of grading up patterns to plus size, and dealing with the different amounts of ease given the original draft and what I was looking for, I used a shirt that I had made before and was happy with the fit to draft the body of the tunic. I really only used the Burda draft for the hood, shoulders and neckline.


I made mine from a very fine wool jersey, and since I also wanted the option of wearing it without a shirt under it, I added snaps to the placket:


So they wouldn't show from the outside, I attached the "top" half of the snaps before the placket was sewn, so they are actually inside. The bottom half I just attached in a standard way. The burda pattern and instructions for the placket frustrated me to no end, so I ended up drafting my own pattern piece, and attaching it my own way...based on the way I did the sleeve plackets on my husband's shirts.

I also did not flat-fell the hood seam the way Burda instructed, I just serged and top-stitched. I don't think it looks bad that way:


Finally, I have also been working on making a good pair of yoga pants/sweat pants. I am now on the third pair, using Kwik Sew 3115:


I raised the back waisline by 1 inch, lengthened the pant leg by 2 inches, and did a "knock-knee" adjustment that accounts for full inner thighs, as well as knock knees. For knit pants, they turned out very well:


I made them in a double-knit, farily soft, like a sweatshirt knit. I think they will be great pants for the plane.

On the table right now is a half-finished bag for a friend, as well as a blue knit version of the black tunic. Other than that, nothing too creative is going on around here. Over the holiday, my husband and I ordered new furniture for the living room, and it will arrive in 8 weeks. In the meantime, we are arguing over whether or not to pull up the living room carpet. The problem is, is if the floor is super-jacked-up, we don't have the money to refinish it right now. If its just a matter of sanding and refinishing...we can do that ourselves. But massive repairs? Replacement? No dice.

I'll keep you posted....

Sunday, December 19, 2010

Musings on Muslins

With the holidays, I haven't been sewing anything, so I thought I might finish some unfinished blogs that I have sitting in my blog account. I had started a blog about muslins a while ago, and just never completed it. But this weekend gave me a little time, so here it is.

So, what are your thoughts on muslins? A key step in any sewing? Something to be avoided at all costs? I'll do one if I have to?

When I first started sewing, I knew nothing of muslins. I thought...these are my measurements...if I sew this size, then of course it will fit. If it looks wonky, then clearly this is not a style for me. Until I discovered that using that method, only about one pattern in 20 was "for me."

As I became more involved in PatternReview.com, and started to follow a number of sewing blogs, I discovered things like fitting...and tissue fitting...and muslining. If you are like me, and have extensive fitting issues, you are probably used to making muslins. But, if you are new to sewing or don't have fit difficulties you may be somewhat more averse to sewing a garment twice. When I first started making muslins, I was frustrated at the idea of having "make the garment twice," but now I rarely attempt a new pattern without one, unless I am using a "TNT" pattern to check fit.

One of the main things that muslins are utilized for is refining fit. However, a quick muslin will also help determine whether or not a particular style will be flattering to your body shape. I have used them for both purposes, but usually use them for fitting.

Besides muslins, there are a number of ways that people go about fitting. I have used simple flat pattern measurements (to get a place to start), but to do that you already have to have a pretty good idea about how you like your clothes to fit, and what to expect from particular styles. I see flat pattern measurements as a way to establish a starting point, from which alterations will take place. To make good use of flat pattern measurements, you have to already know what your wearing ease preferences are.

Wearing ease is something that varies from person to person. For example, I have found that where pants are concerned, I like less than one inch of ease at the waist and high hip. Some people find that to be constricting and uncomfortable, but more ease feels floppy and gapey to me. However, at the bust, I need no less than three inches of ease for a button-down shirt, otherwise the buttons gape. Knits, I leave zero ease or negative ease at the bust, depending on the style and the nature of the knit I am sewing with. Examples of clothes that have negative ease are leggings, exercise clothing made from performance fabrics, stretch jeans, and yoga pants.

Beyond flat pattern measurements, there is tissue fitting. Palmer/Pletsch is BIG on tissue fitting. And I despise tissue fitting. First off, I always feel like I am going to inhale and burst out of my paper garment like The Incredible Hulk. Second, it seems like it takes just as long and just as much effort to do a paper fitting as it does to just cut out a muslin. Third, even if I can get the paper to fit around me, half the times I find a dozen other problems once I make the garment because paper doesn't behave like fabric. Many of the folds and pulls that you find in a pair of pants won't appear during a paper fitting because the paper basically stands up on its own.

So, my preference is the actual sewn muslin. Sometimes I will do a quick muslin or even a partial muslin, for example, just a bodice of a dress, to make sure that everything fits. Other times I will make muslin after muslin...adding ease, moving darts, shifting bits and pieces around....such as when I work with vintage patterns, which you not only have to alter to fit, but also alter to accommodate the modern physique, unaltered by layers of control garments.

However, the muslin of actual muslin is a rarity for me. This is where I diverge from most muslin-makers. When I make "muslins" I will usually sew the entire garment from a less expensive fabric...finishing it as if it were the final product. The reason for this is that I have time and again sewn a muslin (of muslin), agonized over fit, slashed, marked, altered, and then sewn the final garment and HATED it.

Why? Why would that happen? Because how a garment fits standing in front of a mirror...and how a garment WEARS are two different things.

For example, the garment may look lovely standing still, with shoulders back and gut sucked in, in front of the fitting room mirror...but half way into the first day of wearing it, I may find I am tugging at the collar or the waistband has ridden up alarmingly. Sometimes this is the fault of the fabric, sometimes the pattern, and sometimes just me. Some examples of issues that I have encountered in WEARING that were not found in muslining are as follows:
  • A large, open collared shirt from Burda that rode up like a vampire's cape during the day
  • A pencil skirt that spun around while I walked
  • A double-layer ruched dress that when combined with tights managed to climb halfway up my thighs during the day
  • A wrap dress in which the waist sash popped up over my belly every time I sat down
  • A pair of jeans in which the waistband distorted and grew by at least 3 inches during the day (in spite of being interfaced, and cut on the lengthwise grain as opposed to the bias)
Therefore, "muslins" for me are entire garments, made from appropriate (if inexpensive) fabrics. I may make a fitting garment from actual muslin in the PROCESS of making my version of a muslin...but I really see that as part of the pattern making. I'll slit the seams and use that as my actual pattern if I am happy with with the fit.

But for me, the MUSLIN is a finished garment. One could call it a "wearable muslin," although I am loathe to do so as sometimes I discover that the garment is actually unwearable. It also gives me a chance to practice techniques, such as welt pockets, topstitching, particular seam finishes, etc. But most of all, it gives me an opportunity to "test drive" a garment and decide what I like or don't like about it.


For example, I recently purchased the Hot Patterns Riviera Boulevard Cardigan pattern. I had concerns about the shape of the cardigan and intended to lengthen that jacket overall, and also taper the waist. I also worried that the multiple layers of knit at the pockets, lapels, etc., would not lie right. So I decided that I would make a muslin, from a fleece that would approximate my sweater knit:


Making the pattern out of a fabric that approximated what I would use for the final garment allows me to test certain aspects of the fabric. For example I decided to make the pocket bags out of a lightweight knit to limit the thickness of the fabrics:


I also found that the fabrics were much too thick to use my buttonholer, and instead added snaps:


So, what did I find when I "test drove" my finished muslin? One, I found that with the multiple layers of heavy knit at the front of the cardigan, it was INCREDIBLY HOT.


I also found that I really disliked the 1/2 length sleeves with the decorative plackets and the buttons. For one, I think that 1/2 length sleeves are not that flattering, especially with a longer sleeve underneath. Second, I whacked those buttons right at elbow height on doorways, chair arms, everything that I could possibly catch them on during the day:


So, what did I learn from my muslin?
  1. I will lengthen the sleeves from 1/2 length to 3/4 or full length in the final version
  2. I will eliminate the faux placket and the button
  3. The cardigan needs lengthened further and tapered under the arms, across the back, and at the waist
  4. I will eliminate the pocket flaps on the chest. My bust is large enough that the little flaps stick straight out and I had to stitch them down. Plus, eliminating them will save some additional thickness at the seams.
Of these issues, very few would have been identified in an "unwearable" muslin. For example, the problem with the buttons on the elbows. I wouldn't have known that they would become an annoying liability during the day. I also wouldn't have known that the cardigan was so overly warm due to the multiple layers around the neck and across the front of the garment. But, these are all issues that impact the wearability of the final garment.

It is for this reason that I, more often than not, do not make muslins for fit, but muslins for wearability.

I would love to hear your thoughts on muslins!

Saturday, December 18, 2010

Year End Summary

Today I decided that I would take a look back at what I worked on this year, which has been a busy sewing year, busier than last year...which I find surprising!

In 2010, I sewed 85 items overall. 62 items were garments for me, but I also made a number of gifts. 12 of the items were tea wallets that I made for a valentines day exchange, and 11 were garments made as gifts for my nephew Darrell, my brother Darrell (no Larry jokes, we've heard them, I promise!!) and garments that I assisted my niece with while she learns to sew (or, perhaps more accurately, garments that she sews the long, straight seams on and I do the rest while she watches...and then she later takes all the credit for it).

This is significantly more than 2009, in which I made 49 items for me. I also sewed 16 projects made with my niece and nephew, Sadie and Darrell. I also made 14 gifts.

The year broke down as follows:

January was the most prolific month, in which I sewed 18 items. However, 12 of those items were the tea wallets for the Valentines Day exchange. Otherwise, I sewed 6 items, which is about average for me. The most prolific garment sewing month was October. In October, I sewed 11 items, and that was the month I started my SWAP. The least prolific months were July, August, September, but these were also the months I made the most complex garments, like my trench coat.

In the end, I averaged 7 items per month, better than one a week...so the next time I feel like I never get anything done, I will read this!

The source of my patterns has changed significantly. I used to sew almost exclusively "Big 4," but this year I sewed a lot more from independents (Jalie and Hot Patterns) and also from magazines. For the garments that I sewed for myself, the breakdown is as follows:
  • 18 garments from Burda patterns (I include downloads, envelope, magazine)
  • 16 garments from Hot Patterns
  • 7 garments from Butterick patterns
  • 6 garments from Vogue
  • 6 garments from McCalls
  • 3 garments from Jalie
  • 2 garments from Simplicity
  • 2 garments from New Look
  • 2 garments that were self-drafted
When I first started sewing, I made almost exclusively dresses...which is interesting, because I never really wore dresses before I started sewing. So, I re-evaluated and tried to sew more separates this year. The garments I made were:
  • 27 shirts (either blouses or pullovers)
  • 11 pairs of pants
  • 11 dresses
  • 7 jackets
  • 4 skirts
  • 1 coat
In 2009, the item that I made most were pants....24 pairs, 4 of which were unwearable...in my quest for good pants fit. I increased my shirt sewing from 8 to 27.

Of the garments I made, they ranged from the most simple tees, to the most complex garments that I have made. The quickest and easiest were a number turtlenecks from a Burda magazine patterns, tees from my TNT New Look pattern, and the Hot Patterns Uptown Downtown Dress. The turtleneck takes as much time to cut out as it does to sew!

The most complex garments that I made included a fully-lined McCalls Trenchcoat, and a Hot Patterns Coat Dress in silk with organza underlining and hong kong seam binding. I also made an embroidered western-style shirt for Jeremy, my husband.

As for the expense of my hobby, I added up all my fabric, notion, and pattern expenditures and found that I spent a total of $1800.00 over the course of the year. If you divide this by the 72 items that were actual garments, I averaged a total expenditure of $26.00 per garment. However, some garments were very complex, and a comparable garment would have been cost-prohibitive to purchase a RTW version. Knowing my purchasing preferences, what I WOULD have spent breaks down like this:
  • 27 shirts (either blouses or pullovers) x an average of $20.00 = $540.00
  • 11 pairs of pants x $40 = $440.00
  • 11 dresses x $75 = $825.00
  • 7 jackets x $50 = $350.00
  • 4 skirts x $40 = $160.00
  • 1 coat x $200 = $200.00
This adds up to a total of $2515.00 that I would have spent (assuming I could have caught everything on sale. I'm not even going to pretend that I haven't spent $120.00 on a pair of suit pants). But, I use the lower cost given that I actually end up with more clothes than I would have purchased when I make them. So, ultimately I spent moderately less then I would have had I purchased the items in the stores, but this also does not take into account my time. I even wrote a whole blog about how sewing saves me absolutely nothing, or a huge amount depending on whether my goal is to merely cover my nakedness (I could purchase t-shirts and jeans at Old Navy, Target and other discount stores for considerably less ) or to knock off designer duds (in which case I can save a significant amount, even if I add in my time).

My accomplishments this year include:
  • Became competent with the serger
  • Began sewing with better quality fabrics like wool and silk
  • I made my first attempt at welt pockets, which previously scared the bejesus out of me
  • I got better at drafting/morphing patterns
  • Conquered more complex constructions like underlining garments, coats, jeans
  • I also became less reliant on instructions, so I could take advantage of patterns like Burda magazine patterns, and Hot Patterns (which is definitely reflected in my pattern usage this year!)
My goals for next year are not incredibly extensive...I have tackled a lot of techniques, so my main goal is to just refine my sewing. Besides overall refining of technique, I would also like to begin to learn pattern drafting or draping. I would also like to finish a wool coat, and have considered taking on a blazer for my husband (IF I could find a good pattern).

Here are some photos this year's projects. Here are all my boys wearing shirts made by me:


Here is my simplest project of the year, the Burda turtleneck (worn with redrafted Jalie jeans):


And my most complex project of the year, my McCalls trench coat:


My most creative project of the year, an embroidered shirt for my husband:


My favorite project of the year, my Hot Patterns Coat Dress:


Most worn, my Hot Patterns Uptown Downtown Dress:

Sadie loves hers, too!


In all, this has been a good year...a year in which I have become a better sewer, as well as a better PLANNER, which has made for a better year in terms of production. In fact, only two complete wadders this year, and no new UFOs. THIS is an accomplishment!!

Sunday, December 12, 2010

Pieces Eight and Nine...and Final Contest Entry

This weekend I completed my entry into the Endless Combinations contest at Pattern Review. I had only ever entered one other contest at PR, and that was the One Fabric: Cotton contest. For that contest you had only to make a single garment, and the garment had to be made entirely of 100% cotton fabric. For this contest you had to make a minimum of four items, and each item had to coordinate with at least one item that was made before it.

The example given on the PR discussion board was: "Sew skirt A. Sew blouse B that goes with skirt A. Now your garment C could pants to go with blouse B, or a shirt to go with skirt A. Garment D could be another blouse that goes with skirt A."

Based on this, I started with a tunic sweater...and ended with a black twill blazer. Here is the "path" I followed for the contest:


This weekend, I finished the final two items, the grey turtleneck (#8) and the black twill jacket (#9). The grey turtleneck was from the BurdaStyle pattern that I had already used a number of times, and the black twill jacket was from Butterick 4610:


Because I had recently made a Big 4 pattern with two-piece sleeves and found the sleeves to be both too long and too wide, I checked this pattern against the alterations that I made to that pattern. Sure enough, the sleeves were too long and too wide again, so I slit the sleeves vertically to overlap some of the width and narrow towards the wrist. I also but them horizontally along one of the fitting lines, and shortened them by one inch.

I also decided to make a back facing since I was not lining the jacket. I made the jacket from a heavy-weight black twill, so I decided to topstitch the seams and leave it unlined.

Finally, I took the seams in by 1/2 inch each on both the front and back at the side seams between the armscye and the waist, as well as contouring the center back seam at the waist.

Once these items were finished, I had my contest entry ready.


I have (rather unimaginatively) titled the collection "From Monday Meeting to Tuesday Teaching to Casual Friday."

I wanted to create a collection that would address a number of work needs. I work at a university, but in a number of different capacities. I am the assistant director of our advising center, but also teach as an adjunct professor, so I need clothes for the office, but also the classroom. Our office falls at what could be described as "the more eclectic end of business casual," so I need clothes that can go from that environment, to committee meetings, to class lecture, to casual friday.

To this end, I made a total of nine pieces using eight patterns for my contest entry:

1. Tunic Sweater
2. Blue Knit Turtleneck
3. Skinny Jeans
4. Chanel-style Jacket
5. Grey Corduroy Pants
6. Print Draped Top
7. Khaki Twill Skirt
8. Grey Knit Turtleneck
9. Black Twill Blazer

Once I had the 9 pieces completed, I was able to combine them in a total of 24 ways:

1. Sweater tunic+blue turtleneck+skinny jeans (photo)
2. Blue turtleneck+skinny jeans (photo)
3. Print top+skinny jeans (photo)
4. Chanel-style jacket+blue turtleneck+grey cords (photo)
5. Print top+khaki skirt (photo)
6. Corduroy pants+print top+blazer (photo)
7. Khaki skirt+print top+blazer (photo)
8. Skinny jeans+grey turtleneck+Chanel-style jacket (photo)
9. Skinny jeans+grey turtleneck+sweater tunic (photo)
10. Jeans+grey turtleneck+blazer (photo)
11. Grey turtleneck+skinny jeans
12. Blue turtleneck+corduroy pants
13. Grey turtleneck+corduroy pants
14. Skinny jeans+print top+blazer
15. Corduroy pants+grey turtleneck+sweater tunic
16. Corduroy pants+blue turtleneck+sweater tunic
17. Corduroy pants+blue turtleneck+blazer
18. Corduroy pants+grey turtleneck+blazer
19. Corduroy pants+grey turtleneck+Chanel-style jacket
20. Skinny jeans+blue turtleneck+Chanel-style jacket
21. Corduroy pants+print top+blazer
22. Skirt+grey turtleneck+blazer
23. Blue turtleneck+skirt+blazer
24. Blue turtleneck+skirt

By using a variety of types of garments (jackets, pants, shirts, and a skirt) I was able to create a collection that could address both casual and dressier needs, as well as a collection that was comfortable for trekking across campus (rain, shine, or snow) for meetings or teaching class. My pieces could be worn with flats or with heels, boots or loafers, under a coat or layered with jackets or other toppers from the collection for warmer days. Most of the pieces were layered to address the variation in building temperatures (even in our own office suite, it can vary from my office, which has been described as "a terrarium," to our front desk where the reception staff all have space heaters under their desks).

In the end, I think that I was successful in creating a set using shades of blue, grey, and khaki that allowed for a variety of combinations that would address all of these needs. Because I used a number of neutrals (black, grey, khaki), I can further build off of this collection by incorporating additional colors (I have in my stash a number of fabrics in shades of purple that could easily build off of the greys in the base pieces in this collection).


This did pull me away from my SWAP for winter for a bit, but many of the SWAP pieces coordinate with the Endless Combinations pieces, especially the blue and grey.

So here is where I stand with my winter SWAP, the purple ones are the ones that are finished. The ones in blue are the pieces that could potentially coordinate with the Endless Combinations set:
  1. Dark heather gray wool jersey (dress)
  2. Wool blend flannel-Burda pants
  3. Periwinkle charmeuse (shirt)
  4. Grey/black print charmeuse (blouse with bow)
  5. Black and grey herringbone suiting (lined pants)
  6. White jersey knit-3 Graces Tee
  7. Purple jersey knit with diamond pattern-Butterick 5525
  8. Purple/ivory cotton shirting eliminated, replace with black and grey knit for McCall's 5978 twinset cardigan and New Look 6735 tee from leftovers
  9. Heather gray knit (shirt)
  10. Silk Tweed suiting (skirt)
  11. Plum jersey knit-3 Graces Tee, also New Look 6735 Tee from leftovers
  12. Black jersey knit Mighty Aphrodite Draped Tee
  13. Black boiled wool knit-Cardigan/Jacket
  14. Orchid stretch shirting-Butterick 5526
  15. Plum and orchid striped jersey (shirt)
  16. Gray cashmere wool suiting (pants)
  17. Black rayon challis with purple/orange trim-Hot Patterns Deco Vibe Delicious Dress
Based on this, I should finish this winter with a well-coordinated wardrobe. Although I guarantee that at least one day in February I will stand in my closet and yell to no one in particular that "I HAVE NOTHING TO WEAR!"

Sunday, December 5, 2010

Endless Combinations Pieces Five, Six and Seven

I've been working away on my Endless Combinations entry, and the past week I finished pieces five, six, and seven.

Piece five is a pair of corduroy pants made to match the blue turtleneck and blue boucle jacket:


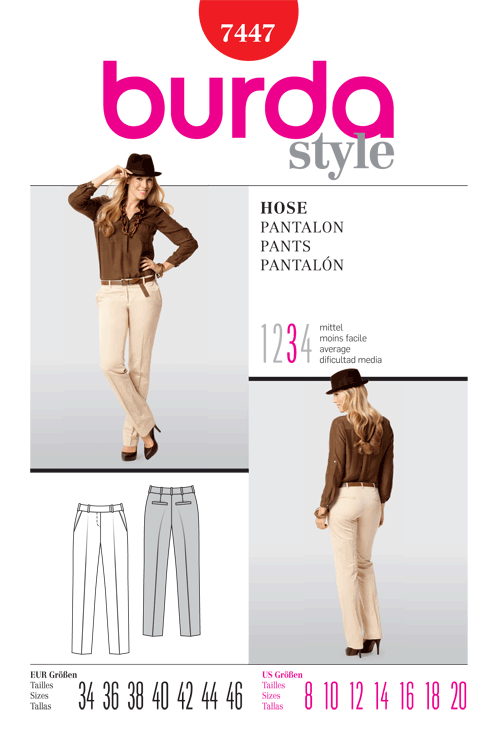
I used a Burda envelope pattern, 7447. It is a narrow-leg pant pattern with back welt pockets and slanted front pockets. I started with a size 20, and made some alterations...but not as many as you might imagine. I didn't go crazy trying to get things to fit, because the more you reduce the ease, the more those wrinkles and pulls appear. Even the model on the envelope has some under-butt wrinkles:

I compared the pattern to my TNT burda magazine pant, and ended up adding some extra width to the back, but then enlarging the darts (to make it curve over the top of the bum better....no back waist gaping that way). I also curved the center back seam and added a wedge to raise the center back slightly. Other than that, no alterations were made.

These were my first welt pockets, an I used Ann Rowley's tutorial rather than the Burda instructions (I NEED pictures!). My pockets ended up a bit wobbly, probably corduroy wasn't the best choice in fabrics for the first welt pockets I ever made. The difficulties in ironing without leaving marks, combined with the precision necessary for welt pockets made for not a great result. But, here they are:


I used some left over oxford shirting in my stash for the pocket bags:


The front pockets were a concern....I am always worried about slant pockets gaping. However, the pockets have stays that extend to the front fly:


So, in the end, no gaping.

My sixth piece was a top to go with the corduroy pants. I used a rayon blend knit that I got from fabric.com, and made another version of the Hot Patterns Mighty Aphrodite tee:


I had made this tee once before, and because of that I decided that I wanted the gathers to extend further up the side, so I lengthened the casing by about 4 inches:


Other than that, I made no changes...unless you count sewing the shoulder pleats correctly this time!

Finally, the seventh piece was a skirt to go with the draped tee:


I used a stretch twill that I had initially purchased to make pants, only to discover later that I didn't have enough because it was only about 50 inches wide...not 60. So, I didn't have enough for pants. But, I had plenty for a pencil skirt. I used Butterick 5249, a high waisted skirt with princess seams:


There are a couple of different versions...with hip pleats, ruffles, etc., but I did the simplest version. I left off the belt loops, but also added topstitching:


Topstitching made it a quick and easy project because it meant that I could machine sew the hem, and also stitch down the facing without having to worry about whether or not it would be visible.

This is the last weekend that i will have an opportunity to sew for the contest, and may be able to work another piece in. We shall see.....

Endless Combinations Piece Four

I know it's been a long time since I posted, but life has intervened....I had hoped to spend the Thanksgiving holiday sewing, but had my in-laws in town instead and this weekend I have had my niece and nephew.

I have still been plugging away on pieces four and five, but my progress has been slow, slow, slow.

Piece four is complete...a boucle jacket to coordinate with piece two, the blue turtleneck:


I used McCall's 6041, a pattern that I had used once before. Because I had made it already, I knew that I needed to lengthen the jacket by 1 1/2 inches, and also shorten and narrow the sleeves. I also added a facing to the back neck, so that the lining would not go all the way to the edge. I thought that the boucle needed some support, so added the facing.

For the lining, I used a navy poly lining from Hancock's. I didn't use the pattern instructions for inserting it, however. They have almost the whole insertion done by hand, so I used a Threads tutorial for bagging the lining.


McCall's tends to get carried away with the "Make it Crafty" patterns, so I eliminated all but one bit of trim. I used a silver braid with small sequins in the center:


I also left off the pockets. Overall I am pretty pleased with how it turned out, although I did have a heck of a time matching the stripes. I had never matched plaids or stripes across princess seams before and it got a little wobbly on the back:


This weekend, I also completed a pair of corduroy pants that will coordinate with the jacket, all they are in need of is hemming and a good pressing. I also have a rayon knit top cut out, which would bring me to six pieces total, and that may be all I am going to be able to pull off for Endless Combinations.

Cross your fingers that I manage to get everything put together and photgraphed by the 14th!